Prep time: 15 minutes
Cook time: 10 minutes
Total time: 25 minutes
Servings: 12
When you’re in need of a quick treat that satisfies your sweet tooth while remaining incredibly simple to whip up, nothing quite compares to the elegance of 5-Ingredient Dark Chocolate Peanut Clusters. These delightful bites are not only indulgent, but they also boast a unique combination of flavors and textures that will make your taste buds sing. The rich, creamy dark chocolate mingles perfectly with the crunchy roasted peanuts, creating a treat that is vastly more complex than its simplicity suggests. Whether you’re sharing them at a gathering, indulging after a long day, or preparing an easy dessert for your family, these clusters are a go-to solution.
What sets this particular recipe apart is its ease of preparation and the minimal number of ingredients. In a world where many feel pressured to create extravagant desserts, this recipe is a refreshing reminder that sometimes less is more. You will learn not only how to make these clusters but also various ways to customize them to suit your taste. From tips on achieving the perfect chocolate melting consistency to variations for dietary preferences, this recipe encompasses everything you need to delight your loved ones with homemade sweetness.
What Is 5-Ingredient Dark Chocolate Peanut Clusters?
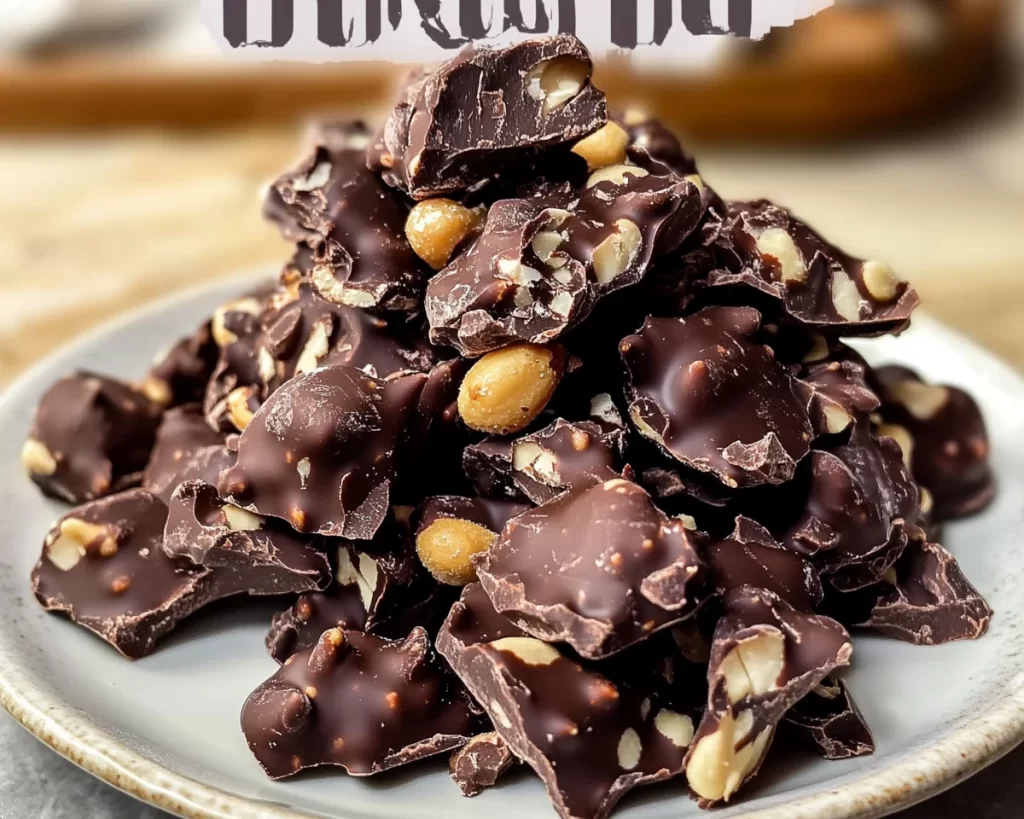
5-Ingredient Dark Chocolate Peanut Clusters are a simple, no-bake dessert that features succulent dark chocolate coated around crunchy roasted peanuts. This delightful treat is said to be a favorite in various cultures due to its accessible ingredients and ease of preparation. The dish achieves a *perfect balance* between bitter and sweet, making it appealing for assorted palates.
The process begins with melting high-quality dark chocolate, which serves as the star of the show in this recipe. Once the chocolate is fully melted and has reached the optimal consistency, it is combined with the peanuts, allowing each cluster to form naturally as a scoop of the mixture is dropped onto a lined baking sheet. As the chocolate sets, you’re left with a *satisfying texture* that is simultaneously crisp and creamy, a delightful combination in every bite.
The beauty of this recipe lies in its versatility and adaptability. While peanuts serve as the primary ingredient, you can easily switch to almonds, walnuts, or even cashews if desired. Such flexibility allows you to cater to a wide variety of tastes or dietary types.
Why You’ll Love This
One of the most compelling reasons to love these 5-Ingredient Dark Chocolate Peanut Clusters is their *irresistible flavor*. The deep, rich taste of dark chocolate harmonizes beautifully with the nutty crunch of peanuts, creating an experience that truly lingers on your palate. If you are someone who relishes that *melty chocolate sensation*, combined with a satisfying crunch, this treat will surely become a staple in your dessert repertoire.
Another reason is their *ease of preparation*. Busy parents or those just starting in the kitchen will appreciate how simple this recipe is to follow. Time spent in the kitchen is minimal, allowing you to dedicate more of your precious moments to those you love. With only five ingredients and straightforward instructions, these clusters come together quickly, making them a fantastic option for last-minute guests or after-school snacks.
Moreover, they are quite budget-friendly. High-quality desserts can sometimes come with a hefty price tag, but this recipe allows you to indulge without breaking the bank. Additionally, they can be made in bulk, making it efficient for meal preps and gatherings.
Ingredients You’ll Need
- Dark Chocolate: Use high-quality dark chocolate with 60-70% cocoa for a rich flavor. You can also use dark chocolate chips for convenience.
- Roasted Peanuts: Choose unsalted peanuts for a balanced taste. You can replace them with any nut or a nut-free option if necessary.
- Salt: A pinch of sea salt enhances the flavor. This can also be omitted, especially if you’re watching your sodium intake.
- Vanilla Extract: This adds a subtle vanilla flavor that complements the chocolate. Feel free to use an alcohol-free version if you prefer.
- Parchment Paper: While not an ingredient per se, parchment paper is essential for easy removal of your clusters without sticking.
Each ingredient plays a pivotal role in the resulting flavor and texture. The chocolate gives sweetness and richness, while peanuts introduce that satisfying crunch. It’s this perfect harmony of flavors and textures that makes these clusters so special.
How to Make
- Melt the Dark Chocolate: Start by chopping your dark chocolate into small, uniform pieces. This ensures that it melts evenly and avoids burning. Place the chocolate in a microwave-safe bowl. Heat it in the microwave in 30-second intervals, stirring well after each round. Aim for a smooth, glossy consistency, which usually takes about 2 minutes. If you notice that there are still some lumps, give it a vigorous stir. The residual heat will continue to melt the chocolate.
- Mix in the Peanuts: Once your chocolate is melted, it’s time to add in the roasted peanuts. Pour the peanuts into the bowl, and use a spatula to gently fold them into the chocolate until they are fully coated. This step allows you to ensure every peanut is generously covered, creating a delightful chocolatey experience in every bite.
- Add Vanilla and Salt: After your peanuts are coated, consider adding a splash of vanilla extract for enhanced flavor. This is optional, but it does elevate the overall taste. If you’re choosing to use salt, a pinch can help balance the sweetness of the chocolate. Stir again to combine everything thoroughly so that the flavors meld beautifully.
- Scoop onto Parchment Paper: Now, take a spoon or a cookie scoop and drop clusters of the mixture onto a lined baking sheet. You can customize the size according to your preference. Smaller clusters are perfect for snacking, while larger ones might serve as a more decadent treat! Make sure to leave a little space between each cluster, allowing them room to set without sticking together.
- Chill Until Set: Transfer the baking sheet to the refrigerator and let the clusters chill for about 20 to 30 minutes. This will allow the chocolate to harden, creating that satisfying snap when you bite into them. Patience is key, and while it might feel like torture waiting to taste them, I assure you, it is worth it!
- Enjoy Your Treats: Once set, remove the clusters from the refrigerator. If you used parchment paper, they will lift off easily. Enjoy them immediately or store them in an airtight container for later. They make a wonderful treat for a busy week or an indulgent snack during movie night!
Variations & Substitutions
Nut-Free Version: If you have nut allergies, you can easily adapt this recipe to make it safe for consumption. Substitute the peanuts with *sunflower seeds* or *pumpkin seeds* for a crunchy substitute that adds a new layer of flavor. These seeds will provide that satisfying crunch you crave while ensuring that everyone can enjoy the treat. The texture will differ slightly from peanuts, but the overall experience will still be delightful. Ensure that your chocolate is nut-free as well.
Vegan Option: The recipe can easily be made vegan by using plant-based chocolate. Look for brands that specifically label their chocolate as vegan to ensure there are no dairy ingredients. Additionally, during the mixing process, double-check that your add-ins (like vanilla extract) are also vegan-friendly. This option caters to those who are dairy-free without sacrificing any of the rich chocolatey goodness.
Fruit and Nut Clusters: For a more adventurous twist, consider adding dried fruits like cranberries, raisins, or even diced apricots along with your peanuts. This addition brings a chewy texture that contrasts beautifully with the chocolate and crunchiness from the nuts. The sweetness from the fruit can offer a delightful counterbalance to the rich dark chocolate, making each bite even more enticing.
Chocolate Coating Variations: If dark chocolate isn’t your preferred flavor, feel free to switch it up! Milk chocolate or even white chocolate can be used. Keep in mind that these alternatives will change the overall sweetness of your clusters. If you choose to go with a sweeter chocolate, slightly adjust the quantity to keep that irresistible taste nuanced and enjoyable.
Common Mistakes to Avoid
One common mistake when making these clusters is not melting the chocolate properly. It is important to avoid overheating your chocolate, as it can seize up and become unworkable. Use short bursts in the microwave, stirring frequently, to ensure it is melted smoothly.
Another issue can arise when dropping the clusters onto the parchment. If they are scooped too close together, they can merge while chilling, making it difficult to separate them later. Be sure to leave adequate space between each cluster so they cool individually.
Finally, ensure you are using high-quality ingredients. Subpar chocolate can lead to a lackluster flavor. When it comes to components like chocolate and nuts, higher quality typically means better taste. Don’t skimp here; the flavors will shine if you invest in dependable brands.
Storage, Freezing & Reheating Tips
Proper storage of your clusters is key to keeping them fresh and delicious. Store them in an airtight container at room temperature in a cool, dry place; they will last up to two weeks, though they are unlikely to stick around that long! If your environment is warm, refrigeration may be necessary to maintain firmness. However, be cautious not to expose them to excessive moisture, as this can ruin the texture.
If you plan on making a large batch, freezing is also an option! Simply place your clusters in a single layer on a baking sheet to freeze them quickly before transferring them to an airtight container. They can be kept in the freezer for up to three months. When you’re ready to indulge, you can simply pull out a few and let them sit at room temperature for about ten minutes before enjoying.
Reheating is typically not necessary, given that these clusters are best enjoyed at a comfortable temperature. If, for some reason, you have clusters that have melted together, gently reheat the batch in a warm spot before re-scooping into individual clusters.
Frequently Asked Questions
What type of chocolate is best for this recipe?
The best type of chocolate to use for 5-Ingredient Dark Chocolate Peanut Clusters is high-quality dark chocolate with a cocoa content between 60-70%. This balance yields a delicious richness without being overly bitter. If dark chocolate isn’t your preference, milk or white chocolate can also work; just remember to adjust for sweetness accordingly.
Can I make these clusters ahead of time?
Absolutely! These clusters can be made ahead of time and stored in an airtight container for up to two weeks. They are perfect for preparing in advance for holiday gatherings or weekly meal prep. If you opt to freeze them, they can last up to three months, making them an easy treat to have on hand.
Can I substitute the peanuts for other nuts?
Yes, definitely! This recipe is highly adaptable, and you can easily substitute peanuts with any type of nut you enjoy. Roasted almonds, cashews, or walnuts can provide varying flavors and textures while maintaining that satisfying crunch.
Are these clusters suitable for vegans?
Yes, by using vegan dark chocolate and ensuring that other ingredients like vanilla extract are also vegan-friendly, you can enjoy these clusters without any concerns. They are a lovely, plant-based option for satisfying your sweet cravings.
Can I add other toppings or mix-ins?
Yes! Feel free to experiment with additional toppings like sea salt flakes, crushed pretzels, or even shredded coconut. Dried fruits like cranberries, raisins, or apricots can also be added for a chewier texture. The possibilities are endless, allowing you to personalize the recipe to your taste!
Conclusion:
In conclusion, 5-Ingredient Dark Chocolate Peanut Clusters are a delightful, simple recipe that will undoubtedly satisfy your sweet cravings with minimal effort. Their rich chocolate flavor paired with the satisfying crunch of peanuts creates a treat that’s hard to resist. Feel confident in customizing this recipe to fit your dietary needs or personal preferences. Whether you’re making these for yourself, your family, or a gathering, they are bound to be a hit. Give this recipe a try and share it with friends to spread the joy of homemade sweets! Enjoy the process and don’t be afraid to get creative; happy cooking!