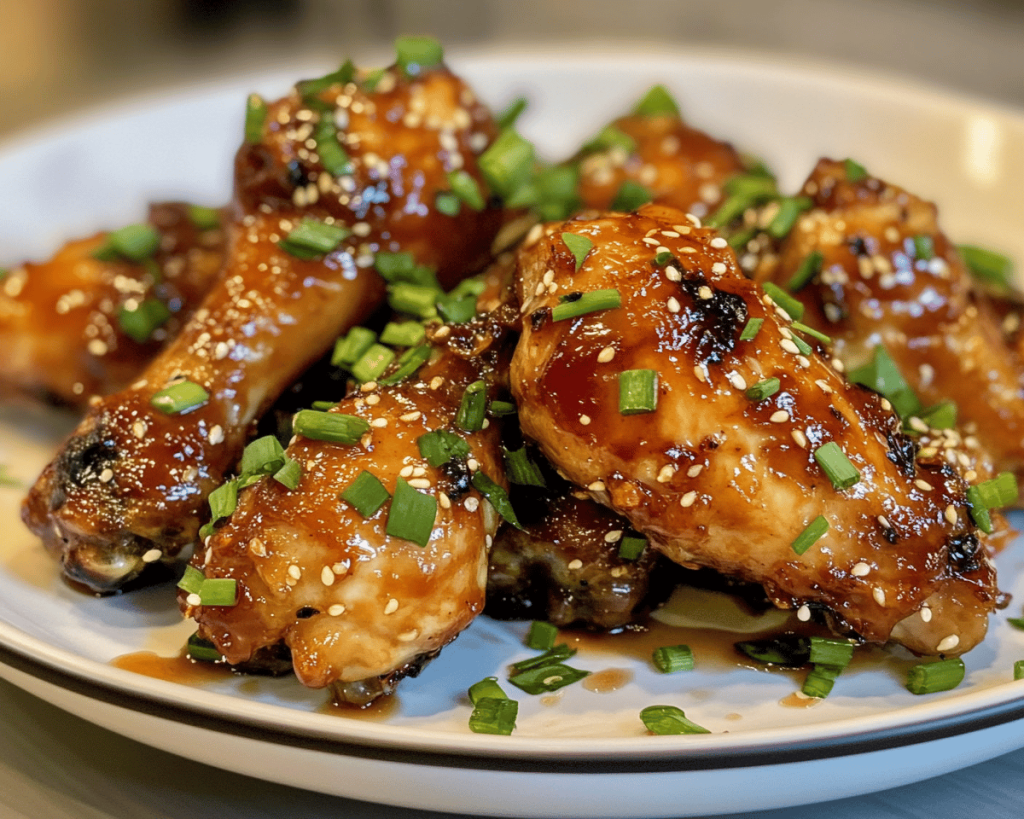
Ah, the beautiful dance of chicken and a sweet glaze! Honestly, whenever I make my **Air Fryer Maple Glazed Chicken**, I feel like I’m hosting a cozy dinner party—even if it’s just me at my kitchen counter, enjoying my creation. There’s something about the rich aroma that wafts through my home as it cooks that makes me feel all warm inside, like a big hug after a long day.
This recipe is one of those happy accidents that came about when I was rummaging through my pantry and noticed a sleepy bottle of **maple syrup** and a pack of chicken thighs that had been resting in the fridge a tad too long. You know how it goes, right? One thing leads to another, and before I knew it, I was whipping up a sticky, sweet delight that my taste buds still sing songs about.
What makes it special for me is not just how easy it is to whip up—especially in my trusty air fryer—but also how it brings back memories of those early fall days in New England. As a kid, we used to take family trips to maple farms, where the thick, amber syrup drizzled over everything felt like pure magic. So, this dish isn’t just dinner; it’s a little time capsule. You can almost hear the laughter and smell the crisp autumn leaves with every bite!
### What Goes Into Air Fryer Maple Glazed Chicken?
Now, let’s break this down, shall we? Here’s the ingredient lineup that comes together to create this symphony of flavors.
– **Chicken Thighs**: I swear by **bone-in, skin-on thighs** for this recipe. They’re juicy, flavorful, and they hold up against the glaze wonderfully. Plus, they seem to be more forgiving if you forget about them for a minute (or five).
– **Maple Syrup**: This is the star of the show! Not all syrups are created equal, so I recommend using the good stuff—pure *Vermont maple syrup* is my go-to. It adds a depth of flavor that the cheap stuff just can’t compete with. It’s dark, rich, and just the right amount of sweet.
– **Soy Sauce**: A splash of **soy sauce** brings balance to the sweetness. It’s like the best friend that holds everything together—making it savory and giving you those delightful umami vibes.
– **Garlic Powder**: Some might say it’s optional, but let’s be real: can you ever have too much garlic? I use **garlic powder** because it blends in effortlessly with the glaze—it’s like the sneaky flavor enhancer that lifts this dish to new heights without overpowering the maple.
– **Paprika**: I’m a firm believer that a bit of **smoked paprika** adds a lovely hint of warmth and an extra layer of complexity. It’s not just for looks; it adds a beautiful warmth that complements the sweetness of the glaze.
– **Black Pepper**: I like to grind my own—there’s something about the freshly cracked black pepper that elevates a dish, don’t you think?
– **Salt**: You know I’m not a big fan of oversalting, but just a pinch is needed to enhance the flavor of the chicken and the glaze.
– **Optional: Sesame Seeds or Green Onions**: For some crunch and color, I often toss on toasted sesame seeds or sliced green onions before serving. I’m telling you, it’s just the thing!
#### Is Air Fryer Maple Glazed Chicken Actually Good for You?
Let’s be real for a moment. This dish is definitely not a *health food*, but here’s the thing—life should be about balance, right? Sure, it has its indulgent moments, but there are also several aspects that make it a healthier choice compared to some alternatives. Because we’re using the **air fryer**, there’s significantly less oil involved, and because the chicken thighs have that tender meat and flavorful skin, you get all that juicy goodness without the need for frying.
– **Chicken Thighs**: Sure, they have more fat than chicken breasts, but that fat keeps them juicy. Plus, you need some fat in your diet. #Balance
– **Maple Syrup**: While it does add sugar, it’s natural sugar. To me, that feels a bit more wholesome than the refined versions.
– **Soy Sauce**: Just a splash adds flavor without a ton of calories, but opt for a low-sodium version if you’re watching your salt intake.
So, while it’s not salad, it’s still got some redeeming qualities! Enjoy it guilt-free or share it with friends and family at your next gathering—it’s sure to be a hit.
### Here’s What You’ll Need
– 4** chicken thighs** (bone-in, skin-on)
– 1/4 cup **pure maple syrup**
– 2 tablespoons **soy sauce**
– 1 teaspoon **garlic powder**
– 1 teaspoon **smoked paprika**
– 1/2 teaspoon **black pepper**
– 1/2 teaspoon **salt**
– Optional: **sesame seeds** or **sliced green onions** for garnish
### How to Make Air Fryer Maple Glazed Chicken Step-by-Step
1. **Prep Your Chicken**: Start by patting those chicken thighs dry with a paper towel. This helps them crisp up beautifully in the air fryer! I’ve made the mistake of skipping this step, and I ended up with a soggy mess. Not cute.
2. **Make the Marinade**: In a medium mixing bowl, whisk together your **maple syrup**, **soy sauce**, **garlic powder**, **smoked paprika**, **black pepper**, and **salt**. Honestly, the smell alone will make you want to lick the bowl. I won’t judge if you do!
3. **Marinate**: Toss the chicken thighs in the marinade until they’re completely coated. If you have time, let them sit in the fridge for at least 30 minutes—up to two hours if you can. Once, my husband jokingly asked if I was trying to create a science experiment with a dish that can wait ages—it turned out so good that he took it back!
4. **Preheat the Air Fryer**: Set your air fryer to 380°F (193°C) and let it preheat for about 5 minutes. Don’t skip this part; it really helps create that crispy skin.
5. **Arrange the Chicken Thighs**: Carefully place the marinated chicken skin-side down in the air fryer basket. Try not to overcrowd—it leads to uneven cooking, and we want perfection (or at least as close as we can get).
6. **Cook**: Air fry them at 380°F (193°C) for about 25 minutes. I like to flip them halfway through the cooking time so they get nice and golden on both sides. After about 15 minutes, you might want to baste them with some of that leftover marinade. Who can resist?
7. **Check for Doneness**: Make sure the chicken reaches an internal temperature of 165°F (74°C). I can’t tell you how many times I’ve poked and prodded my chicken in a moment of self-doubt—it’s always better to be safe than sorry. I’ve definitely had my share of slightly undercooked chicken scares!
8. **Serve and Garnish**: Once they’re done cooking (and you’ve given them a moment to rest), plate them up! Drizzle any remaining syrup mixture over the top or use it as a dipping sauce. Then, sprinkle with toasted **sesame seeds** or **green onions** if you’re feeling fancy.
### Little Extras I’ve Learned Along the Way
1. **Chicken Alternatives**: If you’re feeling adventurous, try this glaze on chicken breasts or even pork loins. I’ve also made it using shrimp, and let me tell you, the combination of maple and seafood is surprisingly delightful.
2. **Add Some Heat**: Want to step things up a notch? Add a pinch of chili flakes into the glaze for a spicy kick. I made that mistake one time, thinking I could handle the heat, but my friends could barely finish it! Talk about a mouthful of regret!
3. **Marinating Midnight Snack**: There’s something therapeutic about marinating in the evening while sipping on some wine (or juice if you’re in a healthy mood). I sometimes prepare the chicken overnight just to give me that jump-start for dinner the next day.
4. **Waste Not Want Not**: You can totally save any leftover marinade, bring it to a boil, and reduce it slightly to turn it into a dressing. Just remember to refrigerate any excess sauce, and don’t save it if it’s touched raw chicken—safety first!
5. **Sides that Pair Perfectly**: Serve it with roasted vegetables or a simple side salad. I like to throw some greens in a bowl with a light vinaigrette. It’s the perfect complement to counterbalance the richness of the glaze.
This recipe has such a special place in my heart, and I hope it finds a spot in your kitchen too! It’s quick enough for a weeknight meal but also elevated enough to serve to guests. It makes me happy just thinking about the joyous clinking of forks as my family gathers ‘round the table to devour it.
So please give it a shot! This one means a lot to me. Let me know if you try it—I’d love to hear your twist. Happy cooking!