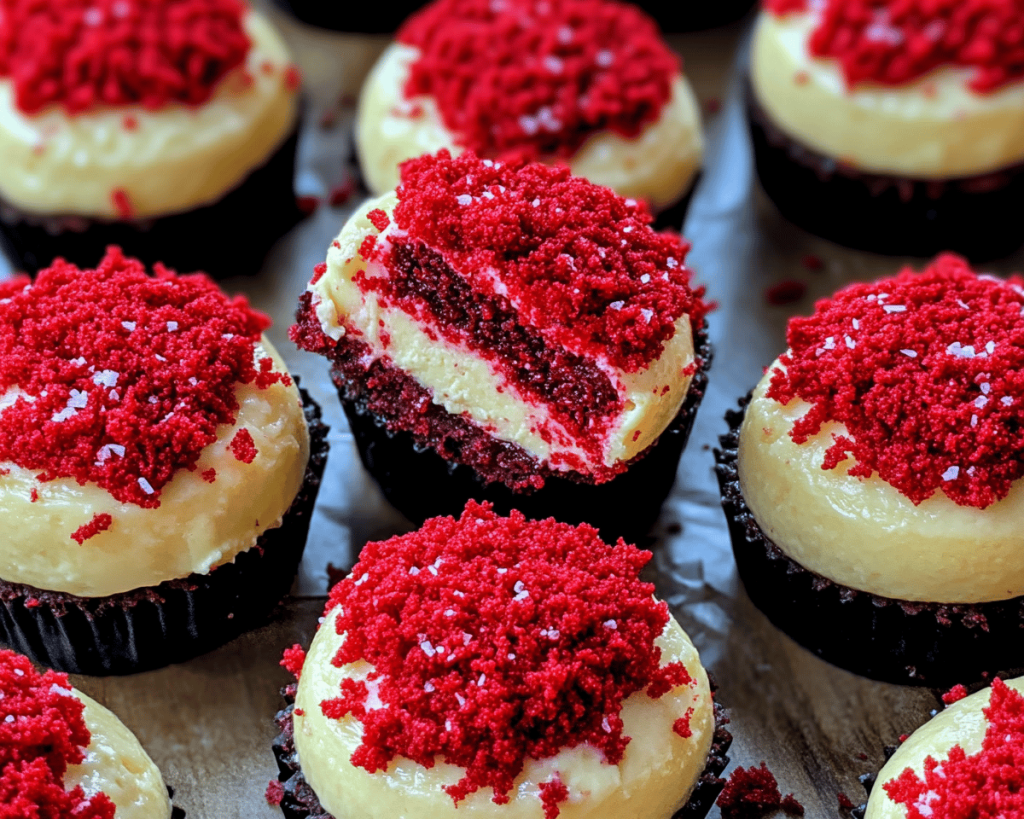
Ah, the weather! Isn’t it just the worst? We’re caught in that awkward in-between phase where winter clings on for dear life and spring teases us with the thought of blooming flowers. As I sit here, wrapped in yet another oversized sweater, sipping my third cup of coffee (I swear it’s all pumpkin spice and no actual coffee at this point), I can’t help but think about what all of this misery calls for: dessert. And not just any dessert—nope, I’m talking about Red Velvet Cheesecake Bites. If you’re looking for a little brightness (and sweetness) in your life right now, pull up a chair and roll up your sleeves.
Now, let’s get real—I was not a fan of red velvet cake as a kid. Nope, not at all. Who decided that chocolate plus food coloring equals a delectable treat? I remember scoffing at the idea of “red cake.” Like, who knew that deep ruby pastry could make people swoon with delight? Fast forward to adulthood (aka my late-night Pinterest binges), and I’ve fully embraced its chocolatey, velvety charm. And don’t even get me started on cream cheese frosting. I only had to experience heartbreak once to understand that cream cheese anything could soothe a broken soul. So now, I’ve melded my previously skeptical inner child with my dessert-loving adult self and turned those two worlds into something scrumptiously bite-sized: Red Velvet Cheesecake Bites.
With every soft, sweet nibble, you’re guaranteed to experience all the feels. They’re great for parties, galas, or just binge-watch sessions of your favorite series on a Wednesday night (who needs a reason?). Plus, they’re easy peasy to whip up! So, grab your apron and let’s dive into this bite-sized dessert bliss together!
Ingredients, Unfiltered
What’s Really in Red Velvet Cheesecake Bites
Let’s talk about the ingredients, shall we? Trust me, I have opinions, and lots of them!
Red Velvet Cake Mix: Listen, purists might scoff at the mere mention of cake mix, but I’m here for convenience. And unless you’ve got a solid red velvet cake recipe stashed under your chef’s hat, mix it is! It’s not cheating; it’s just smart planning.
Eggs: Seriously, what’s a cake without eggs? They bring that helpful moisture and richness. Plus, yes, you could use substitutes, but honestly, why? Just egg it, man.
Vegetable Oil: This is where the magic of moisture occurs. I’m a loyal member of the vegetable oil camp. Use it, love it, embrace it.
Water: Water. We need it for everything, including scaling mountains, building cities, and yes, baking cakes. It might not get all the culinary credit it deserves, but it plays a supporting role here.
Cream Cheese: This is where we get all soft and dreamy. The cream cheese is the heart of the Cheesecake Bites. And if you meet anyone who says they don’t like cream cheese frosting, run. RUN FAST. They can’t be trusted!
Powdered Sugar: This is the sweet stuff that transforms cream cheese into frosting magic. Because obviously, we need sugar in this dessert situation.
Heavy Whipping Cream: I don’t care what anyone says; this ingredient adds indulgence. It also takes cheesecake from “meh” to “OH-MY-GOSH!” So just whip it and love it!
Vanilla Extract: Do you know this flavor is basically happiness in a bottle? I use a generous splash, because I’m not skimping on joy when it comes to any dessert.
Let’s Talk Health (or Not)
Is This Even Healthy? Let’s Discuss
Okay, so if you’re here for the health content, you might want to leave now. Or you can stay, and I can offer you some sweet self-delusion, because honestly, this is not a health food. And you know what? I sleep like a baby after indulging in these bites. Sure, there’s cream cheese, and yeah, there’s sugar, and if you simply can’t with the idea of dessert that might threaten your waistline, I applaud you and wish you all the strength you need. But can we stop pretending that dessert is supposed to be healthy? It’s called dessert for a reason!
However, here’s a litany of ways to justify any guilt afterward! If you eat one Red Velvet Cheesecake Bite instead of devouring an entire slice of cake, you’re winning. Less cake per bite, more flavors exploding in your mouth. It’s logical, right? So embrace the decadence. After all, life is too short to skip dessert, am I right?
Your Grocery List
Here’s What You’ll Need
– 1 box (15.25 oz) Red Velvet Cake Mix
– 3 large eggs
– 1/2 cup vegetable oil
– 1 cup water
– 8 oz cream cheese, softened
– 2 cups powdered sugar
– 1 cup heavy whipping cream
– 1 tsp vanilla extract
– Extra powdered sugar (for dusting, optional)
This recipe yields around 24 bites. Perfect for sharing—or not! Who’s counting, anyway?
The Actual Cooking Part
Okay, Let’s Make This
Now let’s get to the nitty-gritty of making these beauties. Take a deep breath, channel your inner baking goddess, and let’s do this!
1. **Preheat the Oven:** First things first, we need to preheat that oven of yours to 350°F (175°C). It’s like the warm-up for your baking that helps set the mood, you know?
2. **Prepare the Cake Batter:** In a large mixing bowl, combine the entire box of Red Velvet Cake Mix, eggs, vegetable oil, and water. This is where the fun happens. Whisk it all together and channel your inner high-speed mixer! Aim for a smooth batter—like your favorite Netflix character.
3. **Bake the Cake:** Grab a greased 9×13 inch baking dish and pour in the luscious red batter. Pop that bad boy in the oven and let it bake for about 30-35 minutes, or until a toothpick inserted in the center comes out clean. Ah, the smell wafting through your kitchen is heavenly!
4. **Cool Down:** Once the cake is finished, let it cool in the pan for about 10 minutes. After that, transfer it onto a wire rack and let it cool completely. Pro tip: Gently singing your favorite baking song while cooling could give it extra magic. Yes, I’m serious.
5. **Make the Cream Cheese Frosting:** Once the cake is completely cooled, grab yourself another mixing bowl and add the softened cream cheese and powdered sugar. Whip it up until nice and smooth. Then, in a separate bowl, whip heavy cream until stiff peaks form. Once that heavenly peak formation is complete, gently fold that into the cream cheese mixture. Add that splash of vanilla, because vanilla makes everything better!
6. **Assemble Your Bites:** Now comes the fun part! Once the cake is completely cooled, crumble it into a large bowl. Mix in a hefty portion of your lush cream cheese frosting (save a little to frost the tops later) until combined charitably. Make sure not to go heavy on frosting or then you might not enjoy the bite-sized goodness—albeit it’s hard to have too much cream cheese frosting.
7. **Scoop and Mold:** Grab a cookie scoop (or your hands!), and form bite-sized balls with the cake-crumble mixture. Place them on a baking sheet lined with parchment paper for easy transfer to the fridge. Trust me; you want to chill these bites for at least an hour to help them hold their shape.
8. **Frost the Bites:** After about an hour, it’s time for the pièce de résistance! Take those beauties out of the fridge and frost them with the remaining cream cheese frosting. If you want a bit of flair, dust them lightly with extra powdered sugar. Yes, it looks fancy, but let’s be honest: you’re just sweetening the deal.
9. **Chill and Serve:** Chill them in the fridge until ready to serve—this is optional, but it helps the frosting set. Pop them into a nice storage container, place them in the fridge, and try your hardest not to eat them all in one sitting.
Side Notes & Sassy Hacks
Bonus Tips You Didn’t Ask For
– **Substitutions:** If you’re feeling sassy and want to change things up, why not use a gluten-free cake mix? I won’t tell anyone if you don’t!
– **Flavor Enhancements:** Feeling adventurous? Throw in some chopped nuts or swirl in some strawberry preserves between layers. It’s your dessert life; live it!
– **Freezing the Bites:** If you’ve got leftovers (bless your heart), you can freeze these cuties! Just place in an airtight container and keep for about a month. Defrost in the fridge when you’re feeling the itch for a late-night snack.
– **The Cream Cheese Dilemma:** If you want to go full-on rebel, whipped topping can be used instead of cream cheese for lighter bites. Personally, I find it lacks that creamy richness that’s iconic to a good cheesecake; however, I respect your choice.
Final Words of (Culinary) Wisdom
Well, my friend, there you have it! Your guide to the Red Velvet Cheesecake Bites that I personally believe will make any day feel just a touch brighter. If you try them out (and let’s be real, I know you will—because who can resist?) I want to see all your glorious creations. Be sure to tag me, or better yet, just send me a mental high-five because I’ll know you’re out there making dessert magic happen! Life is short, guys. Eat the cake, share the bites, and don’t forget to live your dessert dreams. Happy baking!