Let’s Get Real
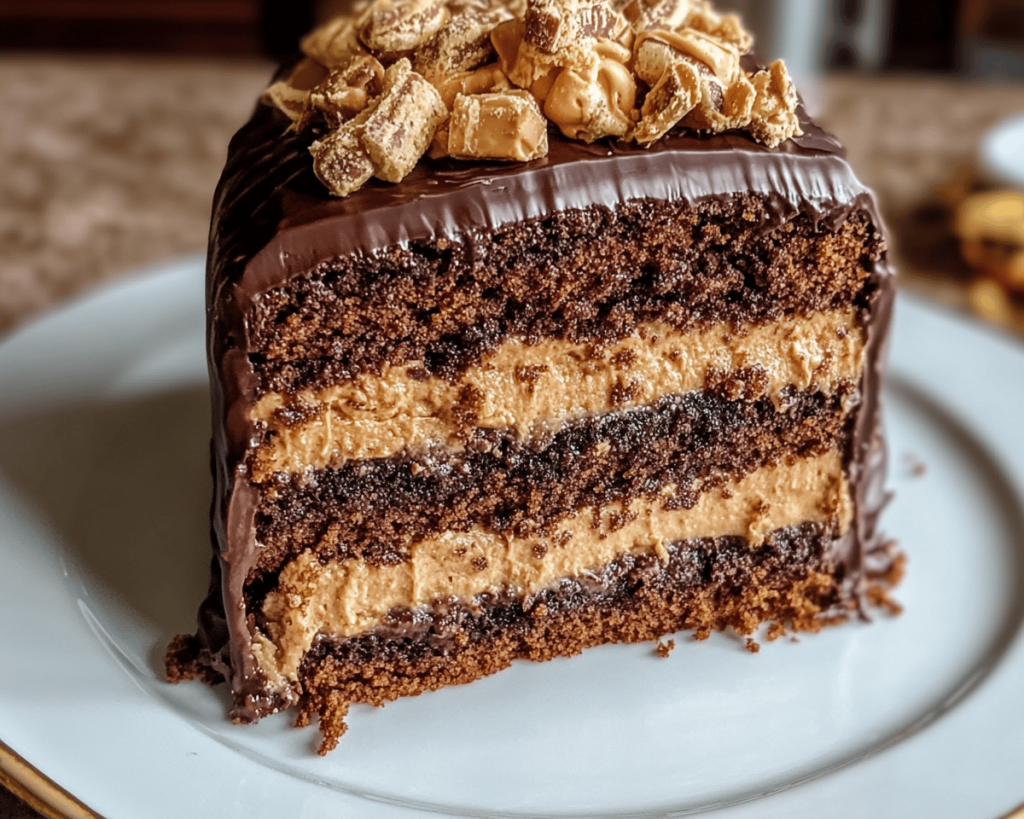
Okay, everyone, gather around, because I’m about to take you on a journey into the sweet, gooey, glorious world of the Butterfinger Bomb Cake. If you’re anything like me, the mere mention of “Butterfinger” conjures up visions of my childhood—a time when candy bars ruled my taste buds, and “diet” was a foreign word, like “internet dating.” Seriously, can we talk about how amazing this candy is? There’s just something about that crunchy peanut butter center, smothered in chocolate and wrapped in a sugary shell that sends me straight back to Saturday morning cartoons. Because, duh, nothing pairs better with cartoons than a sugary high.
So, it’s no surprise that when I caught wind of this cake, I practically screamed. And I may or may not have done an awkward little happy dance in my kitchen. Spoiler alert: I was the only one there. Why this cake wormed its way into my heart? Oh, I’ll tell you. It’s decadent, indulgent, and downright bad for you in a way that makes you want to punch your sweet tooth right in the face. Let’s just say, if this cake were an artist, it would be the one that paints with chocolate and sprinkles on a daily basis and believes in creating edible masterpieces instead of being practical.
Now, rain has been falling heavier than my willpower at a bakery, making me want to cozy up with something sweet, warm, and chocolaty. So I rolled up my sleeves, put on some seriously questionable ’90s pop music, and dove headfirst into creating this Butterfinger Bomb Cake. And let me tell you, it turned into a bit of a chaotic adventure, but it’s the mess that made it all worth it.
Ingredients, Unfiltered
What’s Really in Butterfinger Bomb Cake
Alright, folks, buckle up because we’re about to break down the glorious components of this cake. Each one is a star in its own right and when combined? They’re like a culinary Avengers team. Here’s what we need:
Butter: Let’s not beat around the bush—this cake is not for the faint of heart. We’re talking about a full stick of butter. Just imagine it—golden, creamy goodness melting into every forkful of your cake. Honestly, if you’re gonna go for it, just go all in. Clarification: this is NOT the time for low-fat butter. Nobody wants a sad cake!
Sugar: We obviously need sugar, because what’s a dessert without a little sweet love? Personally, I’m a big fan of using granulated sugar here. It dissolves beautifully and makes everything blissfully sweet. And don’t skimp, folks. Life is too short for reduced sugar. Just use the good stuff!
Brown Sugar: Okay, now we’re talking about that beautiful molasses-y addition. Brown sugar brings a depth and richness that white sugar could only dream of. If you’re feeling sassy, you can mix light and dark brown sugar for a more complex flavor. Go ahead and live life dangerously!
Eggs: We need eggs to bind this masterpiece together. And trust me, the fresher the eggs, the better the cake. I usually waltz into the store with my “I-have-a-slightly-manic-coffee-addiction” look and grab the local organic eggs. You know, because those happy hens probably sing to their eggs or something.
Flour: Plain old all-purpose flour is our building block. But you know what? I’ve been there and done that with the gluten-free swapping, and can tell you that you *can* use a gluten-free blend and it’s just as divine. Just know that I’m judging whether you’re really a gluten-free person or just jumping on the bandwagon.
Cocoa Powder: The dark, rich cocoa powder is what makes this cake a chocolate lover’s dream. You’re going to want the unsweetened kind, trust me. The sweetness will come from the sugar later.
Butterfinger Bar: And finally, the star of the show! Oh, sweet Butterfinger! I recommend using at least two full bars for the cake and, of course, a few extra for decoration. Because no one should ever be separated from their Butterfinger stash, am I right?
Let’s Talk Health (or Not)
Is This Even Healthy? Let’s Discuss
Now, let’s step back for a moment and address the elephant in the room: Is Butterfinger Bomb Cake healthy? Cue the facepalm. Sure, there’s butter, sugar, chocolate, and more sugar. But let’s get real. Life is about balance, and sometimes that means indulging in cake that could out-sweet any overly cheerful, smoothie-sipping health nut. And let’s be honest: every single bite of this cake screams, “Eat me!” while simultaneously making me forget I’m an adult who should probably care about dietary choices.
But if it makes you feel any better, you could argue that the peanut butter in the Butterfinger is a protein source. So, in my mind, that totally justifies diving into the cake with both hands. Sure, it’s not a kale salad, but sometimes you just have to say, “Forget it” and go for the goodness.
Your Grocery List
Here’s What You’ll Need
– 1 stick unsalted butter, softened
– 1 cup granulated sugar
– 1 cup brown sugar (packed)
– 4 large eggs
– 2 cups all-purpose flour
– 1 cup cocoa powder
– 1 teaspoon baking powder
– 1 teaspoon baking soda
– 1 teaspoon salt
– 2 teaspoons pure vanilla extract
– 1 ½ cups water
– 2-3 Butterfinger bars (plus extra for decoration; I won’t judge your desires)
*Serves 12-16 (or 1 if I’m alone and watching bad reality TV)*
The Actual Cooking Part
Okay, Let’s Make This
Alright, my fearless kitchen warriors — let’s get our hands dirty and make this cake! I promise, this is so easy even a toddler could do it (with supervision, of course). Follow my lead, and let’s channel our inner pastry chefs.
1. Preheat the oven to 350°F (175°C). This is crucial, people. There’s no room for cold spots in this cake. We want it nice and toasty, not lukewarm.
2. Grab a large mixing bowl—preferably one that won’t retaliate by breaking on you because, honestly, that’s chaos you don’t need right now. Combine the softened butter, granulated sugar, and brown sugar. Beat them together until fluffy and light. You want it happy. This is typically where my stand mixer becomes my best friend—seriously, I can’t live without it!
3. Add the eggs, one at a time, mixing until each is fully incorporated. If you forget to crack them into a separate bowl first (guilty!), do not panic! Just fish out the eggshells like a pro. Just kidding, don’t be silly; that never happens. Or does it?
4. In another bowl, combine the flour, cocoa powder, baking powder, baking soda, and salt. Whisk them together until they’re best buddies.
5. Gradually add the dry mixture to the wet mixture, alternating with water. Yes, water! You’re not imagining things! It’s like a fairy godmother sprinkling hydration magic into your cake batter. Mix until combined and totally luscious. It shouldn’t be too thick—think melt-in-your-mouth.
6. Fold in your chopped Butterfinger bars. CAN YOU BELIEVE WE’RE AT THIS STAGE? I might have danced a little at this part.
7. Pour the batter into a greased 9×13 inch cake pan and send it off into the oven for about 30-35 minutes. This is where you will be staring at the oven like it holds the secrets of the universe. I know you’ll keep peeking—stop it! Leave it alone; we all know the cake will come out beautifully if left undisturbed.
8. Now for the hard part: we must let it cool! I mean, it’s almost torture. Just be sure it’s completely cooled before we tackle the frosting because, uh-oh, melted frosting is not cute!
Side Notes & Sassy Hacks
Bonus Tips You Didn’t Ask For
Now that your kitchen smells like heaven, let’s talk about some clever hacks and ways to make this Butterfinger Bomb Cake even better!
1. **Frosting Choices**: If you feel wild (and you should), go classic with a rich chocolate buttercream frosting. But if you want to be a true rebel, why not whip up a peanut butter frosting and let the flavors collide like two best friends who haven’t seen each other in years? Just remember to add extra chopped Butterfinger bars on top for decor and a little crunch.
2. **Cake Toppers**: Speaking of toppings, crushed Butterfinger bars are like the cherry on top of this cake. They add a crunchy texture and can make anyone question their life choices regarding travel vs. cake eating goals. Plus, who doesn’t love a sprinkle of decadence?
3. **Storing**: If you have leftovers (which is highly improbable unless your friends bailed on you, and let’s be honest, that’s rude), you can store the cake in an airtight container for a few days. But let’s face it, if you’re like me, there’s no way you’ll be holding onto leftovers.
4. **Flavor Variations**: Don’t shy away from mixing it up! If you’re not a Butterfinger fan (let’s talk about how we need to change this), swap in your favorite candy bars. Snickers, Milky Ways, or crunch bars—go nuts! Just imagine the chaos and delight!
Final Words of (Culinary) Wisdom
Well, my lovelies, we made it through the wild ride of Butterfinger Bomb Cake together! If you try it, tag me in your posts so I can cheer you on from the couch while I’m simultaneously eyeing my own cake leftovers. Take it from me—it’s not just a cake; it’s a celebration of all that is good in the world of sweets. And if life hands you lemons, just turn that frown upside down and whip out your cake-loving spirit instead.
Now, get that mixer whirring, embrace the chaos, and let’s make some sweet memories. Enjoy every crumb you can get your hands on, because some things are just meant to be savored. Happy baking!


