You know those moments when you take a bite of something and it transports you back in time? That’s exactly how I feel every time I make these Sweet Potato Yeast Rolls. They’re not just any bread; they’re a warm hug wrapped in fluffy, pillowy goodness that seems to whisper, “Everything is going to be alright.” This recipe has become a staple in my kitchen, and I can’t help but obsess over it. It all began on a chilly autumn afternoon when I was rummaging through my kitchen, trying to figure out what to do with some leftover sweet potatoes.
Honestly, I had no idea what I was getting myself into when I decided to whip up these rolls. At first, it was meant to be a simple side for dinner, but after the first rise, the smell wafting through my home was enough to make my heart sing. I decided then and there that this was going to be a must-have for every family gathering, holiday dinner, and just because—every time I make them, I’m instantly transported back to my mom’s kitchen, where the warmth of fresh bread was our sanctuary against the outside world.
So, what’s the secret to this delightful recipe? It’s all about balancing the right ingredients and some patience (though I know, patience is sometimes in short supply, especially when the smell of sweet potato bread fills the air). But trust me, every minute spent waiting for these beauties to rise is worth it.
What Goes Into Sweet Potato Yeast Rolls?
Let’s break down the ingredients. Here’s what we’re working with:
1. **Sweet Potatoes**: I absolutely adore using roasted sweet potatoes in this recipe. Not only do they bring a natural sweetness, but they also add moisture to the dough, which keeps the rolls soft. Pro tip: If you’re short on time, you can opt for canned sweet potato puree — it works like a charm too! Just make sure to drain any excess liquid.
2. **All-Purpose Flour**: This is the backbone of the recipe. I usually use unbleached all-purpose flour because it has a lovely texture. Here’s the thing with flour — don’t stress about being super precise. I’ve had moments where I underestimated how much I needed, and you know what? It still turned out fine! Just always start with the recommended amount and add more if needed.
3. **Active Dry Yeast**: Yeast is a magical little organism that helps our dough rise, giving those rolls that airy texture we crave. I always keep my yeast in the fridge to keep it fresh. A little secret: if you’re unsure if your yeast is still alive, do a quick “proofing test”—dissolve it in warm water (with a pinch of sugar) and watch for bubbles after a few minutes.
4. **Milk**: I prefer whole milk for a rich texture, but if you’ve got almond or oat milk on hand, those work too. Warm the milk before mixing to encourage a cozy environment for the yeast—like a warm blanket for the dough.
5. **Butter**: Ah, butter. If you’re like me, you can never have too much of it! I usually use unsalted butter so I can control the saltiness of the rolls. Just be sure to let it cool slightly after melting, or it might kill the yeast.
6. **Sugar**: Just enough to balance the savory and enhance that sweet potato flavor. I sometimes use brown sugar for a deeper flavor, but granulated works just fine too.
7. **Egg**: One egg adds richness and helps bind everything together. It’s like a little miracle worker in baking.
8. **Salt**: I eyeball the salt, but generally, about a teaspoon does the trick. Salt is important because it controls yeast activity—too much, and your dough won’t rise at all, too little, and your rolls will lack flavor.
With these ingredients in your arsenal, you’re already halfway to a magical moment in your kitchen.
Is Sweet Potato Yeast Rolls Actually Good for You?
Okay, let’s get real here. These rolls are a little indulgent—after all, we’re talking about homemade bread slathered in butter. However, the sweet potatoes do offer a nutritional boost! They’re packed with vitamins A and C, fiber, and even a bit of potassium. The roll is not just a fluffy side; it adds some nutrients to the table that plain white rolls just can’t compete with.
Here’s the thing: you’re not doing this for a diet; you’re doing this for the joy of cooking and sharing something special with loved ones. I call it “food for the soul.” Enjoy them fresh out of the oven alongside a hearty soup or dunk them into a stew. Just remember to savor the moments. And honestly, if there’s some slight guilt about the butter, just remember life is all about balance, right?
Here’s What You’ll Need
– **1 cup mashed sweet potatoes** (about 1 medium sweet potato)
– **2 ¼ teaspoons active dry yeast** (one 0.25-ounce packet)
– **½ cup warm milk** (about 110°F)
– **4 cups all-purpose flour** (plus more for dusting)
– **¼ cup unsalted butter**, melted
– **2 tablespoons granulated sugar** (or brown sugar)
– **1 large egg**
– **1 teaspoon salt** (adjust to taste)
This recipe should yield about 12 rolls, perfect for sharing—or hoarding, if you’re feeling particularly selfish (I won’t judge!).
How to Make Sweet Potato Yeast Rolls Step-by-Step
Alright, friends, let’s get cooking! Even if this is your first time baking bread, I promise you can absolutely do it. Just follow my steps, and keep your sense of humor handy.
1. **Prep the Sweet Potatoes**: If you’re starting from scratch, peel and cube the sweet potato and place it in a pot of boiling water. Cook until tender, about 15-20 minutes. Drain and mash until smooth. You can even throw it in the food processor for a velvety texture. Set aside to cool.
2. **Proof the Yeast**: In a small bowl, mix the **warm milk**, **yeast**, and **sugar**. Let it sit until it’s frothy—about 5-10 minutes. It’s like watching magic happen, seeing that yeast bubble to life!
3. **Mix Everything Together**: In a large mixing bowl, combine the **mashed sweet potatoes**, **melted butter**, **egg**, **salt**, and the frothy yeast mixture. Using a wooden spoon or a spatula, gently mix until combined.
4. **Add the Flour**: Gradually add the **all-purpose flour**, one cup at a time. I usually start with a wooden spoon, but once it gets too tough, I dive in with my hands. Don’t be afraid to get messy! If the dough is sticky, sprinkle a little more flour on the surface and knead until a smooth ball forms.
5. **Knead the Dough**: Transfer to a floured surface and knead for about 5-10 minutes. You want to develop the gluten structure, which gives your rolls that fluffy lift. Kneading is also therapeutic—just imagine all your worries getting pounded into that dough!
6. **First Rise**: Place the dough in a greased bowl, cover it with a clean towel, and let it rise in a warm spot for about an hour or until it has doubled in size. This is the part where I often hover around the dough, checking every few minutes like a worried parent. Patience is key here!
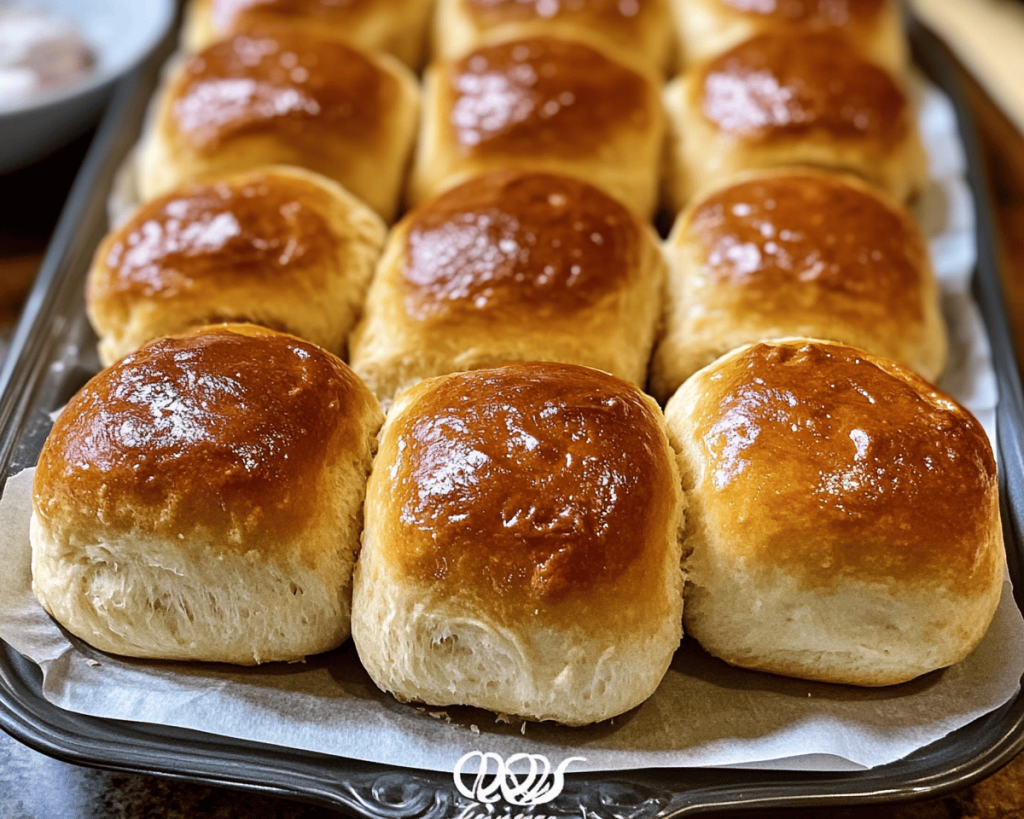
7. **Shape the Rolls**: Once doubled, punch the dough down (a satisfying moment!) and turn it out onto a floured surface. Divide the dough into 12 equal portions. Shape each portion into a ball, tucking the edges under to create a smooth top. Isn’t it funny how satisfying it is to make those little balls?
8. **Second Rise**: Place the rolls in a greased baking dish or lined baking tray, brushing the tops with a little additional melted butter. Cover and let them rise again for about 30 minutes. This time, I like to prep my dinner or set the table while dreaming about how amazing these rolls will be.
9. **Preheat Your Oven**: While the rolls are rising, go ahead and preheat your oven to 350°F (175°C). The smell of freshly baked bread is one of life’s greatest joys, and you’ll want your oven to be ready.
10. **Bake**: Once they’ve risen, pop those rolls into the oven and let them bake for 18-20 minutes until they’re golden brown. Keep an eye on them, as every oven can be quirky.
11. **Glaze and Enjoy**: When they’re done, let them cool for a few minutes before brushing them with more melted butter (because more butter is always better). Serve warm with a side of honey or jam—or just dive right in as they are.
Little Extras I’ve Learned Along the Way
Now, here’s something I’ve discovered over the years—this recipe is incredibly flexible!
– **Flour Alternatives**: You can swap a cup of all-purpose flour for whole wheat flour if you want a bit more fiber. Just know that they’ll be denser and have a nuttier flavor.
– **Add-ins**: I’ve experimented by tossing in some dried herbs like rosemary or thyme to the dough. It gives a savory twist that’s perfect for accompanying a soup or stew.
– **Sweetening it Up**: If you’re in the mood for something sweeter, try adding a dash of cinnamon or nutmeg for a warm spiciness that perfectly complements the sweet potatoes’ natural flavor.
– **Make-Ahead**: These rolls freeze beautifully. I often bake a double batch because well, why not? After baking, let them cool completely and store them in a zip-lock bag. Whenever the craving strikes, just pull a few out and reheat them in the oven. They’ll be just as soft and fluffy as when they came out of the oven!
– **Allergy-Friendly Option**: If you need to make this recipe gluten-free, use a gluten-free all-purpose flour mix. Just note that the texture might be slightly different, but still delightful.
Anyway, those are just a few quirks I’ve picked up along my sweet potato roll journey. You know what I mean? It’s about finding what works for you and making it your own.
This one means a lot to me. It’s more than just a recipe—it’s a path to cozy, memorable moments around the table. It’s about sharing who we are through food. I’d love for you to try your hand at these Sweet Potato Yeast Rolls. Let me know how they turn out or if you find your twist on this recipe. I can’t wait to hear about your baking adventures! Happy cooking!