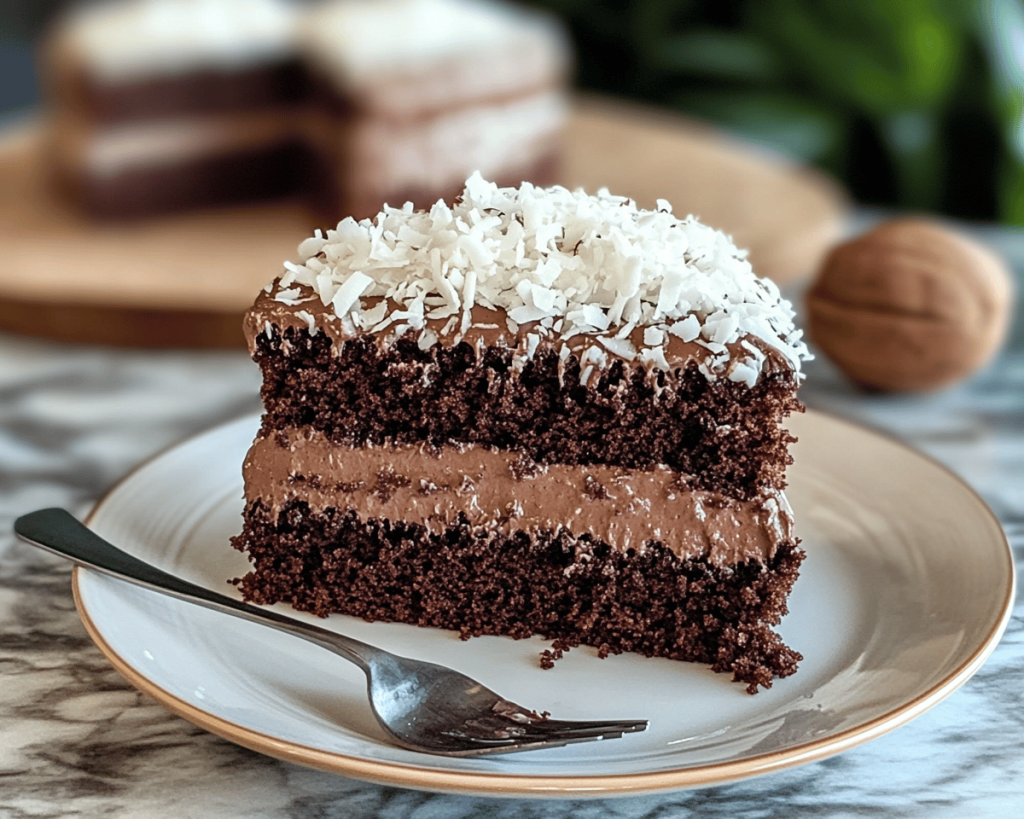
# Delicious Easy Chocolate Coconut Cake
Have you ever found yourself craving a rich, decadent cake that feels like a warm hug? A cake so divine that when you take the first bite, your taste buds dance with joy? That’s exactly what you’ll experience with this delicious easy chocolate coconut cake—a delightful fusion of fluffy chocolate layers and luscious coconut frosting that will make your heart (and stomach!) sing.
This cake has been a favorite in my family for years—each slice brings back vivid memories of birthday celebrations, rainy afternoons, and cozy gatherings. The chocolate sponge cake is moist and incredibly fluffy, while the coconut frosting adds a delightful sweetness and a hint of tropical flair. You’ll learn how to whip up this cake effortlessly, making it the perfect centerpiece for any occasion or simply to satisfy that sweet tooth.
## What is Chocolate Coconut Cake?
Chocolate coconut cake is a scrumptious treat that combines the rich flavors of chocolate with the sweet, nutty taste of coconut. Often layered with creamy frosting and shredded coconut, this cake can be traced back to the classic American desserts where chocolate cakes became popular in the early 20th century, and coconut was frequently used in Southern baking.
The flavors and textures meld beautifully—imagine sinking your fork into a slice where the tender, moist chocolate cake meets a soft, fluffy icing. Each bite bursts with rich cocoa flavor, complemented delicately by the fragrant coconut. It’s a combination that feels luxurious yet approachable, designed to please both the chocolate lover and coconut aficionado alike.
## Why You’ll Love This Chocolate Coconut Cake
There are countless reasons why you will adore this easy chocolate coconut cake! First and foremost, **it’s a breeze to make**. Forget spending all day in the kitchen; this cake comes together quickly and easily, making it perfect for novice bakers and seasoned pros alike.
Another factor is the **versatility**. This chocolate coconut cake can be dressed up for celebrations or enjoyed casually on a Tuesday afternoon with a cup of coffee. Whether it’s a birthday, anniversary, or just a random craving, this cake never fails to impress.
Also, let’s not forget how **affordable and adaptable** this recipe is. You only need a handful of pantry staples, making this delightful cake a budget-friendly option. You can play with different variations too—add some nuts for crunch, drizzle chocolate ganache on top, or even infuse your frosting with a hint of vanilla or almond flavor.
## Ingredients You’ll Need
To bake the perfect chocolate coconut cake, here’s what you’ll need:
### For the Cake:
– **1 ¾ cups all-purpose flour**
The backbone of your cake! Choose unbleached flour for a more natural taste.
– **1 ½ cups granulated sugar**
This brings sweetness and helps achieve that tender crumb. You can substitute half with brown sugar for added moisture.
– **¾ cup unsweetened cocoa powder**
Use high-quality cocoa for a rich, chocolate flavor. Dutch-process cocoa will deepen the taste even further.
– **1 ½ teaspoons baking powder**
This is your leavening agent, giving the cake its lift.
– **1 ½ teaspoons baking soda**
Works in tandem with the baking powder to elevate the cake beautifully.
– **1 teaspoon salt**
Enhances all flavors in your cake.
– **2 large eggs**
These help bind the ingredients and add moisture. For an egg-free version, you can use flax eggs.
– **1 cup whole milk**
This is key for flavor and moisture. Almond milk works too for a dairy-free option.
– **½ cup vegetable oil**
This adds richness and keeps the cake incredibly moist.
– **2 teaspoons pure vanilla extract**
It elevates the flavor profile, giving the cake a warm aroma.
– **1 cup boiling water**
This may sound odd, but it intensifies the chocolate flavor and results in an incredibly moist cake.
### For the Coconut Frosting:
– **1 cup unsalted butter (softened)**
This is crucial for a creamy frosting. Make sure to allow it to sit at room temperature before starting.
– **3-4 cups powdered sugar (to taste)**
The sweetness and volume of the frosting depend on how much sugar you incorporate.
– **1/4 cup heavy cream or milk**
Adds creaminess to your frosting. You can also use coconut milk for extra flavor!
– **1 teaspoon pure vanilla extract**
Enhances the overall flavor—never underestimate the power of vanilla!
– **1 ½ cups sweetened shredded coconut**
Toss this in with the frosting for a deliciously chunky texture.
## How to Make Chocolate Coconut Cake
Follow these easy steps to create your chocolate coconut cake masterpiece:
### Step 1: Preheat the Oven
Preheat your oven to 350°F (175°C). Grease and flour two 9-inch round cake pans. Ensuring the pans are ready is crucial for a seamless release after baking.
### Step 2: Combine Dry Ingredients
In a large mixing bowl, sift together the flour, sugar, cocoa powder, baking powder, baking soda, and salt. Whisk them well to combine; this helps aerate the flour and even out the leavening agents.
### Step 3: Add the Wet Ingredients
Add the eggs, milk, oil, and vanilla extract directly into the bowl with the dry ingredients. Beat on medium speed for about 2 minutes. Do not worry too much about beating it—this step creates the structure of your cake batter.
### Step 4: Incorporate Boiling Water
Carefully stir in the boiling water. This will thin out your batter significantly—don’t be alarmed! The boiling water blooms the cocoa powder, resulting in an incredibly rich flavor and making a moist cake.
### Step 5: Bake the Cakes
Divide the batter evenly between the two prepared pans. Bake in the preheated oven for 30-35 minutes, or until a toothpick inserted into the center comes out clean. You can also tell they’re done by the edges pulling away slightly from the pan—just keep an eye on them.
### Step 6: Cool the Cakes
Once baked, remove the pans from the oven and let them cool in the pans for about 10 minutes. After that, turn them out onto a wire rack to cool completely before frosting. (This is a great time to clean up a bit!)
### Step 7: Make the Coconut Frosting
In the meantime, beat the softened butter with an electric mixer until it’s creamy and fluffy. Gradually add the powdered sugar, mixing on low to avoid a cloud of sugar. Pour in the heavy cream and vanilla extract, mixing until everything is combined and the frosting is light and fluffy. Don’t forget to add shredded coconut for that delicious texture.
### Step 8: Assemble the Cake
Once the cakes are cooled, place one layer on a serving plate. Spread a generous layer of coconut frosting on top, then carefully place the second layer on top. Ice the top and the sides of the cake with the remaining frosting. Don’t worry about perfection; rustic charm is always in style!
### Step 9: Chill & Serve
For the best flavor, allow the frosted cake to sit for about 30 minutes in the refrigerator. This helps the flavors meld together beautifully. When ready, slice and enjoy that blissful experience!
## Tips, Tricks & Variations
Here are some expert tips to help enhance your baking experience:
1. **Use Quality Cocoa Powder**: A good cocoa quality makes a world of difference; look for brands like Valrhona or Ghirardelli.
2. **Battling Cake Sticking**: To ensure an easy release, consider lining the bottom of the pans with parchment paper.
3. **Storage**: This cake stays fresh for up to 3 days in an airtight container at room temperature, or up to a week in the fridge.
4. **Flavor Variations**: Want to shake things up? Try adding a tablespoon of espresso powder in the cake for a mocha twist.
5. **Make It Dairy-Free**: Substitute the butter with vegan butter and the milk with almond or coconut milk to make this cake vegan-friendly.
## What to Serve With Chocolate Coconut Cake
This delicious cake stands well on its own, but pairing it with certain delights can elevate it even further! Here are a few suggestions:
– **Whipped Cream**: A dollop of lightly sweetened whipped cream adds a lovely airy counterpoint to the rich cake.
– **Ice Cream**: Serve a scoop of vanilla or coconut ice cream beside your slice for an indulgent treat.
– **Fresh Berries**: The tartness of raspberries or strawberries can balance the sweetness of the chocolate coconut cake.
– **Coffee or Tea**: Pair a slice with a hot cup of coffee or tea for a comforting afternoon treat.
## Nutrition & Health Benefits
While indulgent, this chocolate coconut cake can still fit into a balanced eating plan. Just one slice packs a punch of flavor and energy, with approximately 350-400 calories (this will depend on portion size and exact ingredients). Chocolate, enjoyed in moderation, can be a source of antioxidants, while the coconut brings healthy fats and hydration.
For more insights into desserts and their effects on health, check out credible resources like [Healthline](https://www.healthline.com/nutrition/coconut-health-benefits).
## Frequently Asked Questions
### 1. How do I store leftover cake?
Store any leftover pieces in an airtight container at room temperature for up to three days. If you need to keep it longer, refrigerate it where it’ll last up to a week. Just remember to allow it to come to room temperature before serving!
### 2. Can I freeze this cake?
Absolutely! Wrap slices tightly in plastic wrap, then place them in a freezer-safe container. They can last in the freezer for up to three months. Thaw in the fridge overnight before enjoying!
### 3. What can I substitute for eggs?
If you want to make this cake egg-free, use flaxseed or chia eggs. To make one flax egg, mix 1 tablespoon of ground flaxseed with 3 tablespoons of water and let it sit until it thickens.
### 4. Can this cake be made ahead of time?
Yes! You can bake the layers a day ahead and store them wrapped in plastic wrap until you’re ready to frost and serve.
### 5. What can I do if my frosting is too thick?
If your coconut frosting is too thick, gradually add more cream or milk until you reach the desired consistency. A little at a time goes a long way!
In conclusion, making your own delicious easy chocolate coconut cake should be on your baking bucket list! The joy it brings to those you share it with is immeasurable. So roll up your sleeves, gather your ingredients, and take that first step toward creating something spectacular. If you loved it, drop a comment or tag me on Instagram with your baking success! Happy baking!