Prep time: 20 minutes
Cook time: 15 minutes
Total time: 35 minutes
Servings: 24 cookies
St. Patrick’s Day is a time when the world comes alive with vivid shades of green and celebratory cheer. Among the various customs, one treat stands out—**Shamrock Shortbread Cookies**. Every bite of these delicate cookies encapsulates a sense of nostalgia, charming anyone who takes a moment to savor their buttery richness and crisp texture. As you prepare for the festivities, imagine the aroma of freshly baked cookies wafting through your kitchen, inviting family and friends to join in the celebration.
This recipe is special not only for its delightful flavor but for the memories it can create. You might recall baking with your family, laughter filling the air as cookie dough formed into cute shapes, or simply enjoying a delicious treat with your children. Here, you will learn how to create these charming cookies that are as easy to bake as they are to enjoy. With tips, variations, and a wealth of information, you’ll be ready to impress your guests this St. Patrick’s Day.
What Is St Patrick’s Day Shamrock Shortbread Cookies?
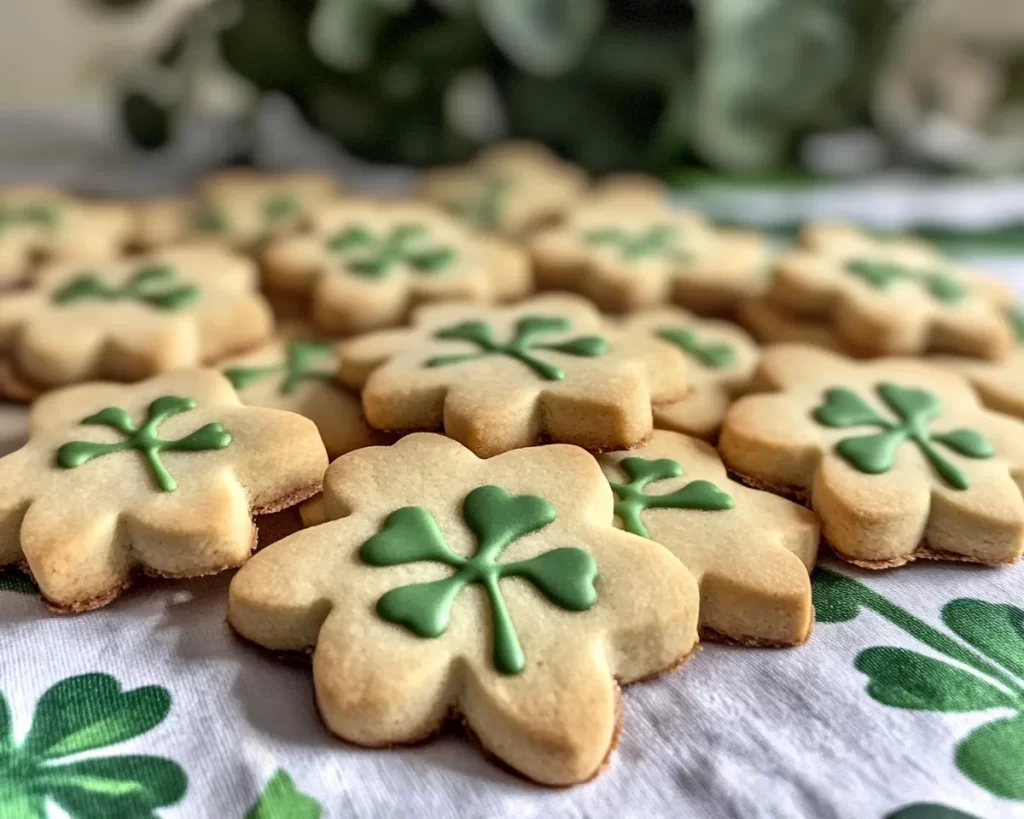
**Shamrock Shortbread Cookies** are a delightful twist on the classic Scottish shortbread, known for their simple ingredients and buttery flavor. Originating from Scotland, traditional shortbread is made from just three key ingredients: flour, butter, and sugar. For St. Patrick’s Day, we incorporate a **shamrock shape** to commemorate the holiday, adding a whimsical touch ideal for parties and family gatherings.
The texture of these cookies is both crisp and crumbly, offering a melt-in-your-mouth experience with every bite. In contrast to other cookies that may be too soft or chewy, shamrock shortbread has a satisfying structure. The flavor profile is wonderfully rich, primarily due to the high-quality **butter** used. You can easily identify the delicate notes of vanilla and, if you choose, a hint of citrus zest. This playful design and remarkable taste make these cookies festive favorites among both children and adults.
During St. Patrick’s Day celebrations, these cookies can be beautifully decorated with **green icing** or sprinkles, reinforcing the theme while adding a delightful sweetness. Their charm extends beyond the holiday, making them a wonderful treat any time you want to add a bit of cheer to your baking.
Why You’ll Love This
There are countless reasons to love **St. Patrick’s Day Shamrock Shortbread Cookies**. First and foremost is the incredible flavor balance. The rich buttery taste paired with the subtle sweetness creates a cookie that is not overly indulgent but simply delightful, making it a perfect accompaniment to your morning coffee or an afternoon tea.
Another benefit is the ease of preparation. This recipe utilizes straightforward techniques that even beginner bakers can master. With minimal ingredients and simple steps, you can whip up a batch in no time. Additionally, these cookies are cost-effective. Using pantry staples such as flour and sugar, they make an excellent choice for families looking to indulge without breaking the bank.
Unlike many recipes that require special techniques or equipment, shamrock shortbread cookies are accessible to everyone, making them an excellent choice for busy parents or those who might be new to baking. You can also customize these cookies to accommodate different diets by substituting ingredients, which highlights their versatility.
However, one common misconception is that shortbread cookies are bland or boring. You’ll quickly learn that **shortbread** can be anything but! Variations can add flavors like **almond** or **citrus**, inviting an entirely new taste profile. With the main recipe as a base, you can explore your creativity and impress friends and family with a unique twist.
Ingredients You’ll Need
- 2 cups all-purpose flour – The base of your cookie, providing structure. For gluten-free alternatives, consider using a **gluten-free flour blend**.
- 1 cup unsalted butter, softened – The key to the distinctive buttery flavor. Always use high-quality butter for the best results.
- ½ cup powdered sugar – Adds sweetness while achieving that smooth texture; a perfect pairing for the buttery taste.
- 1 teaspoon vanilla extract – Infuses a warm flavor into your cookies; this can be substituted with **almond extract** for a different twist.
- ¼ teaspoon salt – Balances the sweetness; don’t skip this, as it enhances the flavors.
- Optional: Green food coloring – For added festivity, mix in a few drops to achieve that signature shamrock hue.
Each ingredient plays a crucial role in creating the perfect shamrock shortbread cookies. If you’re out of powdered sugar or prefer a less sweet option, you can blend regular granulated sugar in a blender to make your own powdered sugar within minutes. You may even omit the salt if using salted butter; just adjust accordingly.
How to Make
To make **St. Patrick’s Day Shamrock Shortbread Cookies**, follow these detailed steps for delicious results:
- Start by preheating your oven to **350°F (175°C)**. This temperature is crucial for achieving that perfect buttery texture. While the oven heats, prepare your baking sheets by lining them with parchment paper to prevent sticking.
- In a mixing bowl, cream together **1 cup of softened unsalted butter** and **½ cup of powdered sugar**. Using a hand mixer or a stand mixer, blend until the mixture is light and fluffy. This step is essential as it incorporates air, giving your cookies a delicate texture.
- Once mixed, add in **1 teaspoon of vanilla extract** and **¼ teaspoon of salt**. If you’re using **green food coloring**, add it at this stage until you reach your desired color. Mix again until evenly distributed, and you’ll notice a vibrant shade that enhances the festive appeal of your cookies.
- Gradually incorporate **2 cups of all-purpose flour** into the butter mixture. Mix on low speed to prevent flour from flying everywhere. You’ll want the dough to come together but not be overly worked—you’re aiming for a soft consistency that holds together without being sticky.
- Once the dough forms, turn it out onto a lightly floured surface. Gently knead it until smooth, which should only take a minute or two. Be careful not to over-knead; you want to maintain that fabulous shortbread texture. A well-formed dough is vital to avoid spreading during baking.
- Roll out the dough to about **¼ inch thick**. Use a shamrock cookie cutter to cut out the cookies, placing them on the prepared baking sheets about an inch apart. If you don’t have a shamrock cutter, your imagination can guide you; use any cookie shape that captures the essence of the celebration!
- Bake in the preheated oven for **12-15 minutes** or until the edges are lightly golden. Keep an eye on them, as they can go from perfectly cooked to overbaked quickly! Once done, allow them to cool on the baking sheet for a few minutes before transferring them to a wire rack to cool completely.
- For an extra festive touch, consider decorating your cookies with **green icing** or **sprinkles** once they have completely cooled down. The icing will add sweetness and a bit of flair, making them even more appealing to your guests.
With these steps, you’ll have perfect shamrock shortbread cookies ready to impress. The key to success is timing and careful mixing, ensuring you get that superb buttery flavor and delicate texture.
Variations & Substitutions
Citrus Zest Variation: Adding the zest of a lemon or lime can elevate the flavor of your shamrock shortbread to the next level. This variation introduces a bright, refreshing taste that pairs beautifully with the buttery base, making it ideal for springtime gatherings. Just about **1 tablespoon of zest** will do; mix it in during the creaming process to maximize incorporation. This version is not only invigorating but also offers an alternative for those wanting something beyond the traditional cookie.
Nuts Addition Variation: If you’re a fan of added crunch, consider incorporating **chopped nuts**, like walnuts or pecans, into your dough. About **½ cup** of finely chopped nuts blended in during the last mixing phase will give your cookies added texture and flavor. This version is particularly great for those who enjoy a heartier cookie and can provide important nutrients as nuts are a great source of healthy fats.
Chocolate Chip Variation: For the chocolate lovers, integrating **dark or white chocolate chips** can add a delightful surprise! You can add about **1 cup of chips** to the dough before you roll it out. This addition can create a lovely contrast between the rich buttery base and the sweetness of the chocolate, making for a delicious combination that will delight both children and adults alike.
Gluten-Free Variation: If you or your guests are gluten-sensitive, you can easily convert this recipe. Use a **1:1 gluten-free baking blend** as a direct substitute for the all-purpose flour, ensuring that your cookies remain crumbly and delicious. Make sure to verify that your powder sugar and any additional mix-ins like chocolate chips are also gluten-free. This option ensures that everyone can indulge in the festivities.
Royal Icing Variation: For a more professional-decorated cookie, consider using **royal icing** instead of traditional icing. Made from egg whites and powdered sugar, royal icing hardens beautifully and allows for intricate designs that are perfect for decorating cookies. You’ll create a softer texture that is also visually appealing, turning your cookies into a show-stopping dessert.
Common Mistakes to Avoid
When embarking on your baking journey, it’s important to be aware of common pitfalls that can affect your cookies. One prevalent mistake is **overmixing the dough**, which results in a dense, tough cookie rather than the light, crumbly texture desired in shortbread. To avoid this, mix just until the ingredients are combined; remember, less is often more when it comes to shortbread!
Another issue is **baking at an incorrect temperature**. A hot oven may cause the edges of your cookies to cook too quickly while leaving the centers raw; on the flip side, if the oven is too cool, they may spread too much. Always preheat your oven thoroughly and consider using an oven thermometer for accuracy.
If you’re decorating with icings, many home bakers make the error of applying icing before the cookies have fully cooled. This can lead to **melting** or running designs. Allow your cookies to cool for at least **30 minutes** before you spread any icing or toppings.
Lastly, using inferior or old ingredients can also detract from your shortbread’s taste. Always opt for fresh, high-quality ingredients, especially your butter, which plays an essential role in the flavor profile. Skipping this step can result in bland cookies that don’t do justice to this delightful recipe.
Storage, Freezing & Reheating Tips
To keep your **Shamrock Shortbread Cookies** fresh, store them in an airtight container at room temperature. They can maintain their delicious taste and texture for up to **one week** this way. For longer storage, consider freezing them. Allow the cookies to cool completely and then arrange them in a single layer on a baking sheet to flash freeze for about 1-2 hours. Once solid, pack them in a freezer-safe container or a heavy-duty freezer bag with layers of parchment paper between. They can last for **up to three months** in the freezer.
When you’re ready to enjoy your frozen cookies, simply take them out and allow them to thaw at room temperature for about **20-30 minutes**. If you prefer a warm cookie, pop them in the oven at a low temperature for a few minutes until warmed through. This revival method almost restores them to their original baked glory, ensuring a delightful treat with minimal effort.
As with all baked goods, keep food safety in mind. If using any cream or custard-based decorations, refrigerate the cookies rather than storing them at room temperature. Remember to check the condition of your ingredients when baking to ensure freshness and quality.
Frequently Asked Questions
Can I use margarine instead of butter for shamrock shortbread cookies?
While margarine can be used, I strongly recommend sticking with unsalted butter for the best flavor and texture. Butter gives the cookies their characteristic richness that margarine simply cannot replicate. If you choose to use margarine, ensure it has a high-fat content to maintain the integrity of the cookie.
How can I make my cookies look prettier for St. Patrick’s Day?
To achieve a more festive appearance, consider using royal icing and food coloring to outline and fill your shamrock cookies. Adding edible decorations like **green sprinkles** or colored sugar before baking also creates a wonderful visual effect without much effort, allowing your cookies to take center stage at your holiday gathering.
Can these cookies be made in advance?
Absolutely! These cookies can be made up to a week in advance. In fact, some say they taste even better a day or two after baking as the flavors meld together. Store them in an airtight container at room temperature or freeze them for longer storage, as mentioned previously.
Is it necessary to chill the dough before baking?
It is not mandatory, but chilling the dough for about **30 minutes** can help to firm it up, making it easier to handle and cut into shapes. Plus, chilling can prevent the cookies from spreading too much during baking, ensuring they maintain their pretty shamrock shapes.
What should I do if my dough is crumbly?
If your a dough turns out to be too crumbly, you can add a tablespoon or two of cold water or milk. Add a little at a time until the dough comes together, but be cautious not to overwork it. A light touch will yield the best results and prevent tough cookies.
Conclusion:
In summary, **St. Patrick’s Day Shamrock Shortbread Cookies** provide a delightful blend of tradition and celebration. Not only are they simple to make, but the flavors and textures are sure to create lasting memories. I encourage you to gather your loved ones, experiment with variations, and make this recipe your own. Don’t forget to share your creations and joy with others; after all, good food is best enjoyed in the company of good friends and family. Happy baking!