Prep time: 25 minutes
Cook time: 45 minutes
Total time: 1 hour 10 minutes
Servings: 8
If you’re searching for a dessert that combines tangy brightness with a silky-smooth texture, look no further than the classic Easter Lemon Tart. This delightful treat not only captures the essence of spring but also provides a refreshing end to any meal. As memories of family gatherings and sunshine-filled afternoons flood back to you, you’ll appreciate how this lemon tart can take center stage on your Easter dessert table or any special occasion year-round. In this recipe, you’ll discover how to achieve that perfect blend of tartness and sweetness, making it an irresistible option even for those who might not be a fan of desserts.
The beauty of this Easter Lemon Tart lies in its simplicity. You won’t need to be a professional pastry chef to pull off this stunning dessert; with just a few essential ingredients and some straightforward steps, you’ll impress your family and friends. In the following sections, I will guide you through the ins and outs of making this elegant dessert, from understanding its origins to the best ways to store it for later indulgence.
What Is Easter Lemon Tart?
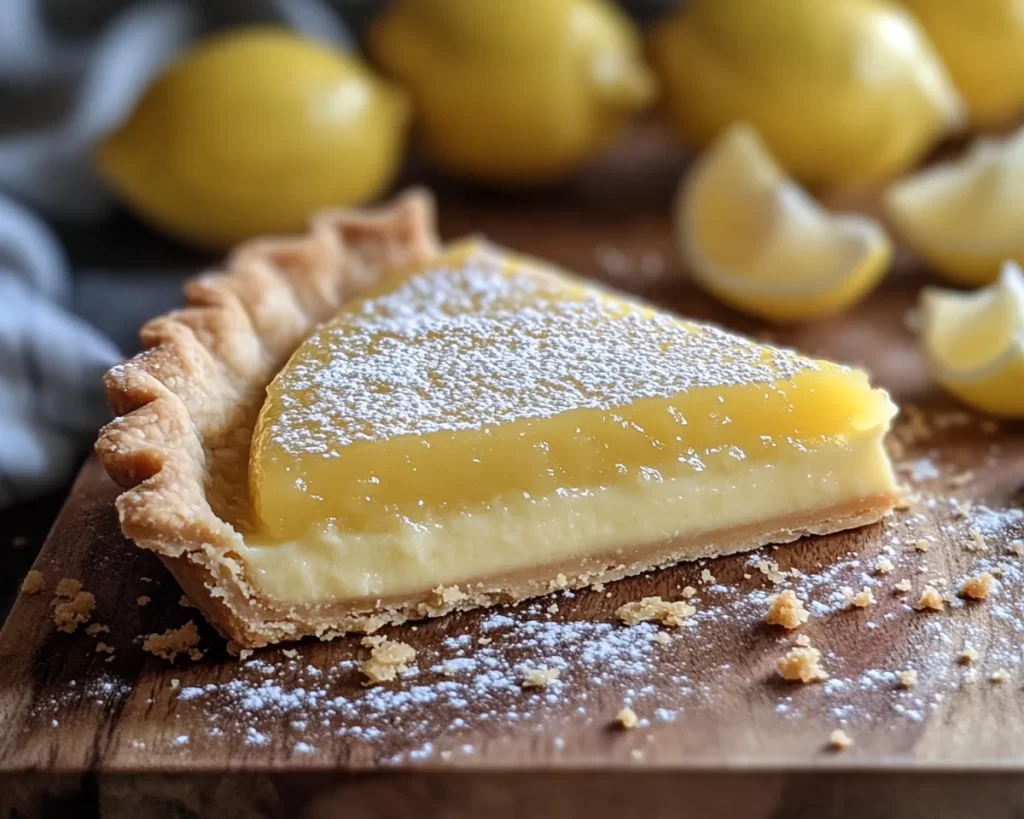
Easter Lemon Tart is a classic dessert that has roots in French cuisine, celebrated for its bright and zesty flavor profile. Often served during springtime and Easter celebrations, this tart features a smooth, creamy lemon filling nestled within a buttery, flaky crust. The combination of these textures creates a mouthwatering experience that balances the sweetness of the sugar with the tartness of the lemon juice, making it a delightful end to any meal.
The outer crust, made with flour, butter, and a touch of sugar, possesses a delicate crunch that gives way to a velvety filling. Often garnished with a dusting of powdered sugar or fresh berries, the presentation is truly stunning. Additionally, the vibrant yellow color of the lemon filling not only pleases the eye but also suggests the refreshing flavors you are about to encounter. For those who enjoy a citrus kick, this tart is nothing short of a celebration on a plate.
Why You’ll Love This
One of the standout aspects of this Easter Lemon Tart is its vibrant flavor that wakes up your taste buds and promises a delightful experience with each bite. The recipe is surprisingly easy to follow, making it perfect for both novice and seasoned bakers. Despite its elegant appearance, you’ll find that you don’t need any advanced skills to create a beautiful tart that’s sure to impress.
Cost-wise, this dessert is quite economical; the ingredients are generally inexpensive and often found in your pantry. The health perspective also shines through, as the tart features natural ingredients, such as eggs and fresh lemons, that contribute essential nutrients. While it certainly satisfies a sweet tooth, you can enjoy it in moderation without feeling guilty. Its versatility allows it to fit various occasions, from casual family dinners to formal spring festivities.
Many people believe that citrus desserts are overly complicated, but this recipe breaks that misconception. With a few breakdowns of the process, you’ll see that it’s easier than it appears, and soon you’ll be making it without second thoughts.
Ingredients You’ll Need
- Flour: Used to create the tart crust. You can substitute with almond or gluten-free flour if needed.
- Granulated sugar: This sweetens the crust as well as the filling. Feel free to use coconut sugar for a more health-conscious option.
- Salted butter: Adds richness to the crust. Unsalted butter can also be used; just remember to adjust the salt content in the recipe.
- Eggs: Essential for thickening the lemon filling. They contribute moisture and structure. Substituting with a flax or chia egg may work for vegan adaptations.
- Lemon juice: The star ingredient that lends the tart its characteristic flavor. Freshly squeezed lemon juice is advised for the best taste.
- Lemon zest: Enhances the citrus notes. It’s best to use organic lemons to avoid pesticides.
- Heavy cream: To add a rich and velvety texture to the filling. You can also substitute with full-fat coconut milk for a dairy-free option.
This list represents the foundations of your Easter Lemon Tart, but don’t hesitate to get creative. Each ingredient plays a significant role in flavor and texture, so understanding their purpose will help you achieve the best result.
How to Make
1. **Prepare the Tart Crust:** Start by mixing together 1 cup of flour and 1/4 cup of sugar in a large mixing bowl. Add 1/2 cup of chilled, diced butter and using a fork or pastry cutter, blend until the mixture resembles coarse crumbs. You want to achieve a sandy texture. Add a splash of cold water, one tablespoon at a time, until the dough holds together but isn’t sticky. Form it into a disc, wrap it in plastic wrap, and refrigerate for 30 minutes.
2. **Preheat Your Oven:** While your dough is chilling, preheat your oven to 350°F (175°C). This is crucial for getting that perfectly baked crust, ensuring even cooking.
3. **Roll Out the Dough:** Once chilled, take the dough out of the refrigerator. On a floured surface, roll out your dough into a circle, about 1/8 inch thick. Carefully transfer it to a tart pan, pressing it into the edges. Trim off any excess dough and prick the base with a fork to avoid bubbles. Refrigerate again for about 10 minutes.
4. **Blind Baking the Crust:** Line the crust with parchment paper and fill with pie weights or dried beans. Bake in the preheated oven for 15 minutes, then remove the weights and parchment, and bake for another 10 minutes until light golden brown. Allow it to cool completely.
5. **Preparing the Filling:** In a mixing bowl, whisk together 3 large eggs and 1 cup of granulated sugar until light and frothy. Then, add in 1/2 cup of freshly squeezed lemon juice, 1 tablespoon of lemon zest, and 1/2 cup of heavy cream. Combine until smooth.
6. **Bake the Tart:** Pour the lemon filling into the cooled tart shell. Bake in the oven for 20-25 minutes, or until the center is set but still slightly jiggly. It will firm up as it cools.
7. **Cool and Serve:** Once baked, remove the tart from the oven and let it cool at room temperature for about an hour. For best results, refrigerate it for at least 2 hours before serving to allow the flavors to meld. Serve with a dusting of powdered sugar or fresh berries for an added touch of sweetness and visual appeal.
This step-by-step process ensures that you not only follow the recipe but also learn the techniques involved in making a perfect Easter Lemon Tart. Remember, practice makes perfect, so don’t hesitate to bake multiple times until you find that sweet spot for flavor and texture.
Variations & Substitutions
Berry-Infused Lemon Tart: If you want an extra layer of flavor, consider adding a berry infusion. You can puree fresh raspberries or blueberries and swirl them into the lemon filling before baking. This not only enhances the tart flavor but adds a beautiful visual contrast. It’s especially wonderful for those who love the combination of citrus and berry. Ensure that the puree contains no seeds for a smoother texture.
Gluten-Free Lemon Tart: To make this recipe suitable for gluten-sensitive individuals, simply substitute the all-purpose flour with a 1:1 gluten-free flour blend. This will maintain the structure of the crust while allowing everyone to enjoy it. Ensure that all other ingredients are gluten-free, especially if you’re using any pre-packaged items.
Vegan Lemon Tart: For those following a plant-based lifestyle, replace the eggs with a mixture of flaxseed meal and water (1 tablespoon of flaxseed meal mixed with 2.5 tablespoons of water equals one egg). For the cream, use coconut cream or cashew cream instead of heavy cream. This substitution will still offer a rich texture without compromising on taste.
Matcha Lemon Tart: If you’re a fan of matcha, try incorporating it into your lemon filling for a unique twist. Mix 1-2 teaspoons of high-quality matcha powder into the lemon filling. This delightful addition brings an earthy flavor that pairs surprisingly well with the tartness of lemons and also presents a stunning green hue.
These variations allow you to personalize your Easter Lemon Tart to suit various diets and flavor preferences while ensuring that it remains a crowd-pleaser.
Common Mistakes to Avoid
One common mistake in making lemon tarts is overcooking the filling. You want it to be *just* set when you take it out of the oven. Overcooking results in a rubbery texture that detracts from the creamy silkiness that you desire. To avoid this, start checking the tart a few minutes before the suggested cooking time. A slightly jiggly center is okay as it will continue to set as it cools.
Another potential pitfall is using bottled lemon juice. While it might be convenient, nothing compares to the vibrant flavor of freshly squeezed lemon juice. The bottled varieties often contain preservatives that can dull the tart’s natural brightness.
Additionally, make sure you properly blind bake your crust. If you skip this step, you risk a soggy bottom that can lead to a less appealing texture. Always use pie weights or dried beans to hold the crust in place while it bakes.
Lastly, letting your tart cool entirely is vital. Cutting into it too early can cause the filling to spill out, ruining the aesthetic and overall enjoyment of the dish.
Storage, Freezing & Reheating Tips
To store your finished Easter Lemon Tart, carefully cover it with plastic wrap or aluminum foil and place it in the refrigerator. It will last for about 3-5 days, maintaining its flavor and texture as long as it’s properly sealed. The tart actually tastes better the next day, as the flavors have more time to meld.
If you want to make it ahead of time, you can freeze it. Ensure it’s completely cooled before wrapping it tightly in plastic wrap and placing it in a freezer-safe container. It can be frozen for up to 2 months. To thaw, simply transfer it to the refrigerator a few hours before you plan to serve it.
Reheating is unnecessary for this dessert, as it is best enjoyed chilled. However, if you prefer it slightly warm, set your oven to a low temperature and place the tart in for a couple of minutes.
Remember to employ food safety best practices, such as keeping your tart covered and ensuring it’s kept at appropriate temperatures to prevent spoilage.
Frequently Asked Questions
Can I use bottled lemon juice instead of fresh?
While you can use bottled lemon juice in a pinch, I strongly recommend sticking to fresh lemon juice for the best flavor. Fresh lemons contain more essential oils and flavor nuances that bring depth to the tart. The bottled versions can often taste flat in comparison.
How do I know when the filling is done baking?
A great way to check is to look for a slight jiggle in the center of the tart while it bakes. It should not appear liquidy, but rather set. Once it cools, it will firm up slightly. This balance is key for achieving that creamy texture you desire.
Can I add more sugar if I prefer a sweeter filling?
You can certainly adjust the sugar to your taste; however, be mindful that this could alter the tartness balance of the lemon. Start with the recommended sugar and add a tablespoon more as needed, tasting as you go to find your ideal sweetness level without compromising the tart character.
Can I make this tart ahead of time?
Absolutely! Easter Lemon Tart is a perfect make-ahead dessert. You can prepare it a day or two in advance, allowing the flavors to develop, which often enhances the taste. Just keep it covered in the refrigerator until ready to serve.
Is it possible to substitute the eggs in the recipe?
Yes, you can substitute eggs to make this a vegan tart. Using flaxseed meal mixed with water works beautifully for this recipe, providing similar binding properties without compromising texture. For each egg, mix 1 tablespoon of flaxseed meal with 2.5 tablespoons of water and let it sit for about 10 minutes to thicken.
Conclusion:
In summary, the Easter Lemon Tart is not just a dessert; it’s a joyful celebration of flavor and freshness perfect for springtime gatherings or any occasion. Its combination of simplicity and elegance makes it a fantastic option for both novice cooks and seasoned bakers. Whether you choose to keep it traditional or add a twist with variations, this tart is bound to become a beloved recipe in your home. So why not give it a try today? You’ll impress your family and friends and create lasting memories with every delicious bite. Share your experiences and feel free to customize it to your liking! Happy baking!