Prep time: 20 minutes
Cook time: 50 minutes
Total time: 1 hour 10 minutes
Servings: 12 servings
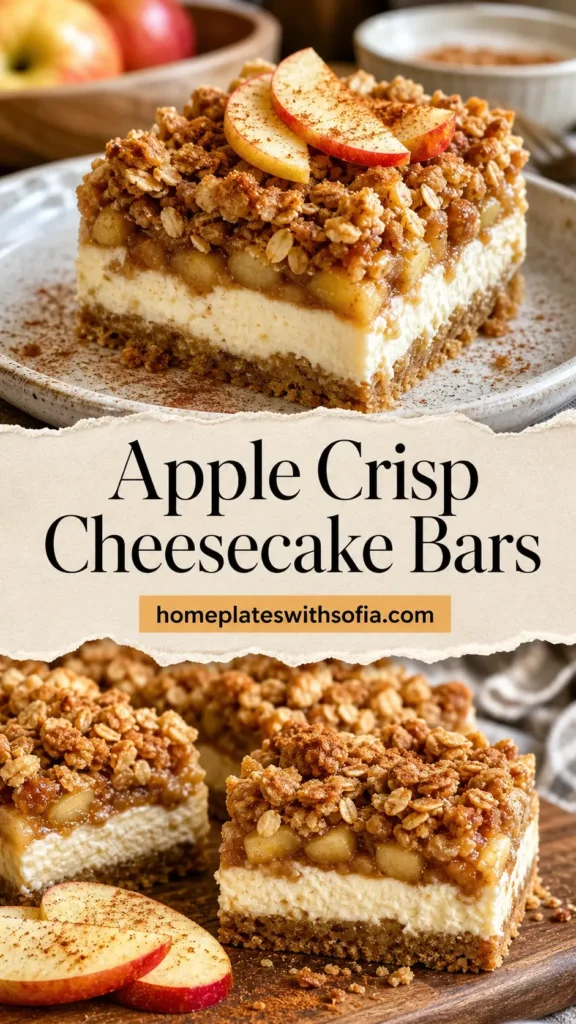
Apple Crisp Cheesecake Bars for Potluck are a sumptuous, dessert concoction that’s both comforting and delightful to eat. Combining the types of dessert we all love, these bars take the robust taste of classic apple crisp and marry it with the creamy perfection of cheesecake. Whether it’s a family gathering or a community potluck, these bars are sure to impress. As you dive into these treats, you’ll notice the contrasting textures—the creamy cheesecake against the crunchy topping—creating a mouthwatering experience every bite.
What Is Apple Crisp Cheesecake Bars for Potluck?
Apple Crisp Cheesecake Bars are delightful desserts that come in easy-to-eat squares, making them perfect for sharing. Layered with a smooth cheesecake filling, spiced apples, and topped with a crispy streusel, they strike a beautiful balance between rich and refreshing. Unlike traditional apple crumble, the addition of the cheesecake layer adds a creamy richness, making these bars not just another dessert but an irresistible treat people will be talking about long after the potluck.
Why You’ll Love This
There are countless reasons to love Apple Crisp Cheesecake Bars! First and foremost, they combine your favorite flavors into a single dessert. The sweetness of the apples brings a seasonal touch, while the cream cheese layer contributes a luxurious texture. Moreover, these bars can be made ahead of time, so they’re an excellent option for busy parents or anyone looking to save time in the kitchen. They are also highly adaptable; you can customize them to meet dietary preferences or simply switch up the fruit. The results are consistently delicious, making them a go-to recipe for any occasion.
Ingredients You’ll Need
- For the crust and topping:
1 ½ cups all-purpose flour – This provides the base structure of the bars, giving them their sturdy yet tender texture.
- ½ cup brown sugar:
Brown sugar adds moisture and a rich flavor thanks to its molasses content.
- ½ cup unsalted butter:
This enhances the richness and helps create that deliciously crumbly texture.
- 1 cup rolled oats:
Oats contribute chewiness and help create the crispy topping you’ll love.
- For the filling:
2 cups cream cheese – This is essential for the creamy cheesecake layer.
- 1 cup granulated sugar:
This sweetens the cheesecake filling and balances the tartness of the apples.
- 3 large eggs:
Eggs provide structure and stability to the cheesecake.
- 1 teaspoon vanilla extract:
Vanilla enhances the overall flavor profile of the cheesecake.
- For the apple layer:
3 cups peeled and sliced apples – Choose your favorite baking apples like Granny Smith or Honeycrisp for their balance of sweetness and tartness.
How to Make
- Preheat your oven to 350°F (175°C). This step is essential for achieving the perfect bake—without preheating, your bars may not cook evenly.
- Begin by preparing the crust. In a large mixing bowl, combine the flour, brown sugar, and rolled oats. Mix in the melted unsalted butter until the mixture resembles coarse crumbs. Reserve a cup for the topping and press the rest into the bottom of a greased 9×13-inch baking dish.
- Next, prepare the cheesecake filling. In another bowl, beat together the cream cheese and granulated sugar until smooth and creamy. Add the eggs one at a time, mixing well after each addition. Finally, mix in the vanilla extract for a delightful flavor.
- Spread the cream cheese mixture over your crust in the baking dish. Follow this with the sliced apples evenly distributed on top. You can sprinkle a little cinnamon over the apples for an extra aromatic touch.
- Finish by sprinkling the reserved crumble mixture over the apples. This will create a crunchy topping that contrasts beautifully with the creamy filling.
- Bake in the preheated oven for 40-50 minutes, or until the topping is golden brown and the cheesecake layer is set. You might notice a slight jiggle, but don’t worry; it will firm up while cooling.
- Allow the bars to cool completely before slicing. Refrigerating them for at least an hour will help them set even more, making it easier to cut clean pieces.
Variations & Substitutions
Spiced Pear Variation: For a delightful twist, replace the apples with pears. Add a touch of nutmeg along with the cinnamon for additional warmth and flavor. The subtle sweetness of pears offers a lovely alternative that pairs wonderfully with cheesecake.
Maple Pecan Variation: Instead of apples, use chopped pecans and give a drizzle of maple syrup over the top before adding the crumbly topping. This adds a nutty crunch and a deep, rich sweetness to the bars.
Dairy-Free Option: For those needing a dairy-free version, consider using coconut cream as a substitute for cream cheese and almond butter in place of butter in the crust. Your bars will have a unique flavor, but they’ll still satisfy that sweet tooth!
Gluten-Free Option: Substitute the all-purpose flour with a gluten-free flour blend, ensuring that all other ingredients are certified gluten-free. This way, you can enjoy these delightful bars without compromising on taste or texture.
Common Mistakes to Avoid
When making Apple Crisp Cheesecake Bars, one common mistake is not properly measuring ingredients. Baking is a science that requires precise measurements. Too much flour can lead to a dry texture, while too little sugar can affect sweetness. Always measure accurately to ensure the best results.
Another mistake is skipping the cooling time. Many are eager to dive into these bars immediately, but allowing them to cool fully helps the cheesecake set up, making it easier to slice without falling apart.
Finally, using the wrong type of apples can affect the flavor profile. Always choose a variety that holds up well in baking, such as Granny Smith, to maintain that perfect balance of tartness and sweetness.
Storage, Freezing & Reheating Tips
To store Apple Crisp Cheesecake Bars, keep them covered in the refrigerator for up to five days. If you want to keep them longer, consider freezing them. To do this, slice the bars and wrap each piece individually in plastic wrap and then in aluminum foil. They can be frozen for up to three months.
For reheating, thaw the bars in the fridge overnight, or allow them to sit at room temperature for about an hour. For a warm dessert, you can microwave individual pieces for about 15-20 seconds, or reheat them in an oven at 325°F (163°C) for about 10 minutes.
Frequently Asked Questions
Can I make these bars ahead of time?
Absolutely! These bars can be made a day in advance and stored in the refrigerator. This helps enhance the flavors as they sit, making them even more delicious for your potluck.
What can I serve alongside these bars?
Consider serving them with a dollop of whipped cream or a scoop of vanilla ice cream. The contrast of temperature and texture enhances the overall dessert experience, turning it into a decadent treat.
Can I use a different fruit?
Yes! While apples are classic, feel free to experiment with fruits like peaches, cherries, or berries. Each fruit will add a distinct flavor and aroma, making each bar unique.
How do I know when the cheesecake bars are done baking?
Look for a golden-brown topping and a center that’s set yet slightly jiggly. Remember, they will continue to firm up as they cool, so be cautious not to overbake!
Can I double the recipe?
Certainly! Just use a larger baking dish and keep an eye on the baking time, as it may need a few extra minutes if the volume increases significantly.
Conclusion:
Apple Crisp Cheesecake Bars for Potluck are not only delicious but also versatile and easy to prepare. With their rich flavors, satisfying textures, and endless variations, they will undoubtedly become a favorite in your dessert repertoire. Enjoy them at gatherings, or simply as a sweet treat for yourself at home!