Prep time: 20 minutes
Cook time: 30 minutes
Total time: 50 minutes
Servings: 8
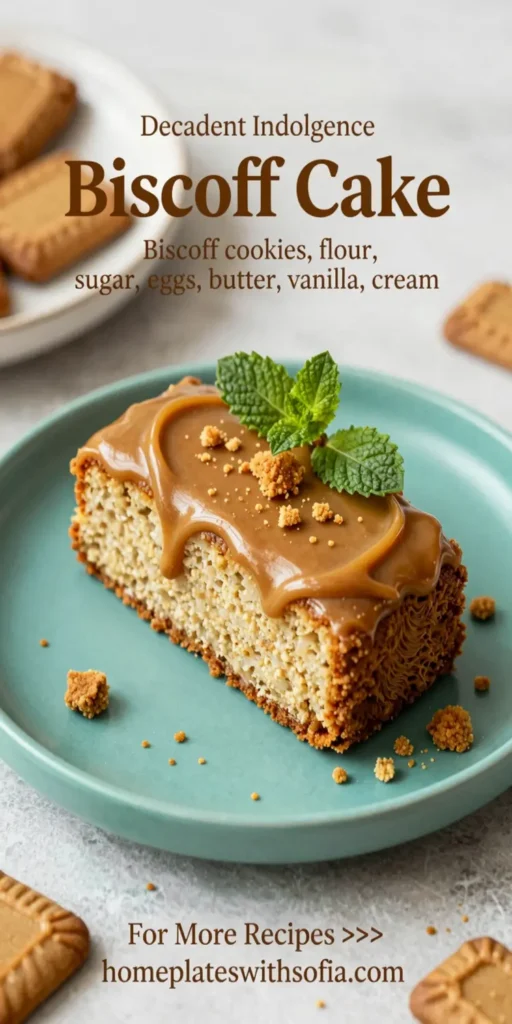
Biscoff cake is a deliciously indulgent dessert that captures the rich, caramelized flavors of Biscoff cookies. This cake is perfect for celebrations or just a cozy afternoon at home. Its moist and fluffy texture, complemented by creamy frosting, makes it a treat everyone can enjoy.
What Is Biscoff Cake?
Biscoff cake is a popular dessert inspired by the beloved Biscoff cookie, known for its unique caramel flavor and crunchy texture. The cake is typically made with crushed Biscoff cookies incorporated into the batter, which not only enhances the flavor but also gives it a delightful crumb. Often layered with a creamy Biscoff spread or frosting, this cake becomes an irresistible treat suitable for any occasion.
Why You’ll Love This
You will love this cake for its rich flavor and simple preparation! It’s particularly appealing for busy parents and novice bakers, delivering a great centerpiece dessert with minimal effort. With its distinct taste, it’s perfect for gatherings and celebrations, impressing guests while maintaining affordability and ease. Plus, Biscoff cookie enthusiasts will find their favorite treats embedded within the fluffy layers, creating a delicious experience.
Ingredients You’ll Need
- 1 ½ cups all-purpose flour: This is the base ingredient, creating the main structure in the cake. Sifting flour will help to ensure a lighter texture.
- 1 cup granulated sugar: Sugar not only sweetens the cake but helps to create that tender crumb due to its ability to retain moisture.
- ½ cup unsalted butter (softened): Softened butter adds richness and moisture, making the cake incredibly soft and flavorful.
- 2 large eggs: Eggs help to bind the ingredients together and also contribute to the cake’s structure and texture.
- ½ cup buttermilk: The acidity in buttermilk tenderizes proteins in the flour for a softer cake.
- 1 cup crushed Biscoff cookies: This key ingredient adds the signature caramel flavor and a slight crunch to the cake.
- 1 teaspoon baking powder: Baking powder acts as a leavening agent, helping the cake to rise.
- 1 teaspoon baking soda: Another leavening agent that works in conjunction with the baking powder for the perfect lift.
- ½ teaspoon salt: Salt enhances the flavor profile of the cake and balances the sweetness.
- 1 teaspoon vanilla extract: This adds a warm and inviting flavor that complements the Biscoff beautifully.
- Biscoff spread (for frosting): Use this creamy spread for a luscious and indulgent frosting, elevating the cake’s flavor.

How to Make
- Preheat your oven to 350°F (175°C): Preheating ensures that your cake bakes evenly. Prepare two 9-inch round cake pans by greasing them and placing parchment paper at the bottom.
- In a mixing bowl, cream the butter and sugar: Using an electric mixer, beat the softened butter and sugar together until light and fluffy, about 3-5 minutes. This process incorporates air into the butter, which helps the cake rise.
- Add the eggs, one at a time: Mixing in the eggs individually allows them to fully incorporate, resulting in a smoother batter. Scrape the bowl as needed to ensure everything is well mixed.
- Mix in the buttermilk and vanilla extract: Incorporate these wet ingredients carefully, mixing just until combined. Overmixing can lead to a denser cake.
- Combine the dry ingredients: In a separate bowl, mix the flour, baking powder, baking soda, and salt. Gradually add this dry mixture to the wet ingredients, mixing gently until no pockets of flour remain.
- Fold in the crushed Biscoff cookies: Gently fold in the crushed cookies, which adds a delightful crunch and flavor to the batter. Be careful not to overmix at this stage.
- Pour the batter into prepared cake pans: Divide the batter evenly between the two pans. Smooth the tops with a spatula to ensure even baking.
- Bake for 25 to 30 minutes: Check for doneness by inserting a toothpick in the center of the cakes. It should come out clean or with a few moist crumbs.
- Cool the cakes: Allow the cakes to cool in the pans for 10 minutes before transferring them to a wire rack to cool completely. This prevents the cakes from becoming soggy.
- Prepare the Biscoff frosting: In a bowl, beat together the Biscoff spread and softened butter until combined. Gradually add powdered sugar and a splash of milk, whipping until fluffy and smooth.
- Assemble the cake: Place one layer on a serving plate, spread a generous layer of Biscoff frosting on top, and then place the second layer on top of this. Add frosting to the top and sides of the cake for a finished look.
- Decorate if desired: Use crushed Biscoff cookies or drizzles of Biscoff spread on top for a visually appealing presentation.
Variations & Substitutions
Chocolate Biscoff Cake: For chocolate lovers, substitute ½ cup of flour with cocoa powder, enhancing the cake with a rich chocolate flavor while still maintaining the beloved Biscoff essence. Top with chocolate ganache for an indulgent twist that pairs perfectly with the Biscoff spread.
Gluten-Free Option: To make a gluten-free Biscoff cake, replace all-purpose flour with a gluten-free 1:1 baking mix. Ensure the Biscoff cookies you use are also gluten-free. This adjustability allows everyone to enjoy this delicious dessert.
Vegan Version: Creating a vegan Biscoff cake involves replacing eggs with flaxseed meal and using plant-based butter and soy or almond milk instead of buttermilk. This makes it incredibly accessible while maintaining that distinctive Biscoff flavor.
Common Mistakes to Avoid
One common mistake is not properly measuring the flour, which can lead to a dense cake. Always spoon flour into your measuring cup and level it off with a knife for the best results.
Another issue is overmixing the batter, which can cause the cake to become tough and chewy. Mix just until combined for the perfect texture.
Failing to cool the cakes completely before frosting can also lead to a messy situation, with the frosting melting and sliding off. Patience is key here!
Storage, Freezing & Reheating Tips
To store your Biscoff cake, cover it tightly with plastic wrap or keep it in an airtight container. It remains fresh at room temperature for up to three days, making it a perfect dessert for gatherings. If you need to keep it longer, consider freezing it. Wrap each layer separately in plastic wrap and store in a freezer-safe bag. You can freeze it for up to three months.
To reheat, simply let it defrost in the refrigerator overnight and enjoy at room temperature. If you would like a warm slice, pop it in the microwave for a few seconds, but ensure not to overhear it to maintain its moist texture.
Frequently Asked Questions
Can I use Biscoff spread instead of cookies?
Yes, you can use Biscoff spread as a replacement for some of the butter in the recipe if you want to intensify the Biscoff flavor. Just remember that it may slightly alter the texture, making it more dense.
How do I know when my cake is baked?
To check for doneness, insert a toothpick into the center of the cake. If it comes out clean or with a few crumbs, your cake is done. If it has wet batter on it, give it a few more minutes.
Can I make this cake ahead of time?
Absolutely! You can bake the cake layers a day in advance and store them wrapped tightly until you’re ready to frost and serve. This can save time on the day of your event or celebration.
What should I do if my cake is too dry?
If your cake turns out dry, you can brush it with simple syrup after baking to add moisture. Just mix equal parts sugar and water, heat until dissolved, and brush it onto the cake layers before frosting.
Can I use different flavors of cookies in this recipe?
Certainly! Feel free to experiment with other types of flavored cookies, such as speculoos or ginger snaps, to achieve different flavor profiles while still keeping the original concept of the cake intact.
Conclusion: In summary, making a Biscoff cake is a joyous baking adventure that yields a wonderfully delectable treat. With this detailed recipe, step-by-step guidance, and helpful tips, you’re set to create a scrumptious Biscoff masterpiece. Enjoy creating this cake and delight in the smiles it brings to everyone who tries it. Happy baking!