**Meta Title:** Butterfinger Peanut Butter Pie Recipe – Decadent Delight
**Meta Description:** Indulge in a creamy and crunchy Butterfinger Peanut Butter Pie. This easy recipe is perfect for dessert lovers and guaranteed to impress!
—
You know that dreamy, utterly blissful moment when a slice of pie meets your taste buds, and it feels like a fiesta of flavor exploding in your mouth? If you’re anything like me, that is the exact experience you long for when dessert calls your name. Enter the Butterfinger Peanut Butter Pie — a luscious concoction that combines the creaminess of peanut butter with the delightful crunchiness of Butterfinger candy bars. Trust me, this pie is not just dessert; it’s an experience, a slice of nostalgia wrapped in a delightful treat that will steal your heart and leave your family and friends begging for more.
This Butterfinger Peanut Butter Pie is incredibly easy to make and delivers a decadent punch that will make any occasion feel special. You’ll learn how to create this delightful pie from scratch, complete with a buttery cookie crust, a rich filling, and topped with those beloved Butterfinger pieces. Are you ready? Let’s dive into this mouth-watering recipe!
What is Butterfinger Peanut Butter Pie?
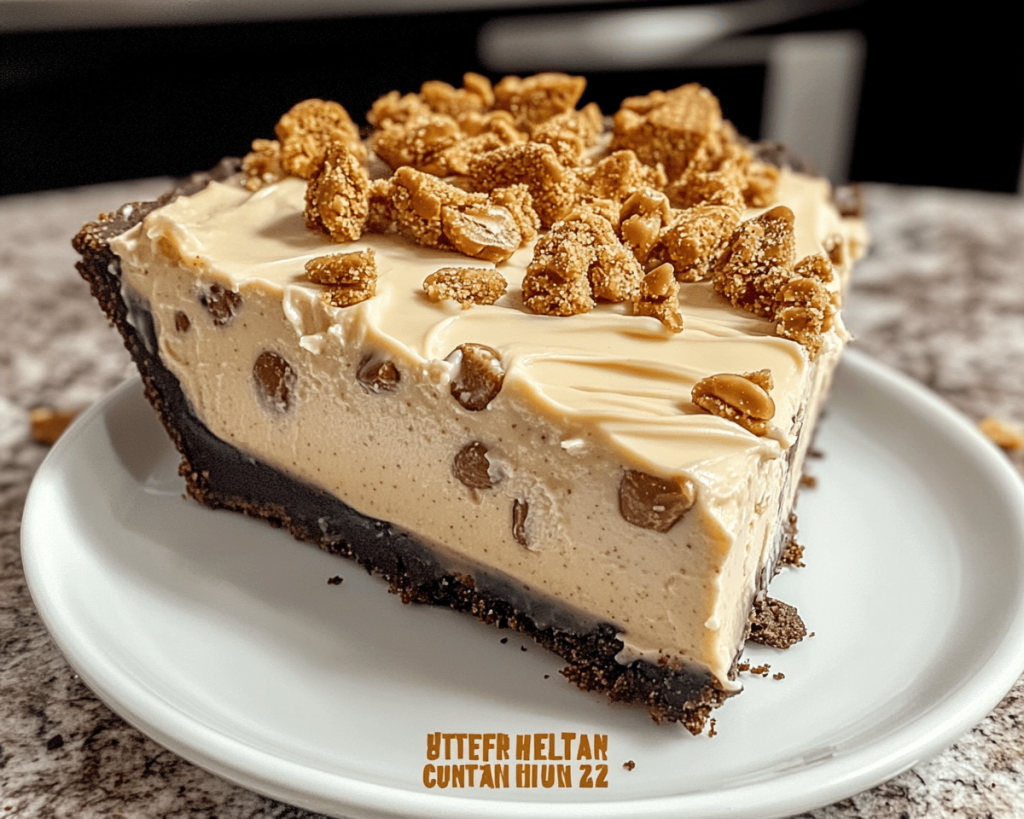
Butterfinger Peanut Butter Pie is a delightful dessert that marries the rich flavors of creamy peanut butter and sweet, crunchy Butterfinger candy bars. Originating from American kitchens, it has become a favorite at parties, barbecues, and holiday gatherings. Each bite of this pie is a sweet mix of velvety smoothness and crunchy goodness, making it an irresistible treat for peanut butter lovers.
The base is formed from crushed graham crackers blended with buttery goodness that forms a sturdy crust, while the filling is a heavenly blend of peanut butter and cream cheese, sweetened to perfection. Topped off with whipped cream and, of course, generous shavings of Butterfinger, the texture transitions beautifully from creamy to crunchy. People love this pie not only for its irresistible taste but also for its eye-catching presentation and delightful simplicity.
Why You’ll Love This Butterfinger Peanut Butter Pie
This Butterfinger Peanut Butter Pie stands out for numerous reasons. First and foremost, it’s incredibly easy to prepare. With just a handful of ingredients and minimal cooking skills required, you’ll impress even the most critical dessert aficionados in your life. **Time-saving** is another fabulous attribute. Toss this beauty together in about 30 minutes, and let it chill while you ponder your next culinary masterpiece.
But the real showstopper is the **flavor** combination. The luscious peanut butter filling, rich yet airy from the whipped cream, contrasts beautifully with the delightful crunch of the Butterfinger topping. You get layers of textures and flavors that leave you craving more, which is exactly why you’ll want to share it (or not!).
The pie is also perfect for **meal prep**; make it ahead of time, and it’ll keep your guests happy while allowing you to focus on other aspects of your gathering. It’s budget-friendly too, ensuring you can indulge without breaking the bank. So whether you’re hosting a family dinner, celebrating a special occasion, or just looking to satisfy that sweet tooth, this pie has all your bases covered.
Ingredients You’ll Need
For this irresistible Butterfinger Peanut Butter Pie, gather the following ingredients:
1. **Graham cracker crumbs** (1 ½ cups): The base of your pie, providing a sweet, buttery foundation. For a twist, consider using chocolate crackers for an extra chocolaty flavor.
2. **Unsalted butter** (½ cup or 1 stick, melted): It brings the graham cracker crust together and gives a richness that complements the peanut butter filling.
3. **Cream cheese** (8 ounces, softened): This adds creaminess and helps hold the filling together, creating a smooth texture.
4. **Powdered sugar** (½ cup): Sweetens the filling without adding graininess. You can adjust based on your sweetness preference.
5. **Peanut butter** (1 cup): The star of the show! Use creamy peanut butter for smoothness or crunchy for extra texture.
6. **Whipped topping** (8 ounces, thawed): Lightens the filling, making it airy and delightful to eat. You can use homemade whipped cream if you prefer.
7. **Butterfinger bars** (2-3, crushed, plus more for garnish): These are the magic ingredient that adds a delicious crunch and chocolatey flavor.
How to Make Butterfinger Peanut Butter Pie
Follow these easy steps, and you’ll have an irresistible pie that will wow your taste buds!
1. **Prepare the Crust**: In a medium mixing bowl, combine the graham cracker crumbs and melted butter. Mix until the crumbs are well-coated and resemble wet sand. Press this mixture firmly into the bottom and up the sides of a pie pan using your fingers or the bottom of a measuring cup. Bake it in a preheated oven at 350°F (175°C) for 8-10 minutes until lightly golden. This step adds a lovely firmness to your crust and intensifies that buttery flavor. Allow it to cool completely once it’s out of the oven.
2. **Make the Filling**: In a large mixing bowl, beat the softened cream cheese until it’s smooth and creamy with an electric mixer. Add the powdered sugar and peanut butter, mixing until fully incorporated and smooth. This heavenly blend should be thick, creamy, and oh-so-irresistible!
3. **Incorporate Whipped Topping**: Gently fold in the thawed whipped topping until no streaks remain. This step is crucial; it aerates the filling, making your pie luxuriously light. You want to maintain that airy texture, so be gentle but ensure everything is combined well.
4. **Fill the Crust**: Carefully spread the peanut butter mixture into the cooled graham cracker crust. Use a spatula to level the top if you wish; this will help with presentation later. Don’t skimp on taste—savor the filling before moving on to the next step!
5. **Chill the Pie**: Cover the pie with plastic wrap and refrigerate for at least 4 hours, although overnight is best. This chilling time allows the flavors to meld beautifully and enhances the pie’s overall texture.
6. **Add Toppings**: After chilling, remove the pie from the refrigerator and top with additional whipped topping. Sprinkle generously with crushed Butterfinger bars, creating a delightful crunch on top. You can drizzle some chocolate syrup for a dramatic effect if you’re feeling fancy!
Tips, Tricks & Variations
– **Storage**: Store any leftover pie in an airtight container in the refrigerator for up to 5 days. The flavors only get better, trust me!
– **Freezing**: You can freeze this pie for up to 2 months! Just make sure you wrap it tightly in plastic wrap and then foil to prevent freezer burn. Thaw it in the fridge before serving.
– **Make it Vegan**: Substitute the cream cheese with vegan cream cheese, use coconut whipped cream for the topping, and replace regular butter with coconut oil in the crust.
– **Extra Crunch**: For an added crunch, try mixing in mini chocolate chips or additional chopped nuts into the filling before spreading it into the crust.
– **Personalize It**: Feel free to swap Butterfinger with other candies like Snickers or Reese’s for a fun twist that fulfills your cravings. Each will add their unique flavors and textures!
What to Serve With Butterfinger Peanut Butter Pie
This delectable pie is also a wonderful companion for various side dishes and flavors! Consider serving it alongside a scoop of **vanilla ice cream** for a warm and cold sensation or a drizzle of **chocolate or caramel sauce** that will complement the sweetness perfectly. For beverages, a glass of **milk** pairs beautifully with this rich dessert, while a robust **coffee** can offer a delightful contrasting flavor.
You can accompany it with fresh fruits like sliced strawberries or raspberries, whose tartness balances nicely with the pie’s sweetness. Each bite of the pie paired with a fruit will knock your culinary experience up a notch!
Nutrition & Health Benefits
While this pie is undoubtedly indulgent, it does offer some nutritional benefits, especially valuable in the peanut butter filling, which is a good source of protein and healthy fats. Each serving contains approximately 340 calories, depending on the size. It’s essential to enjoy it in moderation as part of a balanced diet.
For more in-depth nutritional insights, you can visit trusted sources like [Healthline](https://www.healthline.com) or [USDA](https://fdc.nal.usda.gov/) to understand the health aspects of the ingredients you’re using.
Frequently Asked Questions
1. **Can I use homemade whipped cream instead of store-bought?**
Absolutely! Homemade whipped cream can add a fresh taste and luscious texture that’s hard to beat. Make sure to chill it well so it holds up for pie topping!
2. **What can I use as a substitute for graham crackers?**
You can use digestive biscuits, vanilla wafers, or even crushed chocolate cookies for a new flavor twist. Just keep in mind that different cookies may slightly alter the flavor profile of the crust.
3. **How can I ensure my pie sets well?**
Chilling the pie for a sufficient amount of time is key — aim for at least four hours although overnight is best. This allows the filling to firm up nicely.
4. **Can I make the pie gluten-free?**
Yes! Just opt for gluten-free graham cracker crumbs or substitute with ground nuts and coconut for the crust. Many stores also have gluten-free cookie alternatives.
5. **What’s the best way to cut the pie?**
To get clean slices, use a sharp knife dipped in hot water. The heat helps the knife glide through the creamy filling without making a mess!
Conclusion
There you have it, your ticket to an extraordinary dessert experience with the creamy, crunchy delight of Butterfinger Peanut Butter Pie! It’s not just a recipe; it’s a way to create lasting memories around the table, celebrating life’s sweet moments. The next time you crave something truly special, whip out this recipe, and your loved ones will thank you for introducing them to such decadence. If you make this pie, I’d love to see your creations! Snap a picture and tag me on Instagram, or leave a comment below sharing your thoughts. Happy pie baking!