Prep time: 20 minutes
Cook time: 30 minutes
Total time: 50 minutes
Servings: 8 servings
Cherries in the Snow Dessert is a delightful and visually appealing dish that captivates both the eyes and the taste buds. With its layers of creamy goodness and a beautiful cherry topping, this dessert is perfect for any occasion, from family gatherings to holiday celebrations. The contrast between the fluffy layers and the tart cherries creates a delightful harmony that is simply irresistible. Whether you’re a seasoned baker or just starting in the kitchen, this recipe is straightforward and rewarding. Plus, it requires minimal preparation and is sure to impress your family and friends.
What Is Cherries in the Snow Dessert?
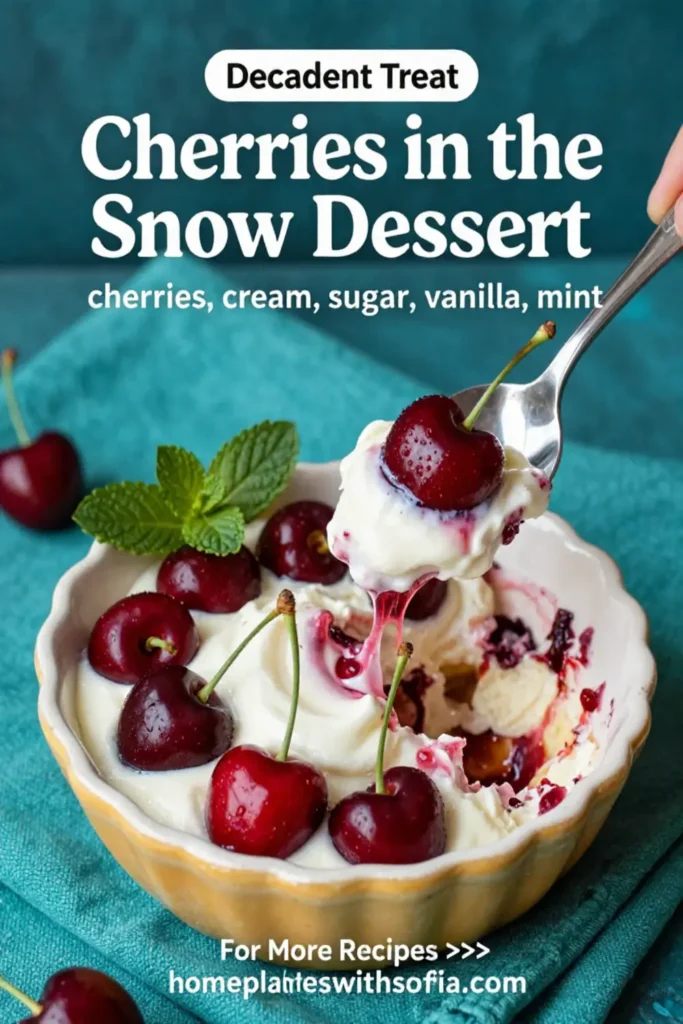
Cherries in the Snow Dessert is a classic American dessert that prominently features sweet cherries on a bed of creamy, cloud-like layers. Typically made with a combination of cream cheese, whipped topping, and a delicious graham cracker crust, this recipe captures the essence of summer with the bright, fruity topping. The dessert is chilled to perfection, allowing the flavors to meld and creating a refreshing treat that is rich yet light. The name evokes the image of snow-covered peaks, where the fluffy layers resemble fresh snow, topped with vibrant red cherries that stand out beautifully against the white backdrop.
Why You’ll Love This
There are numerous reasons to adore Cherries in the Snow Dessert. Firstly, it’s incredibly easy to prepare, making it perfect for busy parents or kitchen beginners. With just a few ingredients, you’ll have a stunning dessert that requires no baking. This is particularly advantageous during hot summer months when the last thing anyone wants to do is turn on the oven. The flavors are well-balanced and appealing to a wide range of palates. The sweet and tangy cherries provide a burst of flavor, while the creamy layers offer a smooth and satisfying mouthfeel. Each bite is a delightful contrast, making it a memorable dessert option for any gathering.
Ingredients You’ll Need
- 1 cup graham cracker crumbs: This will form the base of your dessert, offering a slightly sweet and crunchy texture.
- 1/2 cup melted butter: To bind the crumbs together and provide a rich flavor.
- 8 oz cream cheese, softened: Offers a rich and creamy base for the dessert.
- 1 cup powdered sugar: Sweetens the cream cheese and gives the dessert a smooth texture.
- 1 cup whipped topping: Adds a light and airy texture that balances the creaminess of the cream cheese.
- 2 cups cherry filling: Provides a sweet and tangy topping that adds visual appeal and flavor contrast to the dessert.

How to Make
- Begin by preheating your oven to 350°F (175°C). In a large mixing bowl, combine the graham cracker crumbs and melted butter. Mix until the crumbs are evenly coated with butter, creating a moist and crumbly mixture. This combination will serve as the crust of your dessert.
- Press the graham cracker mixture firmly into the bottom of a 9×13-inch baking dish. Make sure to pack it tightly to create a solid base that won’t crumble when you cut the dessert later. Bake the crust for about 10 minutes until it is lightly golden and fragrant. Allow it to cool completely.
- Next, in a separate bowl, beat the softened cream cheese with a hand mixer until it is smooth and creamy. Gradually add the powdered sugar, beating until fully combined to eliminate any lumps. The mixture should be light and fluffy.
- Gently fold in the whipped topping, mixing until no white streaks remain. This step is crucial as it brings in air and lightness to the dessert, ensuring a lovely texture that contrasts beautifully with the cherries. Pour the cream cheese mixture over the cooled crust and spread it evenly.
- Finally, top the cream cheese layer with the cherry filling. Spread it evenly across the top, allowing the vibrant cherries to shine. Cover the baking dish with plastic wrap and refrigerate for at least 2-3 hours or until set. The chilling time helps the layers meld together.
- Once set, cut into squares and serve adorned with additional cherries if desired. Enjoy the delightful contrast of textures and flavors!
Variations & Substitutions
Dairy-Free Option: You can easily adapt this recipe for a dairy-free version by using dairy-free cream cheese and whipped topping. Look for brands that use coconut cream or almond-based products to maintain a creamy texture without the dairy.
Fruit Toppings: While cherries are the star in this dessert, feel free to experiment with other fruits. Try strawberries, blueberries, or even a mixed berry topping for a colorful twist. Some people enjoy using pie filling as a shortcut for flavor and convenience.
Gluten-Free Crust: To cater to gluten-sensitive individuals, use gluten-free graham crackers or crushed nuts to replace the regular graham cracker crumbs. This will still give a delicious base while accommodating dietary needs.
Common Mistakes to Avoid
One common mistake is not allowing the crust to cool completely before adding the cream cheese layer. This can result in a soggy texture, which detracts from the overall enjoyment of the dessert. Be sure to give the crust enough time to cool.
Another error is overmixing the cream cheese. If you beat the cream cheese too much, you might end up with a grainy texture instead of the desired smoothness. Avoid overbeating! Just mix until smooth before folding in the whipped topping.
Lastly, some may overlook the chilling process, resulting in a dessert that doesn’t hold its shape. Patience is key! Make sure to refrigerate for at least a few hours to allow the layers to set properly.
Storage, Freezing & Reheating Tips
Cherries in the Snow Dessert can be stored in the refrigerator for up to 3 days in an airtight container. To ensure it stays fresh, cover it well with plastic wrap or aluminum foil to prevent drying out.
For longer storage, this dessert can be frozen. Slice the dessert into squares and place them in a single layer in a freezer-safe container. It’s best to freeze the bars without the cherry topping and add it fresh after thawing. The dessert can be frozen for up to 3 months.
To thaw, simply transfer the container to the refrigerator for several hours or overnight before serving. Avoid reheating, as this dessert is best served chilled.
Frequently Asked Questions
Can I use fresh cherries instead of cherry filling?
Absolutely! Fresh cherries can be used for a more natural and less sweet option. Just pit and slice them, then mix with a bit of sugar and lemon juice to create a sweet-tart topping that complements the creamy layers.
Can I double the recipe?
Yes, you can definitely double the recipe to serve a larger crowd. Just make sure to use a larger baking dish and adjust chilling times accordingly. A larger pan will need more time in the fridge for the layers to set properly.
Can I prepare this dessert in advance?
Yes, this dessert can be made a day in advance. It actually improves in flavor when allowed to chill overnight, as the flavors have more time to marry together.
What can I use as a substitute for graham crackers?
If you don’t have graham crackers, digestive biscuits or vanilla wafers can be excellent substitutes. Alternatively, you can use crushed nuts mixed with a bit of melted butter for a gluten-free option.
Is it okay to leave this dessert out at room temperature?
While it’s tempting to serve it immediately, it’s best to keep the dessert refrigerated until just before serving. If left out for more than 2 hours at room temperature, it should be discarded for food safety reasons.
Conclusion: Cherries in the Snow Dessert is a stunning and delicious treat that is surprisingly easy to make. Its combination of creamy layers and fruity toppings creates a perfect balance of flavors and textures, making it an ideal choice for any occasion. By following this recipe, you’ll impress family and friends with a dessert that is both beautiful and delectable. Don’t forget to explore the variations to suit your tastes, and enjoy a slice of this delightful indulgence.


