Prep time: 10 minutes
Cook time: 15 minutes
Total time: 25 minutes
Servings: 8
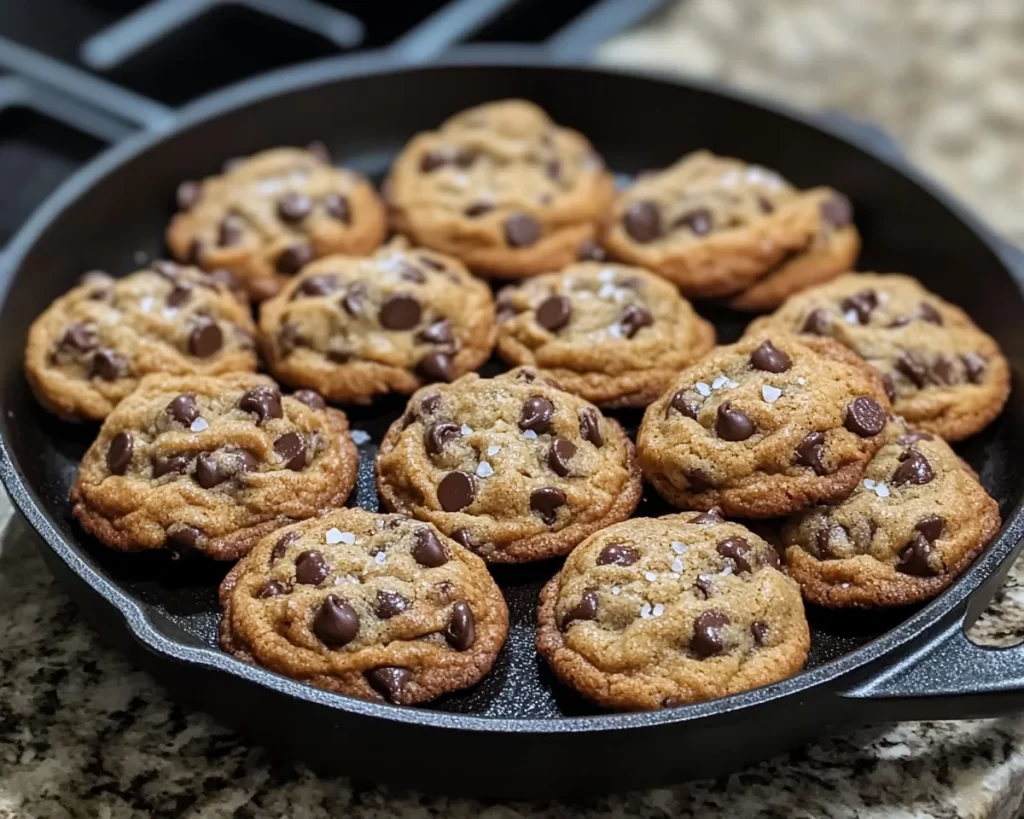
Chocolate Chip Cookies: Sea Salt Brown Butter Chocolate Chip Skillet Cookie is a delightful treat that combines the rich flavor of brown butter with the classic taste of chocolate chip cookies. This recipe is not only quick to prepare, but it also brings a sense of comfort and nostalgia that many of us associate with home baking. Perfect for busy parents, kitchen beginners, or anyone looking for an instant dessert fix, this dish is sure to become a household favorite.
What Is Chocolate Chip Cookies: Sea Salt Brown Butter Chocolate Chip Skillet Cookie in 25 Minutes?
This recipe is a unique twist on the beloved chocolate chip cookie, featuring the nutty, caramel-like flavors of brown butter, all baked conveniently in a skillet. The addition of sea salt elevates the sweetness, making each bite a delightful balance of flavors. The skillet method also gives a fantastic crispy edge with a chewy center, perfect for those who enjoy a multi-textured cookie experience.
Why You’ll Love This
You will love this recipe because it is incredibly easy to make yet delivers gourmet results. The inviting aroma of the brown butter mixed with chocolate chips fills your kitchen and warms your heart. This skillet cookie not only serves as a delightful dessert but can also be enjoyed warm with a scoop of ice cream on top, creating a perfect balance of textures and temperatures. Plus, it requires minimal clean-up—one skillet and a mixing bowl!
Ingredients You’ll Need
- 1 cup (2 sticks) unsalted butter: The star of this recipe, brown butter, adds a deep, nutty flavor.
- 3/4 cup brown sugar: This will give sweetness and the chewy texture we desire in cookies.
- 3/4 cup granulated sugar: Adds sweetness to balance the brown sugar’s richness.
- 1 large egg: Provides structure and moisture, helping the cookie rise.
- 1 teaspoon vanilla extract: Enhances the overall flavor profile with warmth.
- 2 cups all-purpose flour: The base of your cookie, providing stability.
- 1 teaspoon baking soda: Helps the cookie rise and become fluffy.
- 1/2 teaspoon salt: Balances the sweetness of the sugars and the brown butter.
- 2 cups semi-sweet chocolate chips: The classic addition that melts beautifully.
- Sea salt for sprinkling: A finishing touch that enhances the chocolate flavor.

How to Make
- Start by preheating your oven to 350°F (175°C). This quick preheating ensures that your skillet cookie bakes evenly. Meanwhile, melt the butter in a skillet over medium heat, swirling it frequently until it turns a golden brown color and smells nutty. This process takes about 5 minutes and is crucial for developing the rich flavors.
- Next, remove the skillet from the heat and add the brown sugar and granulated sugar. Stir well until the mixture is fully combined. The heat of the butter will help melt the sugars slightly, making it easier to mix.
- Add the egg and vanilla extract, stirring vigorously. The mixture will appear glossy as the wet ingredients blend with the sugars. This step also helps aerate the batter, leading to a chewier texture.
- In a separate bowl, whisk together the flour, baking soda, and salt. Gradually add this dry mixture to the wet ingredients in the skillet. Mix until just combined, being careful not to overwork the dough, which could lead to tough cookies.
- Fold in the chocolate chips. Ensure even distribution throughout the batter for a delightful chocolate experience in every bite! Once combined, smooth the top of the batter with a spatula.
- Sprinkle a generous pinch of sea salt on top of the dough before placing the skillet in the oven. Bake for 15-18 minutes, or until the edges are golden brown but the center still seems a bit soft—it will continue to cook as it cools. Allow the cookie to cool slightly before slicing and serving.
Variations & Substitutions
Nutty Brown Butter Variation: For a delightful twist, consider adding chopped nuts such as walnuts or pecans. These will enhance the texture and add extra flavor. Simply mix in about 1 cup of your preferred nuts when you add the chocolate chips. The crunch and flavor will provide a sophisticated evolution to your skillet cookie.
Gluten-Free Option: If you need a gluten-free alternative, swap out the all-purpose flour for a gluten-free flour blend. Make sure it contains xanthan gum to help with binding. The flavor will remain rich, and the texture can be just as delightful if you utilize the right blend.
Vegan Version: To make this cookie vegan-friendly, replace the butter with a vegan butter alternative and the egg with 1/4 cup of unsweetened applesauce or flaxseed mixed with water. These substitutions will maintain moisture and richness without using animal products.
Personalized Chocolate Blend: Feel free to experiment with different types of chocolate chips. Using dark or white chocolate chips can create distinct flavors that change the overall taste of your cookie. Blend semi-sweet with dark chocolate for complexity or incorporate caramel bits for a sweet surprise.
Common Mistakes to Avoid
One key mistake is not browning the butter sufficiently. Ensure you watch it carefully; you want a deep golden brown color for optimal flavor. Burnt butter can ruin the taste. Additionally, do not skip the resting time after baking; cookies continue cooking as they cool, and cutting into them too early can result in a gooey mess.
Another common error is over-mixing the dough. Once you add the flour, mix until just combined to maintain a tender texture. Over-mixing can create tough cookies that lack the desired chewiness. Lastly, ensure you do not skimp on the sea salt topping; it plays a crucial role in enhancing the sweetness and brings out the flavors beautifully.
Storage, Freezing & Reheating Tips
To store your chocolate skillet cookie, allow it to cool completely before covering it with plastic wrap or transferring it to an airtight container. It will stay fresh at room temperature for up to three days. For longer storage, you can freeze leftovers. Simply cut the cookie into squares, place them in a freezer-safe bag, and they can last for up to two months.
When you’re ready to enjoy your frozen cookie, simply remove it from the freezer and let it thaw at room temperature for about 30 minutes. If you prefer a warm cookie, pop it in the oven at 350°F (175°C) for about 5-10 minutes or microwave each square for about 20 seconds to gently reheat.
Frequently Asked Questions
Can I use different types of chocolate chips?
Absolutely! You can use dark chocolate, milk chocolate, or even a mix. Some people enjoy adding chopped chocolate bars as well for a gourmet touch. Experimenting with different types can yield varied and exciting results.
Can I make this recipe ahead of time?
Yes, you can prepare the dough up to 24 hours in advance. After mixing the ingredients, refrigerate the dough covered, and bake when you are ready. This will also deepen the flavors as the dough rests.
What should I do if the cookie is too gooey in the center?
If your skillet cookie seems too gooey after baking, it may need a few extra minutes in the oven. Keep an eye on it, as overcooking can lead to a dry cookie, so check for that golden edge combined with a soft center to get it just right.
Can I make this recipe dairy-free?
Definitely! You can substitute the butter with plant-based butter or coconut oil. Use dairy-free chocolate chips to keep the entire recipe dairy-free, making it accessible for those who are lactose intolerant or prefer a dairy-free diet.
What can I serve with this skillet cookie?
This cookie is delightful on its own but pairs wonderfully with a scoop of vanilla ice cream for an indulgent treat. You can drizzle caramel or chocolate sauce over the top, or serve it with whipped cream and fresh fruits for a more balanced dessert.
Conclusion:
In just 25 minutes, you can create a luxurious Sea Salt Brown Butter Chocolate Chip Skillet Cookie that will have everyone raving about your baking skills. This unique twist on a classic dessert is perfect for any occasion, whether it’s a casual family gathering or a cozy movie night at home. Don’t shy away from experimenting with the variations and substitutions to make this recipe your own. Happy baking!