Prep time: 20 minutes
Cook time: 10-12 minutes
Total time: 30-32 minutes
Servings: 24 cookies
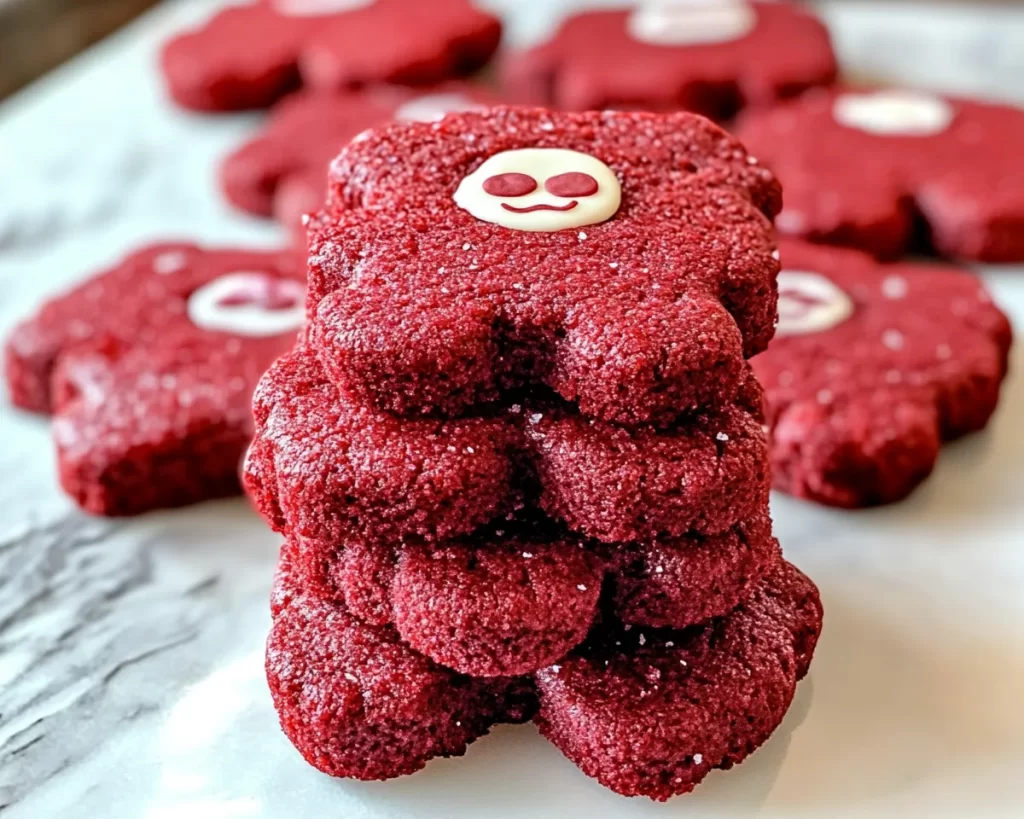
There’s something undeniably captivating about the charm of cookies, especially when they are as visually appealing and delicious as Classic Red Velvet Bear Cookies. Growing up, the sight of these delightful treats often brought memories of baking sessions filled with laughter and sweet aromas filling the kitchen. The vivid red color reminiscent of a warm hug, paired with the soft, chewy texture, makes these cookies a standout dessert. In this recipe, you’ll learn how to create this iconic treat with ease, ensuring that no baking experience, whether novice or seasoned, will be intimidating. I will guide you through everything from ingredients to baking tips, empowering you to create something truly magical.
Classic Red Velvet Bear Cookies are not just another cookie; they have a unique blend of flavors and textures that makes them irresistible. Originating from Southern cuisine, red velvet cakes and cookies have become popular for their rich, buttery taste combined with the light tang of buttermilk and a slight cocoa undertone. The addition of cream cheese frosting to these cookies elevates them to a whole new level, providing a luscious finish that contrasts perfectly with the subtle flavors of the cookie itself. The resulting treat is a delightful combination of soft chewiness and creamy richness that will have everyone asking for seconds.
In this article, I will provide a comprehensive approach to creating Classic Red Velvet Bear Cookies, discussing the taste, ease of preparation, helpful tips, fun variations, and more! You’ll be informed and inspired to make these cookies a staple in your household.
What Is Classic Red Velvet Bear Cookies?
Classic Red Velvet Bear Cookies are an enchanting twist on the traditional red velvet cake, shaped into adorable bear forms that add an element of fun to any dessert table. The iconic red hue comes from the vibrant food coloring, a signature element in classic red velvet recipes. These cookies stand out for their delightfully soft and chewy texture, which complements their deep, rich flavors. Each bite tantalizes with the perfect balance of sweetness and a subtle hint of cocoa, resulting in a cookie that is both comforting and sophisticated.
The origins of red velvet flavors date back to the Victorian era, but they gained widespread popularity in the Southern United States, becoming a cherished dessert for special occasions. These cookies maintain the classic flavors of red velvet cake while being more portable and easy to serve, making them ideal for parties, school functions, or simply as an afternoon treat. When you shape them into friendly bear figures, they bring a joyous element to baking, appealing to both children and adults alike.
In terms of flavor and texture, Classic Red Velvet Bear Cookies boast a tender crumb and a slightly crisp exterior, giving them an inviting appearance that beckons you to take a bite. The cream cheese frosting adds an additional layer of richness, creating a delightful contrast that elevates each cookie to a gourmet experience.
Why You’ll Love This
There are countless reasons to fall in love with Classic Red Velvet Bear Cookies. First and foremost, the taste is simply divine. The combination of cocoa powder, buttermilk, and cream cheese creates a flavor profile that is both rich and unique, making these cookies a hit at any gathering or celebration. They are not only pleasing to the palate, but they are visually striking, making them perfect for festive occasions such as birthdays, holidays, or simply to brighten up a regular day.
In addition to their irresistible taste, the ease of preparing these cookies makes them accessible for bakers of all skill levels. Whether you’re a busy parent looking for a fun activity with the kids or a beginner in the kitchen, making these cookies is straightforward and enjoyable. Each step can be accomplished with everyday kitchen tools, ensuring a hassle-free baking experience.
Another reason for their popularity is their versatility. You can adapt the recipe to suit different dietary needs or flavor preferences, making them customizable for everyone. Want to make them gluten-free or reduce the sugar content? It’s all possible! Plus, they can easily be transformed into different shapes or topped with various frostings, adding endless possibilities for creativity in every batch.
In many ways, baking these cookies can serve as a therapeutic activity. The process of mixing, shaping, and decorating can be a delightful escape from the stresses of daily life. Plus, the result is a delicious reward that you can share with loved ones, making the experience even more fulfilling.
Ingredients You’ll Need
To create these delectable Classic Red Velvet Bear Cookies, you will need the following ingredients:
- All-purpose flour: This is the base of the cookies. It provides structure and stability. If you need a gluten-free substitute, consider using almond flour or a gluten-free blend.
- Cocoa powder: A key ingredient that gives the cookies a subtle chocolate flavor. Use high-quality unsweetened cocoa powder for best results.
- Granulated sugar: This sweetens the cookies. You can substitute it with brown sugar for a more caramel-like flavor.
- Butter: Unsalted butter should be used to enhance the creaminess of the cookie. Make sure it is softened to room temperature for easy mixing.
- Egg: An essential binding agent that helps the cookies maintain their shape. For a vegan alternative, consider using a flax egg or applesauce.
- Buttermilk: It gives the cookies a tender crumb and a little tanginess that complements the flavors. You can create a buttermilk substitute by mixing milk with a little vinegar or lemon juice.
- Vanilla extract: This adds a warm, aromatic quality to the cookies. Always use pure vanilla extract for the best flavor.
- Red food coloring: The star ingredient that gives red velvet cookies their iconic color. Gel food coloring works best as it provides a more vibrant hue without altering the dough’s consistency.
- Baking soda and baking powder: These leavening agents help the cookies rise and become soft and fluffy.
- Salt: A small amount enhances the overall flavor of the cookies.
- Cream cheese: For frosting, providing a rich and tangy finish. Ensure it’s softened for easy mixing.
- Powdered sugar: This sweetens the cream cheese frosting and gives it a smooth texture.
- Lemon juice: A touch of fresh lemon juice in the frosting balances sweetness and enhances flavor.
Understanding the role of each ingredient not only helps in crafting the perfect cookie but also opens up avenues for creativity. Feel free to experiment with flavors and substitutes to suit your preferences.
How to Make
Now, let’s dive into the step-by-step process of making Classic Red Velvet Bear Cookies. Follow these instructions closely to ensure a successful baking session:
- Preheat your oven: Start by preheating your oven to 350°F (175°C). This step is essential for ensuring even baking. While the oven heats up, you can prepare your baking sheets by lining them with parchment paper.
- Mix the dry ingredients: In a medium bowl, whisk together the all-purpose flour, cocoa powder, baking soda, baking powder, and salt until well combined. This will ensure even distribution of the leavening agents and prevent clumping.
- Cream the butter and sugar: In a large mixing bowl, use an electric mixer to beat the softened butter and granulated sugar until light and fluffy. This typically takes about 3-4 minutes. Properly creamed butter is key for a soft cookie texture, so don’t skip this step.
- Add the egg and vanilla: Beat in the egg and vanilla extract until thoroughly combined. This helps incorporate air into the mixture, enhancing the cookie’s overall texture and flavor.
- Incorporate food coloring: Add the red food coloring to the mixture. You can adjust the amount to reach your desired shade of red. This is where the fun begins, making your cookies vibrant and visually appealing.
- Combine wet and dry ingredients: Pour half of the dry ingredient mixture into the wet ingredients and stir gently. Gradually add the buttermilk and alternate with the remaining dry ingredients, mixing until just incorporated. Overmixing can lead to tough cookies, so stop as soon as no flour is visible.
- Shaping the cookies: Use a cookie scoop or your hands to form small balls of dough, about 1-2 inches in size. Place them on the prepared baking sheets, leaving enough space for the cookies to spread as they bake.
- Bake the cookies: Place the baking sheets in the preheated oven and bake for 10-12 minutes, or until the edges are set but the centers look slightly underbaked. This helps maintain a chewy texture. Remove them from the oven and let them cool on the sheet for a few minutes before transferring them to wire racks to cool completely.
- Prepare the frosting: In a medium bowl, beat the cream cheese and softened butter together until creamy and smooth. Gradually add powdered sugar, beating until combined. Add a splash of lemon juice for flavor and adjust based on your preference.
- Frost the cookies: Once the cookies have completely cooled, spread a generous amount of cream cheese frosting on each cookie. You can use a spatula or a piping bag for more precise application. Decorate as you wish for that extra touch of sweetness.
Creating these cookies is a rewarding project that allows the aroma of sweet, buttery goodness to fill your kitchen. Serve them at your next gathering, or simply share them with friends and family to create smiles all around.
Variations & Substitutions
Gluten-Free Red Velvet Bear Cookies: If you or someone you know has gluten sensitivities, don’t worry! You can make gluten-free Red Velvet Bear Cookies by substituting the all-purpose flour with a gluten-free flour blend. Ensure that the blend contains xanthan gum to maintain the cookies’ chewy texture. Additionally, check other ingredients like baking powder and baking soda for gluten content to keep your cookies safe for those with celiac disease or gluten intolerance.
Chocolate Cream Cheese Frosting: For those who want an intense chocolate flavor, consider making a chocolate version of the cream cheese frosting. Simply add cocoa powder to the frosting recipe along with the powdered sugar. This creates a rich, chocolatey frosting to complement the flavor of the red velvet cookies perfectly. Adjust the amount of cocoa to achieve your desired level of richness.
Red Velvet Sandwich Cookies: Take your cookie experience to the next level by transforming your red velvet cookies into delicious sandwich cookies. After frosting one cookie, place another on top to create individual sandwich treats. For those who enjoy variety, think about including fillings like peanut butter, Nutella, or even a flavored buttercream for added dimension.
Nutty Red Velvet Cookies: If you want to introduce a crunchy texture, consider adding chopped nuts such as walnuts or pecans to your cookie dough. About half a cup of finely chopped nuts folded in before baking can take your cookies to new heights. Not only does this add a delightful crunch, but it also introduces a nutty flavor that complements the sweetness of the red velvet well.
Vegan Red Velvet Bear Cookies: If you are looking to make these cookies vegan-friendly, you can easily substitute the egg with a flax egg (1 tablespoon of flaxseed meal mixed with 3 tablespoons of water, allowed to sit until thickened). Use plant-based butter or coconut oil in place of regular butter and a dairy-free cream cheese substitute for the frosting. With these adjustments, you can enjoy the same delicious taste and texture while adhering to a vegan diet.
Making these variations allows you to customize the cookie experience to suit different dietary preferences and to suit your unique taste.
Common Mistakes to Avoid
While baking Classic Red Velvet Bear Cookies can be a joyous experience, there are some common pitfalls that can lead to less-than-perfect results. One frequent mistake is the incorrect measurement of ingredients. It is vital to use the proper measuring techniques, especially for flour. Scooping directly from the bag can lead to packing flour and ultimately result in dry cookies. Instead, spoon the flour into your measuring cup and level it off with a knife for accuracy.
Another issue is skipping the creaming process of the butter and sugar. Properly creaming these ingredients not only helps to incorporate air, leading to a lighter cookie, but it also contributes to achieving that perfect chewy texture. Skimping on this step can result in dense, hard cookies that lack the desired chewiness.
It’s also common to frost cookies that are not completely cool. If you frost warm cookies, the frosting can melt and lose its structure, leading to a gooey mess that’s difficult to manage. Always ensure that your cookies are fully cooled before proceeding with frosting.
Lastly, be mindful of baking times. Ovens can vary in temperature, so it’s essential to keep a close eye on your cookies as they approach the end of the suggested baking time. Underbaking is generally better than overbaking, as the cookies will continue to cook slightly even after you remove them from the oven. Look for slightly underbaked centers that will set as they cool to ensure a perfect chewy texture.
By being aware of these common mistakes, you can improve your baking skills and achieve the most delightful Classic Red Velvet Bear Cookies.
Storage, Freezing & Reheating Tips
To keep your Classic Red Velvet Bear Cookies fresh, it is important to store them correctly. Once the cookies are completely cool, you can place them in an airtight container at room temperature. They should stay fresh for about 4-5 days. If you want to extend their shelf life, you can store them in the refrigerator, where they will last for up to a week. Just be sure to allow them to come to room temperature before serving to enhance the flavors.
If you wish to prepare these cookies in advance, freezing them is a great option. To freezer your Classic Red Velvet Bear Cookies, first ensure they are fully cooled. Place them in a single layer on a baking sheet and freeze until solid. Once frozen, transfer the cookies to a freezer-safe container or zip-top bag, separating layers with parchment paper to prevent sticking. They can stay frozen for up to three months.
When you’re ready to enjoy your frozen cookies, simply remove them from the freezer and allow them to thaw at room temperature for about 20-30 minutes. If you prefer, you can also warm them slightly in the microwave for a treat that tastes freshly baked.
Make sure to always adhere to food safety practices when storing and reheating your cookies. Keeping the cookies in airtight containers and refrigerating them when necessary helps to prevent spoilage and ensures that every bite is as delicious as the last.
Frequently Asked Questions
Can I make Red Velvet Bear Cookies without food coloring? Yes, you can omit the food coloring if you prefer a more classic chocolate cookie. The primary flavor and texture will remain the same, although the distinct red velvet appearance will be absent.
What can I use instead of buttermilk in this recipe? If you do not have buttermilk on hand, you can easily create a substitute by adding 1 tablespoon of vinegar or lemon juice to 1 cup of milk. Let it sit for about five minutes; this will mimic the acidity and consistency of buttermilk.
Can I freeze the dough before baking? Absolutely! If you want to bake smaller batches, you can freeze the unbaked cookie dough. Form the dough into balls and place them on a baking sheet. Freeze until solid, then transfer them to a freezer-safe bag. When you’re ready to bake, no need to thaw; just bake the dough balls for an additional minute or two.
How can I make these cookies healthier? To create a healthier version of Classic Red Velvet Bear Cookies, consider replacing some of the sugar with applesauce or using whole wheat flour instead of all-purpose flour. You can also reduce the butter by half without significantly altering the taste or texture.
What should I do if my cookies are too dry? If you find that your cookies turn out dry, it may be due to overmixing or measuring inaccuracies. Ensure that ingredients are measured correctly and only mix until just combined. For a quick fix, add a little milk or water into your dough to rehydrate it before baking.
Conclusion:
Classic Red Velvet Bear Cookies are a delightful treat that combines a rich flavor profile with a fun and charming appearance. The experience of making these cookies is just as enjoyable as eating them, and I encourage you to customize the recipe to suit your taste or dietary preferences. Whether you serve them at a party or simply enjoy them at home, you’re sure to make lasting memories in the kitchen. Don’t hesitate to try your hand at this delightful recipe; it will undoubtedly become a favorite for you and everyone who gets to taste your baked goods!