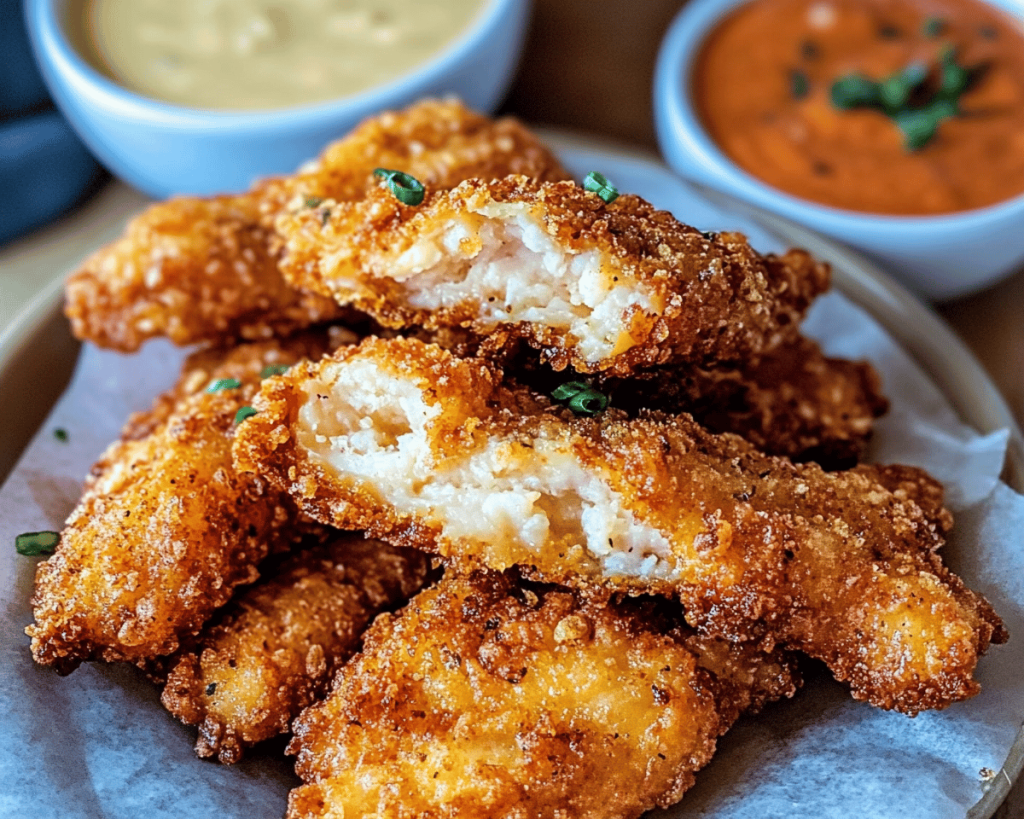
# The Ultimate Crispy Tenders Recipe: Irresistibly Crunchy & Juicy
**Meta Title:** Crispy Chicken Tenders Recipe | Crunchy & Juicy
**Meta Description:** Discover the ultimate crispy tenders recipe! Easy to make, juicy inside, and irresistibly crunchy outside. Perfect for the whole family!
Ah, crispy tenders—the ultimate comfort food that can ignite a craving unlike anything else! Picture this: golden, crispy breading that crackles with each bite, encapsulating tender, juicy chicken that’s been seasoned to perfection. There’s something so nostalgic about chicken tenders; they remind us of family gatherings, movie nights, and those blissful childhood days of easy meals that made everyone happy. Whether you’re dipping them in ranch, slathering them with BBQ sauce, or savoring them plain, they are truly irresistible!
In this article, I’ll guide you through everything you need to know to make the very best **crispy tenders** at home. You’ll discover the secrets to achieving the crispiest, juiciest chicken, alongside a few homey tips that make this the kind of recipe you’ll want to use time and again!
## What are Crispy Tenders?
Crispy tenders, often referred to as chicken tenders or chicken strips, are breaded and fried pieces of chicken that boast a wonderful **texture** that’s both crunchy and juicy. Typically made from chicken breast, these tenders are coated in a seasoned breading that creates a satisfying crunch when you bite into them, while the inside remains moist and flavorful.
This dish has its roots in American cuisine but has found its way into palates around the globe, spawning countless interpretations. You might have tried them in various forms—from fast food iterations to gourmet restaurant offerings—but nothing quite compares to homemade crispy tenders fresh from your kitchen. The **golden-brown exterior** contrasts beautifully with the tender chicken inside, leading to a perfect harmony of **taste** and **texture**. It’s a classic comfort food, adored by kids and adults alike!
## Why You’ll Love This Crispy Tenders Recipe
– **Quick and Easy**: This recipe takes minimal time, making it perfect for a weeknight dinner or an impromptu gathering.
– **Family-Friendly**: Chicken tenders are a sure way to please picky eaters; they’re delicious and fun to eat!
– **Make Ahead**: You can prepare the tenders in advance, so they’re ready to fry when you are, perfect for meal prep.
– **Versatile**: Enjoy them as a simple snack, a party appetizer, or a main dish served alongside your favorite sauces.
– **Customizable**: Feel free to experiment with different seasonings or dip sauces until you find the perfect flavor combo that your family loves.
– **Crispy and Juicy**: Achieving that perfect crunch while keeping the chicken inside juicy is exactly what this recipe does!
## Ingredients You’ll Need
Here’s what you’ll need to create crispy, golden perfection:
– **1 pound chicken breast** (cut into strips): For the best flavor and tenderness. If you’re in a hurry, you can buy store-bought chicken tenders as a substitute.
– **1 cup buttermilk**: This not only helps tenderize the chicken but also adds moisture.
– **1 cup all-purpose flour**: The base for our breading.
– **1 cup breadcrumbs** (Panko for extra crunch): Gives that divine crisp texture.
– **1 teaspoon garlic powder**: Adds a robust flavor.
– **1 teaspoon onion powder**: For a subtle sweetness.
– **1 teaspoon paprika**: Offers a warm, smoky touch to the seasoning.
– **Salt and pepper**: To taste. Don’t skip this; they are essential for enhancing all the flavors.
– **Oil for frying**: Use vegetable oil, canola oil, or peanut oil for frying – each will give a light and crispy finish without overpowering the chicken flavor.
## How to Make Crispy Tenders
Follow these simple steps for perfectly crispy tenders that everyone will love!
### 1. Marinate the Chicken
1. Start by cutting your chicken breast into strips of about 1 inch wide. You want uniform pieces for even cooking.
2. Place the chicken strips in a resealable bag or a bowl, and pour in the buttermilk. Ensure every piece is coated well.
3. Seal the bag or cover the bowl with plastic wrap and let it marinate in the refrigerator for at least 30 minutes (or up to overnight).
### 2. Prepare the Breading Station
1. In a shallow dish, whisk together the flour, garlic powder, onion powder, paprika, salt, and pepper.
2. In a separate shallow dish, place the breadcrumbs. If you’re using Panko breadcrumbs, they will add that extra crunch we’re after!
### 3. Bread the Chicken
1. Remove the chicken from the buttermilk, allowing any excess to drip off.
2. Dredge each chicken strip in the flour mixture, ensuring every side is well coated.
3. Next, dip it back into the buttermilk, then coat it with breadcrumbs, pressing gently to adhere. Repeat with all chicken strips.
### 4. Fry the Tenders
1. In a large skillet or deep frying pan, heat about 1-2 inches of oil over medium heat until it reaches 350°F (175°C). The oil should sizzle when you drop in a breadcrumb; if it doesn’t, let it heat a little longer.
2. Carefully place the breaded chicken tenders into the hot oil in batches, avoiding overcrowding the pan. Fry for about 4-5 minutes on each side, or until they are golden brown and reach an internal temperature of 165°F (75°C).
3. Remove the cooked tenders and place them on a wire rack or paper towels to drain excess oil.
### 5. Serve
1. Serve your crispy tenders immediately with your choice of dipping sauces. Think ranch, honey mustard, or BBQ sauce for a delightful experience.
## Expert Tips, Tricks & Variations
1. **Double Dip for Extra Crispiness**: Want to take it a step further? Before coating in breadcrumbs, dip your chicken strips back into the buttermilk and then in the breadcrumbs again for an even thicker, crunchier coating.
2. **Use Seasoned Bread Crumbs**: For added flavor, use seasoned breadcrumbs or add your favorite spices to the plain ones, like Italian seasoning or cayenne pepper for a kick.
3. **Oven-Baked Option**: If you prefer a healthier approach, you can bake these tenders at 425°F (220°C) for about 20 minutes, flipping halfway through, until golden and cooked through.
4. **Batch Cooking**: Make a larger batch and freeze raw breaded chicken strips on a baking sheet. Once frozen, transfer them to a ziplock bag for long-term storage. They can be cooked straight from frozen.
5. **Plating Ideas**: Serve with a colorful array of dips in small bowls for a fun presentation or whip up a salad to accompany your tenders for a balanced meal.
## What to Serve With Crispy Tenders
Complete your meal with the perfect companions:
– **French Fries**: Nothing beats that classic pairing. Try sweet potato fries for a twist, or even a crispy side salad for some freshness.
– **Coleslaw**: The crunchiness of coleslaw contrasts beautifully with the crispy tenders, and it brings a zesty bite that balances the richness.
– **Macaroni and Cheese**: Creamy mac and cheese is comfort food at its finest, making it an ideal partner for your crispy tenders.
– **Corn on the Cob**: This sweet side dish adds a refreshing aspect to your hearty meal.
## Storage, Freezing & Meal Prep
– **Storing Leftovers**: If you have leftovers (which is rare for this dish!), let them cool completely and store them in an airtight container in the refrigerator for up to 3 days.
– **Freezing**: It’s best to freeze the tenders before frying if you want to prepare them in advance. Once fried, they can be frozen, but they will lose some of their original crispiness. Store in a freezer-safe bag for up to three months.
– **Reheating**: Reheat your crispy tenders in an oven preheated to 400°F (200°C) for about 10-15 minutes to bring back that crunch.
## Frequently Asked Questions
### Can I use other meats instead of chicken?
Absolutely! This recipe works well with pork and fish. Just adjust the cooking time accordingly, ensuring the internal temperature reaches safe levels.
### Is it possible to bake the tenders instead of frying?
Yes, you can! Preheat your oven to 425°F (220°C), place the breaded tenders on a baking sheet lined with parchment paper, and bake for 20 minutes, flipping halfway through.
### What can I use if I don’t have buttermilk?
You can easily create a substitute by mixing 1 cup of milk with 1 tablespoon of vinegar or lemon juice. Let it sit for 5 minutes to curdle before using.
### How do I know when the oil is hot enough?
You can test the oil temperature by dropping a small piece of bread into it. If it sizzles and turns golden brown within a minute, it’s ready for frying!
### How do I achieve that golden color on the tenders?
Make sure your oil is hot enough before adding the chicken and avoid overcrowding the pan, which can lead to steaming rather than frying.
Now it’s your turn—grab your ingredients and create this magic in your kitchen tonight! There’s nothing quite like the joy of serving up a dish of crispy tenders that are sure to bring smiles to your table. Don’t forget to tag me when you try it! Enjoy and happy cooking!