**Meta Title:** Cute Pumpkin Patch Dirt Cups Recipe: Spooky Treats
**Meta Description:** Discover how to make adorable Pumpkin Patch Dirt Cups—spooky, delicious treats perfect for Halloween!
—
You know that delightful crunch of crushed cookies layered with creamy pudding and topped with a sprinkle of Halloween magic? That’s exactly what you’re getting with these Cute Pumpkin Patch Dirt Cups! Picture mini pumpkins emerging from a patch of chocolatey dirt, all while bringing a playful twist to your Halloween dessert table. It’s not just a treat; it’s a mini-adventure, perfect for kids and adults alike.
Today, I’m thrilled to share this spooky yet utterly delicious recipe with you. It combines velvety chocolate pudding with crushed Oreos, making for a wonderfully rich base that’s truly irresistible. Then, we top it all off with cute candy pumpkins and a fun garnish that will have everyone raving about your creativity. Whether you’re hosting a Halloween party, looking for classroom treats, or simply indulging your sweet tooth, these Pumpkin Patch Dirt Cups are here to steal the spotlight. Grab your spoons, and let’s dig in!
What are Pumpkin Patch Dirt Cups?
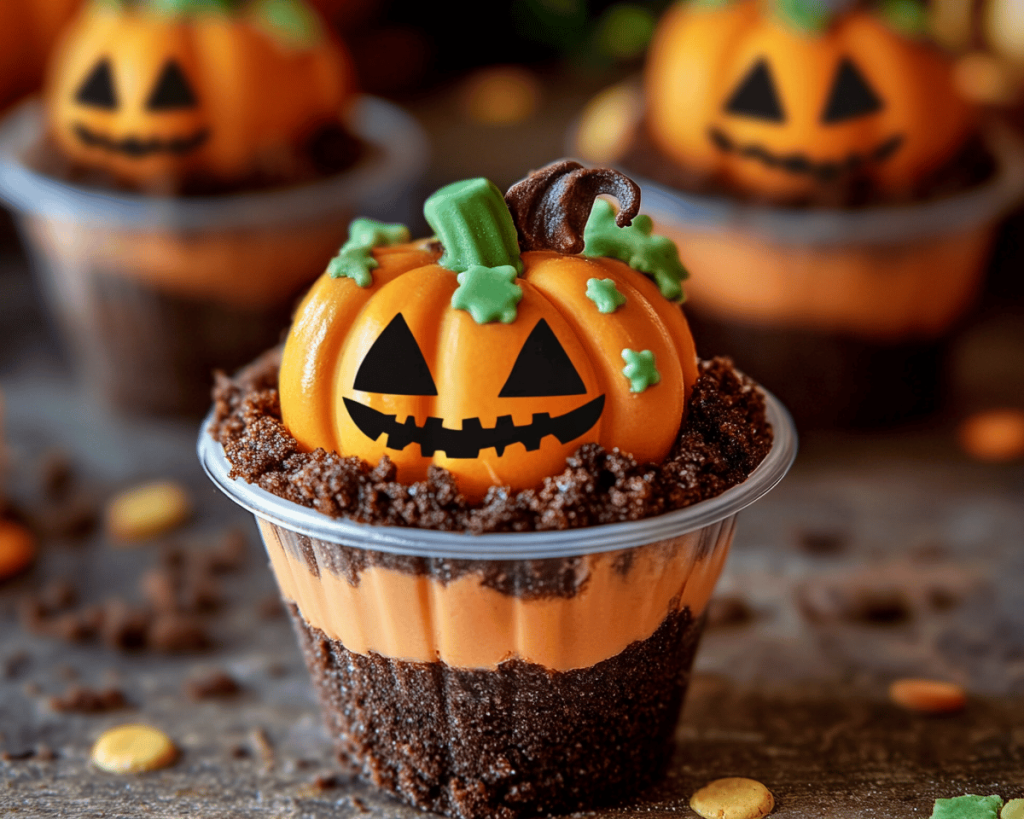
Pumpkin Patch Dirt Cups are a fun, layered dessert crafted to resemble a whimsical pumpkin patch. Originating from the classic “dirt” dessert made with chocolate pudding and crushed cookies, this version brings a festive Halloween flair to the table.
In essence, this dessert features layers of **creamy chocolate pudding** that provide a rich taste, while **crushed Oreo cookies** bring in the delightful crunch that pairs perfectly with the pudding’s silkiness. The trademark visual of these cups is the added whimsy of candy pumpkins that peek out from the “dirt,” resembling a farm-fresh harvest. It’s a nostalgic treat that’s visually appealing and packed with flavor, making it a festive favorite!
Kids (and adults) adore this recipe, not just for its taste but also for its interactive, creative styling. Picture gorgeous, vibrant orange pumpkins contrasting against the dark chocolate “dirt,” creating a visual feast that captures the spirit of Halloween without being overly spooky.
Why You’ll Love This Pumpkin Patch Dirt Cups Recipe
There are countless reasons to fall in love with Pumpkin Patch Dirt Cups! First and foremost, they’re incredibly easy to make, requiring minimal kitchen skills and just a handful of ingredients. In less than 30 minutes, you can assemble these adorable treats, making them perfect for last-minute party preparations or crafty afternoons with the kids.
Moreover, this recipe is versatile and budget-friendly! You can easily modify it according to your taste preferences or dietary restrictions—feel free to swap in your favorite pudding flavor, use gluten-free cookies, or even try vegan alternatives!
The delightful blend of textures is also a huge plus. The chunky, crunchy crumbs provide excellent balance against the smooth, rich pudding. And let’s not forget the visual appeal—these cups are downright adorable. Just imagine how excited your little ones will be when they see these cute characters on their dessert plates!
Ingredients You’ll Need
To craft your adorable Pumpkin Patch Dirt Cups, gather the following ingredients:
1. **Chocolate Pudding** (2 packages, instant)
– Choose a brand you love for the best flavor. You can also experiment with butterscotch pudding for a different color and taste!
2. **Milk** (4 cups)
– Whole milk will give your pudding a rich and creamy texture, but you can use almond milk or oat milk for a dairy-free version.
3. **Oreo Cookies** (1 package)
– Classic Oreos are great for that rich chocolate “dirt” flavor. Consider using gluten-free Oreos or chocolate graham crackers if anyone has dietary restrictions.
4. **Candy Pumpkins** (1 bag)
– These brightly colored gummies serve as the “pumpkins” in your patch. Look for them during the fall season for the freshest options!
5. **Whipped Topping** (1 container, optional)
– For those wanting extra creaminess, whipped topping adds a luscious layer atop your pudding. You could also make your own if preferred.
6. **Clear Plastic Cups or Mason Jars**
– These not only make for beautiful presentations but also allow you to layer up the treats and showcase the colorful design.
How to Make Pumpkin Patch Dirt Cups
Now for the fun part! Let’s dive into creating your adorable Pumpkin Patch Dirt Cups with this simple step-by-step guide:
1. **Prepare the Pudding**
– In a large mixing bowl, whisk together the chocolate pudding mix and the milk until it thickens, about 2 minutes. This pudding should be creamy and smooth. Set it aside while you prepare the Oreo dirt.
2. **Crush the Oreos**
– Place the Oreos in a food processor and pulse until they resemble fine crumbs, or place them in a zip-top bag and crush them with a rolling pin for a more hands-on approach. The chunks will add delightful texture to your cups!
3. **Layer the Cups**
– Grab your clear cups or mason jars and begin layering. Start with a generous spoonful of chocolate pudding at the bottom, followed by a layer of crushed Oreos. Use the back of a spoon to gently press down each layer for a more compact structure.
4. **Repeat the Layers**
– Continue layering until you reach the top of the cup, finishing with a beautiful layer of crushed Oreos. This creates the appearance of dirt in your pumpkin patch.
5. **Add Whipped Topping (Optional)**
– If you’re feeling indulgent, add a dollop of whipped topping on the very top layer of crushed Oreos. This gives a fluffy contrast and enhances the treat’s visual appeal.
6. **Place the Candy Pumpkins**
– Finally, carefully press a few candy pumpkins into the topping or right into the crushed Oreos to create the perfect pumpkin patch look. Arrange them as you like—scattered or gathered together!
7. **Refrigerate**
– Before serving, chill the cups in the fridge for at least 15-30 minutes. This allows the flavors to meld together and ensures an ultra-cold, refreshing treat.
Tips, Tricks & Variations
1. **Make-Ahead Magic**: You can assemble the cups a day in advance! Just keep them covered in the fridge until you’re ready to serve.
2. **Vegan Version**: Use vegan chocolate pudding mix, almond milk, and non-dairy whipped topping for a completely plant-based dessert.
3. **Flavor Swaps**: Feeling adventurous? Try vanilla pudding with crushed graham crackers for a “sandy beach” twist, or use coffee-flavored pudding for an adult upgrade.
4. **Textural Variety**: Add in other candies like gummy worms or chocolate rocks to create a themed “dirt” dessert. The combinations are limitless!
5. **Garnish Galore**: Get creative with edible decorations—top with sprinkles, spooky candy eyes, or even chocolate spider webs for extra spookiness.
What to Serve With Pumpkin Patch Dirt Cups
These Pumpkin Patch Dirt Cups are fantastic on their own, but you might consider some delightful accompaniments! Serve them alongside:
– **Hot Apple Cider**: A warm, spiced drink complements these sweet treats and adds to the fall festivities. A cinnamon stick makes it extra special.
– **Fruit Skewers**: Bright, crunchy apple and pear slices make a refreshing contrast to the dessert’s sweetness. You can even use a melon baller for fun shapes!
– **Halloween Cookies**: Sugar cookies shaped like ghosts, bats, or witches will create a fun dessert platter to satisfy everyone’s sweet tooth.
– **Spooky Cupcakes**: Fill your dessert table with bright orange frosting to tie in the pumpkin theme.
Putting together this dessert table for Halloween can turn a simple gathering into a themed feast filled with laughter and enjoyment.
Nutrition & Health Benefits
While Pumpkin Patch Dirt Cups are not positioned as a health food, they can be a fun treat that encourages shared memories and laughter. The components provide energy and a deliciousness that celebrates the harvest season! Each serving, depending on your ingredients, can carry about 200-300 calories, but feel free to swap ingredients to lower the sugar or fat content.
Puddings are also a source of calcium (if made with milk), while using fresh fruits alongside can enhance fiber intake. For more nutrition tips, check out credible sources like [Healthline](https://www.healthline.com) and [USDA](https://www.usda.gov).
Frequently Asked Questions
1. **Can I make these dirt cups gluten-free?**
– Absolutely! Simply use gluten-free chocolate pudding and select gluten-free cookies (like gluten-free Oreos or chocolate wafers) for your layers.
2. **How long can I store these cups?**
– The cups can be stored in the refrigerator for up to 3 days. Just be sure to cover them to maintain freshness and protect them from other strong smells in the fridge.
3. **Can I freeze these?**
– While it’s best to enjoy the cups fresh, you can freeze the pudding mixture in advance. However, we recommend avoiding freezing once assembled, as the whipped topping may not thaw well.
4. **What if I don’t have clear cups?**
– No worries! Any glass or even small bowls will work. The key is to create layers, which is visually delightful regardless of the container.
5. **What other toppings can I use?**
– Consider crushed pretzels for a sweet-salty kick, candy corn for a colorful addition, or grated chocolate for a splash of elegance at the top.
—
These Cute Pumpkin Patch Dirt Cups are much more than just a festive treat—they’re a dose of childhood nostalgia and a creative opportunity to have fun in the kitchen. Remember, cooking is all about joy, creativity, and perhaps a few delicious messes along the way. So gather your ingredients and whip up this adorable Halloween treat tonight!
Let me know how yours turned out by leaving a comment or tagging me on Instagram! Happy cooking!