Prep time: 20 minutes
Cook time: 0 minutes
Total time: 2 hours (includes chilling time)
Servings: 6 servings
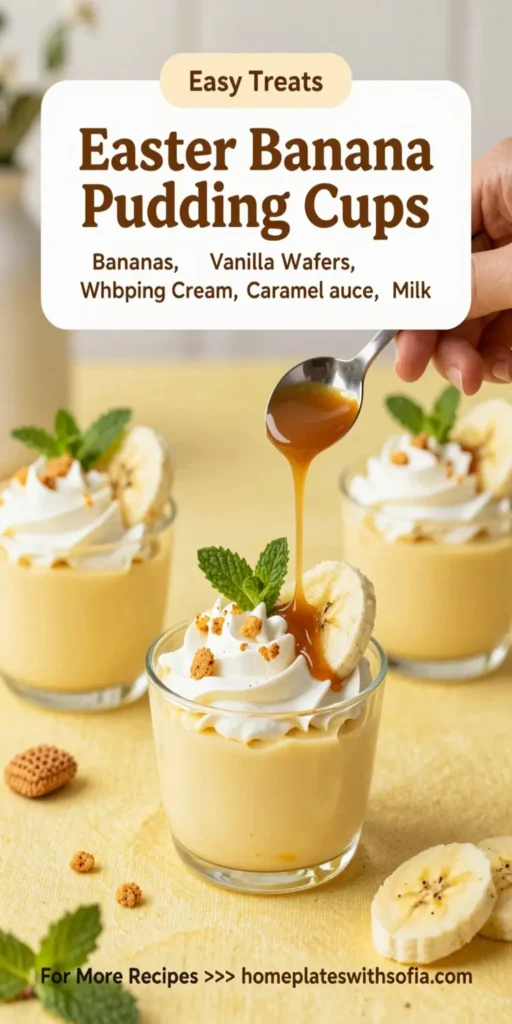
Easter Banana Pudding Cups are a delightful dessert that combines the classic flavors of banana pudding with a fun, portable twist. This dessert is perfect for Easter celebrations or any gathering that calls for something sweet and inviting. They bring together layers of velvety vanilla pudding, whipped cream, and fresh bananas, all served in charming cups. Whether you’re a busy parent looking for a quick treat or someone who loves to whip up desserts for friends, this recipe will not disappoint.
What Is Easter Banana Pudding Cups?
Easter Banana Pudding Cups are individual servings of creamy banana pudding, layered elegantly with fresh banana slices and whipped topping. This dessert is typically made with a base of creamy vanilla pudding—made from scratch or using instant pudding—combined with vanilla wafer cookies, which add a playful crunch. The beauty of this dessert is in its presentation. Serving it in cups makes it not only visually appealing but also perfect for portion control, making it a great option for parties or potlucks.
Why You’ll Love This
There are plenty of reasons to love Easter Banana Pudding Cups! First of all, they are incredibly easy to make, requiring minimal hands-on time in the kitchen. The combination of textures—the creamy pudding, soft bananas, and crunchy cookies—offers a delightful culinary experience. Additionally, these cups can be made ahead of time, allowing you to plan your Easter feast without the last-minute stress.
But perhaps the best part is how customizable they are. You can add different fruits, swap out the whipped topping for whipped cream, or even sprinkle on some chocolate shavings for a decadent touch. This not only permits creativity but also caters to various dietary needs and preferences, appealing to everyone at your table.
Ingredients You’ll Need
- 2 cups cold milk: This will be used to create the pudding. Whole milk works best to contribute to a rich texture but feel free to use 2% or even a non-dairy alternative.
- 1 package (3.4 ounces) instant vanilla pudding mix: This serves as the base for the pudding, thickening as it combines with milk.
- 2 ripe bananas: Fresh bananas add natural sweetness and flavor, making the dish light and fruity.
- 1 cup whipped topping: For a fluffy, airy texture that lightens the pudding.
- 1 cup vanilla wafer cookies: These cookies add a lovely crunch and classic flavor to the dessert.
- Chocolate chips (optional): For those who enjoy a touch of chocolate, sprinkle some on top before serving.
How to Make
- Begin by gathering all your ingredients. This makes the process smoother and more organized.
- In a mixing bowl, combine the cold milk and the instant vanilla pudding mix. Whisk the mixture together for about 2 minutes until it thickens. This creates a smooth and creamy pudding that will be the star of your dessert.
- Once the pudding is ready, fold in the whipped topping gently. It’s essential to fold rather than stir to maintain the light, airy texture. This will make your pudding seem fluffy and delightful.
- Next, slice your ripe bananas into small, round pieces. These bananas will be layered throughout the dessert, so try to keep the slices even for better visual appeal.
- Now, it’s time to assemble your cups. Start by placing a layer of vanilla wafer cookies at the bottom of each cup. This forms a crunchy foundation for the pudding.
- Layer on some of the vanilla pudding mixture followed by a layer of sliced bananas. Repeat this process until the cups are filled, finishing with a layer of pudding on top. For an added touch, top your cups with a dollop of whipped topping and some chocolate chips if desired.
- Finally, cover the cups with plastic wrap and refrigerate for at least 2 hours. This chilling time will allow the flavors to meld together beautifully.
Variations & Substitutions
Peanut Butter Banana Pudding Cups: If you’re a fan of peanut butter, consider adding a layer of peanut butter between the pudding and banana layers. This not only enhances the flavor profile but also introduces a nutty richness that complements the bananas perfectly. You can blend soft peanut butter into the pudding mixture itself for a consistent taste or simply spread it on the cookie layers.
Chocolate Banana Pudding Cups: For a chocolatey twist, use chocolate pudding instead of vanilla. Layer chocolate pudding with banana slices and whipped cream, and use chocolate wafer cookies at the bottom for an indulgent treat. This gives it a richer taste and a dessert that chocolate lovers will adore.
Berry Banana Pudding Cups: If you’re looking for something a bit fruity, add fresh berries to the mix! Strawberries, raspberries, or blueberries can be layered in with or instead of bananas. They not only provide color but also a burst of tartness that contrasts nicely with the sweet pudding.
Common Mistakes to Avoid
One common mistake people make is not letting the pudding set long enough. Failing to chill the pudding cups for at least 2 hours can lead to a runny texture and lack of flavor integration. Always allow enough time for chilling to maximize taste and consistency.
Another issue is overmixing the pudding with the whipped topping. Mixing too vigorously can deflate the lightness of the whipped cream, resulting in a denser pudding. Remember to fold gently to keep that airy quality.
Lastly, using *overripe* bananas can lead to an overly mushy texture. Ensure that your bananas are ripe but not too soft; they should still have a slight firmness for the best presentation and mouthfeel.
Storage, Freezing & Reheating Tips
These Easter Banana Pudding Cups can be stored in the refrigerator for up to 3 days. Ensure that they are covered tightly with plastic wrap to prevent them from absorbing any odors from the fridge. It’s important to note that bananas will start to brown after a day, so for the best presentation, they are best enjoyed within the first day or two.
If you’re considering making these ahead of time, you can prepare the pudding and cookie layers separately and assemble them on the day you plan to serve. This approach will help maintain the freshness of the bananas and the crunch of the cookies.
Freezing: While you can freeze the pudding mixture itself, it’s not recommended to freeze the assembled cups as the texture will change and bananas will not fare well in the freezer. If needed, make the dessert without bananas and freeze the pudding for later use; just remember to add fresh bananas when you’re assembling before serving.
Frequently Asked Questions
Can I use dairy-free alternatives for this recipe?
Yes! You can easily make this recipe dairy-free by opting for plant-based milk like almond or coconut milk and using dairy-free whipped topping. Be sure to also check that the pudding mix you select is dairy-free.
How can I prevent the bananas from browning?
To keep bananas fresh and prevent browning, you can toss them with a bit of lemon juice before adding them to your pudding cups. The acid slows the oxidation process that causes the browning.
Can I make these pudding cups ahead of time?
Absolutely! These pudding cups can be made a day or two in advance, just remember to cover them well and keep them refrigerated. This allows the flavors to meld and enhances the overall taste.
What can I substitute for vanilla wafers?
If you don’t have vanilla wafers, you can use graham crackers or even shortbread cookies as a delicious alternative. Each option will lend a different flavor, so choose based on your preference.
Is there a nut-free version of this recipe?
Yes, simply omit any potential nut-based elements such as peanut butter or chocolate hazelnut spread. Stick to the basic ingredients, and you’ll have a delicious, nut-free dessert that everyone can enjoy!
Conclusion:
Easter Banana Pudding Cups are a charming and delicious dessert that will impress any crowd. Their combination of creamy pudding, fresh bananas, and crunchy cookies makes them a delightful choice for any occasion, especially Easter gatherings. With the ability to customize and prepare them ahead of time, they fit perfectly into any busy schedule. By following the simple steps in this recipe and taking care to avoid common pitfalls, you will create delightful treats that everyone will love!