Prep time: 20 minutes
Cook time: 12 minutes
Total time: 32 minutes
Servings: 24 cookies
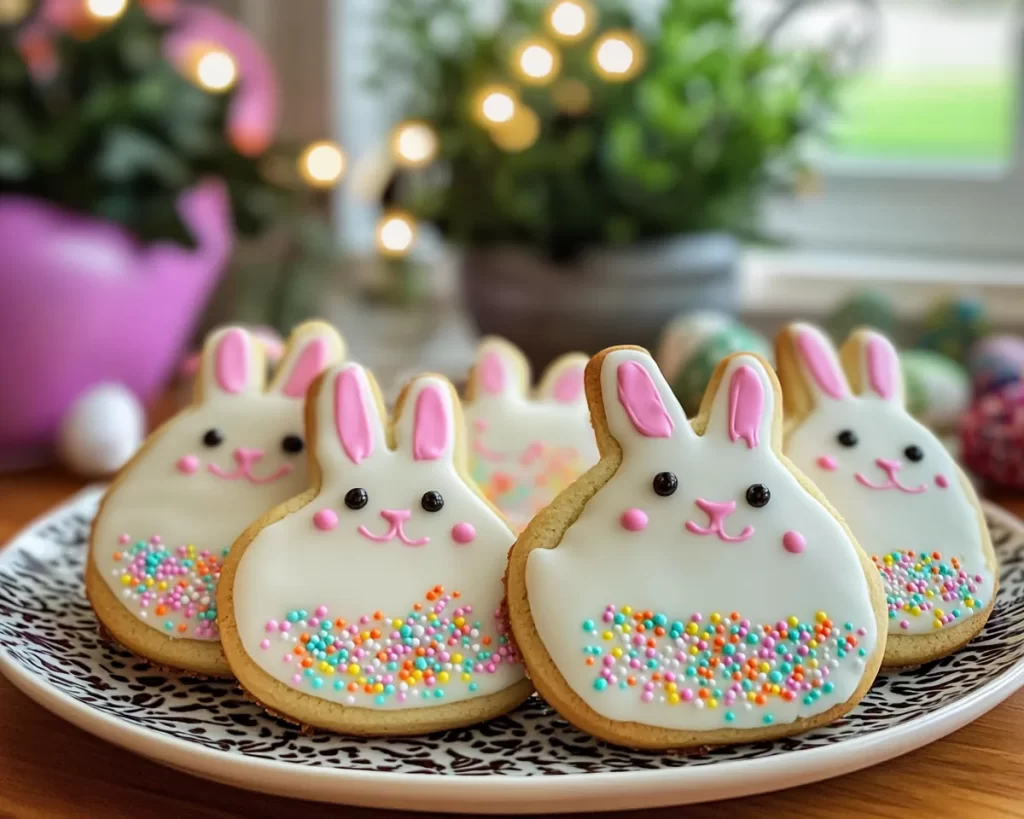
Easter brings with it a sense of joy and celebration, often highlighted with sweet treats that evoke cherished memories. One such treat that has become a beloved favorite in many households is the Easter Bunny Sugar Cookie. These delightful cookies are not just visually appealing; they embody the very spirit of the holiday with their playful bunny shapes and colorful decorations. What makes this recipe special is not only its charming aesthetics but also the superb balance of flavors and the easy-to-follow instructions that make them achievable for even novice bakers. In this article, we will explore every aspect of creating these festive cookies, from the ingredients you’ll need to tips for achieving perfect results every time.
When you make Easter Bunny Sugar Cookies, you will experience a delicious combination of buttery flavor and a soft, chewy texture that melts in your mouth. You will learn how to produce a simple sugar cookie dough that can be shaped into adorable bunny forms. We will discuss decorating techniques using royal icing or fondant, making them perfect for your Easter celebrations. Prepare to delight your family and friends with an irresistible treat that’s festive and enjoyable to make!
What Is Easter Bunny Sugar Cookies?
Easter Bunny Sugar Cookies are traditional sugar cookies that have been shaped to resemble rabbits, embodying the festive spirit of Easter. The origin of the sugar cookie dates back to the early 1700s in New England, but this playful adaptation has gained popularity and is now a staple in Easter celebrations across many cultures. The cookies are known for their sweet, buttery flavor paired with a tender and chewy texture. When baked to perfection, they have a delightful crisp on the edges while remaining soft in the center.
The flavor profile of Easter Bunny Sugar Cookies is predominantly sweet, allowing for a perfect canvas for icing and decorations. The cookies can take on various tastes and textures depending on how they’re decorated; vanilla icing can elevate their sweetness, while sprinkles add a crunchy texture. The combination of the soft cookies and vibrant decorations makes them visually appealing and immensely enjoyable to eat, creating a sensory experience that resonates with festivities.
Families often enjoy making these cookies together, creating cherished memories in the kitchen. Children particularly enjoy cutting out shapes and decorating their bunnies with colorful icing and sprinkles. This engaging activity helps to foster creativity and encourages kids to help in the kitchen, making it a wonderful way to bond over baking.
Why You’ll Love This
When it comes to holiday baking, Easter Bunny Sugar Cookies stand out for several reasons. First and foremost is the incredible taste. These cookies boast a rich texture and pleasant sweetness that make them hit the spot at any gathering. Whether you are enjoying them alongside afternoon tea or serving them as dessert at an Easter picnic, they are sure to be a hit with kids and adults alike.
Another compelling reason to love this recipe is its inherent simplicity. This cookie dough requires minimal ingredients, making it both budget-friendly and accessible for beginner bakers. You can whip them up with little advanced planning, allowing spontaneity in your holiday baking. Plus, the process is straightforward: mix, chill, roll, bake, and decorate!
These cookies are also incredibly versatile. You can customize the flavor profile by adding extracts like almond or lemon, altering the traditional sugar cookie taste to make it uniquely yours. Furthermore, they can be decorated in countless ways, making them perfect for any creative individual. You can choose to keep them simple or go all out with colorful icing, chocolate chips, or even edible glitter, making them perfect for any Easter theme!
However, some believe that baking cookies is only for experienced cooks. This is a common misconception! With our step-by-step guide, you will find that these sugar cookies are not only easy to prepare but also provide a wonderful opportunity for you to bond with family. You can learn the art of cookie making without feeling overwhelmed, making it a joyous experience.
Ingredients You’ll Need
To create the Easter Bunny Sugar Cookies you’ll need the following ingredients:
- All-purpose flour: This is the main structure of your cookies. It provides the essential protein needed for gluten development. For a gluten-free option, consider using a gluten-free all-purpose flour blend.
- Baking powder: This leavening agent helps the cookies achieve a soft texture. Be sure it’s fresh for effectiveness; expired baking powder may yield flat cookies.
- Salt: A pinch of salt enhances the sweetness of the cookies and balances the flavors. Sea salt or kosher salt works well.
- Butter: Use unsalted butter for optimal flavor control. It adds richness to the cookies and contributes to that tender texture. If you’re in a bind, margarine can be a substitute, but the flavor may differ.
- Sugar: Granulated sugar sweetens the cookies. You can also experiment with brown sugar for a hint of caramel flavor, but it will slightly alter the texture.
- Egg: An egg binds the ingredients together and adds moisture. For vegan alternatives, you can substitute with flax seeds or a commercial egg replacer.
- Vanilla extract: This adds depth to the flavor profile. For a more sophisticated note, consider using almond extract in combination.
Each ingredient plays a critical role in the final product, making it important to measure accurately and select high-quality items for the best results.
How to Make
Making Easter Bunny Sugar Cookies is an enjoyable and straightforward process. Follow these step-by-step instructions to create these delightful treats:
- Combine dry ingredients: In a large mixing bowl, whisk together 2 ¾ cups of all-purpose flour, 1 teaspoon of baking powder, and ½ teaspoon of salt. This mix ensures even distribution, which is crucial for consistent baking. Set it aside while you prepare the wet ingredients. Whisking is important as it also aerates the flour, promoting a fluffier texture in the cookies.
- Beat the butter and sugar: In another large bowl, beat 1 cup of softened unsalted butter and 1 cup of granulated sugar together until the mixture is light and fluffy. This step incorporates air, resulting in a tender cookie. You can do this using a hand mixer or a stand mixer on medium speed for about 2–3 minutes. Scrape down the sides of the bowl as necessary to ensure all the ingredients are properly combined.
- Add the egg and vanilla: Now, add 1 large egg and 1 teaspoon of vanilla extract to the butter-sugar mixture. Beat the mixture on low speed until fully combined. Make sure to mix just until the ingredients are integrated; over-mixing can lead to tougher cookies.
- Combine wet and dry mixtures: Gradually add the dry flour mixture to the wet ingredients, stirring carefully with a spatula or mixer on low speed. Continue mixing until the dough is just combined. Avoid overworking the dough or it might become tough. If it appears crumbly, you can add a tablespoon of milk to achieve the right consistency.
- Chill the dough: To prevent the cookies from spreading excessively while baking, wrap the dough in plastic wrap and chill it in the refrigerator for at least 30 minutes. This cooling period helps solidify the fats, making it easier to work with later on.
- Preheat the oven: During the final stages of chilling, preheat the oven to 350°F (175°C). Line your baking sheets with parchment paper to prevent sticking, and set them aside.
- Shape the cookies: Once chilled, roll out the dough on a lightly floured surface to about ¼ inch thick. Use a bunny-shaped cookie cutter to cut out the shapes. Place each shape onto the prepared baking sheets. Ensure they are spaced adequately as they will puff slightly in the oven.
- Bake the cookies: Bake the cookies in the preheated oven for 10–12 minutes or until the edges are lightly golden. Keep a close eye on them to avoid overbaking; they will continue to cook slightly once removed from the oven. The centers should remain soft.
- Cool the cookies: Once baked, let the cookies cool on the baking sheets for about 5 minutes before transferring them to wire racks. Allow them to cool completely before decorating. This cooling period is essential as it solidifies the cookies, making them easier to handle during decoration.
- Decorate: Once completely cool, use royal icing or other decorations to bring your bunny cookies to life. You can pipe on bunny faces, add fun colorful sprinkles, or create a resting environment using edible grass. Get creative and enjoy crafting these delightful treats!
Each step is essential for ensuring your cookies turn out perfectly, providing not just deliciousness but also the joy of creation.
Variations & Substitutions
Almond-Flavored Variation: If you’re a fan of distinct flavors, consider adding almond extract instead of vanilla for a unique twist. The nutty aroma of almond enhances the sweetness and makes your bunny cookies stand out. This variation adds a delightful complexity to the flavor, appealing especially to those who love almonds. Ensure that you’re using pure almond extract for the best flavor.
Chocolate Easter Bunnies: For chocolate lovers, you can easily modify the basic dough by incorporating ½ cup of cocoa powder along with the dry ingredients. This adaptation will yield delicious chocolate sugar cookies that are perfect for decorating as bunnies. To ensure that the dough maintains its structure, consider adding a couple of extra tablespoons of flour to compensate for the cocoa powder.
Gluten-Free Bunny Cookies: For those following a gluten-free diet, substitute the all-purpose flour with a high-quality gluten-free flour blend. Many blends contain xanthan gum, but if yours doesn’t, consider adding 1 teaspoon to ensure proper cookie structure. The flavor and texture might differ slightly, but the end result will still be a delightful cookie that everyone can enjoy.
Vegan Bunny Cookies: To make vegan alternative cookies, replace the egg with flaxseed meal mixed with water (1 tablespoon of flaxseed meal mixed with 2.5 tablespoons of water equals one egg substitute). Additionally, swap the butter for a plant-based margarine. These vegan options allow everyone to indulge in these cute bunny cookies regardless of dietary restrictions.
Decorative Easter Bunnies: Aside from the classic sugar cookie, you can make these bunnies festive by coloring the dough with natural food coloring or decorating them with colored icing. Try using pastel shades to match the Easter theme. Use sprinkles or edible glitter to create an enticing look that captures the essence of the holiday. You can also use fondant to make more elaborate designs, like bunny ears or accessories!
Each variation provides a unique twist, allowing you to tailor this recipe to fit various tastes and dietary preferences. This versatility ensures that Easter Bunny Sugar Cookies can be a delightful treat for everyone!
Common Mistakes to Avoid
While making Easter Bunny Sugar Cookies is a delightful process, there are common pitfalls to avoid to ensure success. One critical mistake is not measuring ingredients accurately. Baking is a science, and even minor discrepancies in flour or sugar amounts can lead to cookies that are too dry or overly sweet. Investing in a digital kitchen scale can help provide precision for a better result.
Another frequent error is neglecting to chill the dough. Skipping this step may result in cookies that spread too much in the oven. Chilling solidifies the butter, ensuring that your cookies maintain their delightful shapes. Inadequately chilling the dough can also create cookies that are less tender, robbing you of that desired melt-in-your-mouth experience.
Furthermore, overbaking cookies is a common mistake. Pay close attention to the baking time and remember that cookies continue to cook slightly after being taken out of the oven. Keeping an eye on them helps maintain the soft, chewy texture that should be characteristic of sugar cookies. If you’re uncertain, it’s better to err on the side of underbaking slightly rather than overbaking.
Lastly, when it comes to decorating, beware of using icing that is either too thick or too runny. If your icing isn’t the right consistency, it will be challenging to pipe out clean designs on your bunny cookies. Aim for a medium thickness that flows easily but holds its shape. If necessary, experiment with adding powdered sugar to thicken or milk to thin your icing for the perfect texture.
Avoiding these common mistakes will set you on the path to making delightful and beautiful Easter Bunny Sugar Cookies that everyone will love!
Storage, Freezing & Reheating Tips
Knowing how to store your Easter Bunny Sugar Cookies properly will extend their deliciousness and keep them fresh. Once fully cooled, you can store the cookies in an airtight container at room temperature for up to one week. Layer parchment paper between the cookies to prevent them from sticking to each other, which preserves both taste and texture.
If you want to store cookies for a longer period, consider freezing them. Place the cooled cookies in a single layer on a baking sheet lined with parchment paper and freeze for about 30 minutes. Following this, transfer them to an airtight freezer bag or container, which can prevent freezer burn. They can last in the freezer for up to three months! When you’re ready to enjoy them, simply thaw them in the fridge overnight or let them sit at room temperature for about an hour.
If you’ve already decorated your cookies, it is preferable to keep them in the refrigerator for maximum freshness. Royal icing can dry out if exposed to air for extended periods. Store them in an airtight container and consume them within a week for the best taste.
Food safety best practices should be followed at all times, so it’s crucial to avoid leaving these cookies out at room temperature for more than two hours, especially during warm weather. Storing cookies properly will not only retain their taste and texture but also ensure that they remain a safe treat to indulge in.
Frequently Asked Questions
Can I make the dough ahead of time?
Yes! The dough can be made a day in advance and stored in the refrigerator for up to 48 hours. Just remember to wrap it tightly in plastic wrap to prevent it from drying out. When you’re ready to bake, allow the dough to soften slightly at room temperature before rolling it out.
How do I make my cookies soft and chewy?
To keep your cookies soft and chewy, avoid overbaking them. Taking them out of the oven when they’re still slightly undercooked in the center will help maintain that desired texture. Additionally, using brown sugar can enhance the softness of your cookies as it contains more moisture compared to granulated sugar.
What can I substitute for royal icing?
If you prefer an alternative to royal icing for decorating, cream cheese frosting or buttercream are excellent choices. They offer a different flavor and texture while still allowing you to pipe designs onto your cookies. However, ensure that the frosting is thick enough to hold its shape when decorating.
Can I color the cookie dough?
Absolutely! You can add gel food coloring to your cookie dough to create fun and vibrant colored cookies. Divide the dough into portions and knead in the food coloring until you achieve the desired shade. This is a fantastic way to add extra charm to your Easter Bunny Sugar Cookies!
What’s the best way to decorate these cookies?
The best way to decorate your Easter Bunny Sugar Cookies is by using royal icing for intricate designs or coloring and adding sprinkles for more playful touches. You could also use edible markers to draw faces or writing. Don’t hesitate to get creative; the only limit is your imagination!
Conclusion:
Easter Bunny Sugar Cookies are a delightful treat that embodies the joy of Easter celebrations. With an easy-to-follow recipe and a variety of customization options, you can create delicious cookies that bring smiles to family and friends alike. From the warm aroma wafting through your kitchen to the delightful experience of decorating, this recipe is all about making meaningful memories. Don’t be afraid to try your hand at cookie making! Whether you stick to the classic version or experiment with variations, these cookies are sure to become a cherished tradition in your home. Gather your loved ones, roll up your sleeves, and start baking — the season of joy is just a cookie away!