Prep time: 20 minutes
Cook time: 30 minutes
Total time: 50 minutes
Servings: 12
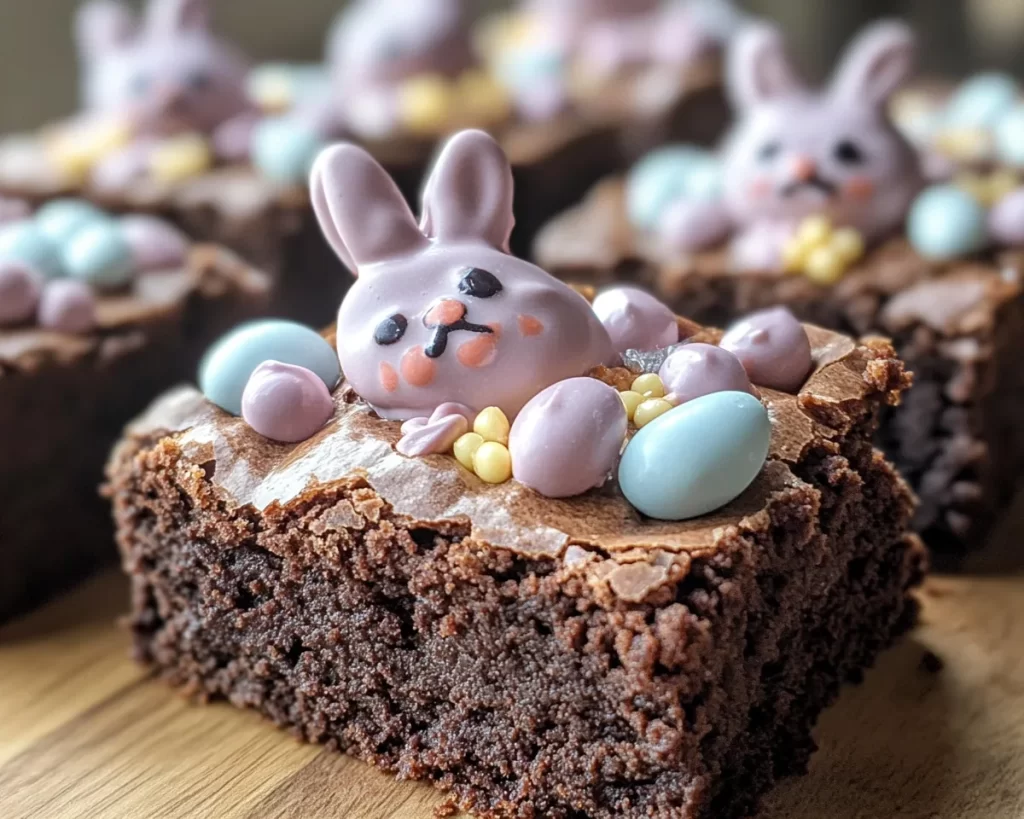
Indulging in a rich, fudgy brownie often evokes feelings of nostalgia and comfort. As Easter approaches, many of us seek creative ways to celebrate and bring joy to loved ones—a time-honored tradition in baking. If you’ve ever considered a chocolate treat that fuses the delightful tenderness of brownies with the whimsical charm of Easter, look no further. The Easter Chocolate Bunny Brownies are here to elevate your holiday dessert game!
These brownies not only ooze with rich chocolate flavor, but they are also adorned with adorable bunny shapes that make them perfect for the occasion. In this recipe, you will learn how to prepare chocolaty goodness that’s easy to whip up, even for novice bakers. The combination of textures—a soft, chewy brownie base topped with delicate chocolate decorations—will impress guests of all ages.
What Is Easter Chocolate Bunny Brownies?
Easter Chocolate Bunny Brownies are a fun twist on the classic brownie, merging chewiness with a beautiful presentation that embodies the spirit of Easter. The essence of these delightful treats lies in dense, dark chocolate brownies that serve as the foundation. Originating from the beloved brownie recipes that have graced dessert tables for generations, these brownies are enhanced with the addition of cute chocolate bunny decorations.
The flavor profile of these Easter Chocolate Bunny Brownies is rich and decadent. A well-balanced sweetness is complemented by the slight bitterness of dark chocolate. The aroma that wafts through your kitchen while they bake is simply intoxicating, making it hard to resist indulging before they even cool. Each bite provides a melt-in-your-mouth experience, aided by the delightful surprise of bunny-shaped chocolates on top, bringing whimsy alongside that familiar brownie richness. Why not treat your friends and family to a dessert that evokes fond memories while creating new ones?
Why You’ll Love This
There are numerous reasons to choose Easter Chocolate Bunny Brownies for your dessert table this spring. First and foremost, the beauty of this recipe lies in its taste. The balance of sweetness and richness paired with the visually appealing decoration makes these brownies appealing to the palate and the eyes. They are guaranteed to be a hit during any Easter gathering or springtime celebration.
Moreover, this brownie recipe is incredibly easy to follow, making it an ideal choice for busy parents or beginners in the kitchen. With straightforward steps and common ingredients, you won’t find yourself scrambling at the last minute. The cost-effectiveness of this dessert is another advantage; most of the ingredients are pantry staples, meaning you can whip them up without breaking the bank.
Some may think that baking requires fine-tuning, but this recipe simplifies the process and offers some surprising tips to avoid common pitfalls. You’ll learn to master baking processes like measuring correctly and understanding how to achieve the perfect texture for your brownies. Ultimately, these Easter Chocolate Bunny Brownies allow everyone to indulge in a delicious treat without the stress that often comes with complicated recipes.
Ingredients You’ll Need
- Unsweetened cocoa powder: Vital for that rich chocolate flavor, this ingredient adds depth. If you prefer a milder taste, consider using Dutch-processed cocoa.
- All-purpose flour: This serves as the structure for the brownies. For a gluten-free option, substitute with a gluten-free flour blend.
- Sugar: Granulated sugar provides sweetness and contributes to the brownies’ moisture. Brown sugar can be used for an extra depth of flavor.
- Butter: Melted butter adds richness and moisture. You may replace it with coconut oil for a dairy-free alternative.
- Eggs: Eggs help bind the ingredients together and provide necessary lift. For a vegan substitute, you can use flaxseed meal mixed with water.
- Vanilla extract: This enhances the overall flavor, bringing a lovely aroma. Feel free to experiment with almond extract for a different twist.
- Chocolate bunnies (or chocolate melts): The charming decoration of these brownies! Choose your favorite chocolate type, whether milk, dark, or white.
- Powdered sugar: Optional but recommended for dusting the finished brownies, adding a decorative touch.
How to Make
- Preheat your oven to 350°F (175°C). Grease and line an 8×8-inch baking pan with parchment paper, letting it hang over the edges. This will make it easier to lift the brownies out after baking.
- In a large mixing bowl, melt the butter in the microwave or over a stovetop, stirring until completely liquid. Allow it to cool slightly before adding the sugars, as you want to keep the texture smooth.
- Add granulated sugar and brown sugar to the melted butter. Mix until fully combined, and you’ll notice the mixture becomes slightly glossy. Include the eggs one at a time, beating well after each addition, then stir in the vanilla extract.
- Sift together the cocoa powder, flour, and a pinch of salt in a separate bowl. This step is vital as it helps to eliminate lumps and ensures an even distribution of dry ingredients. Gradually fold the dry ingredients into the wet ingredients, being careful not to over-mix. The mixture should be just combined.
- Pour the brownie batter into the prepared baking pan and smooth the top with a spatula. Place it in the preheated oven and bake for 25–30 minutes. You’ll know they’re ready when a toothpick inserted in the center comes out with a few moist crumbs – a sign of that chewy texture.
- Remove the brownies from the oven and let them cool in the pan for about 10 minutes before lifting them out using the parchment paper. Allow them to cool completely on a wire rack.
- Once cooled, melt your chocolate bunnies or chocolate melts in a microwave-safe bowl for about 30-second intervals, stirring in between until smooth. Pour the melted chocolate into a piping bag or a resealable plastic bag with a corner snipped off.
- Decorate the top of the cooled brownies by piping bunny shapes—get creative! Finish off with a dusting of powdered sugar for a lovely finishing touch that will impress your guests.
- Cut the brownies into squares and serve them on a vibrant platter. Consider pairing them with vanilla ice cream or a glass of milk to enhance the chocolate experience!
Variations & Substitutions
Nutty Brownies: Want to add a twist to your Easter Chocolate Bunny Brownies? Consider folding in a cup of chopped walnuts or pecans into the batter before pouring it into the baking pan. The nuts add not only texture but also a delightful crunch that complements the fudgy brownie. If you have nut allergies in your family, you might want to skip this variation or swap in toasted coconut flakes instead.
Swirled Cream Cheese Brownies: For a rich, creamy variation, blend together 8 ounces of softened cream cheese, 1/4 cup sugar, and 1 egg until smooth. Once your brownie batter is in the pan, dollop spoonfuls of the cream cheese mixture onto the surface and use a knife to swirl them together. The result is an exciting contrast of flavors that will have your guests swooning over each luscious bite.
Gluten-Free Option: If you are catering to gluten-free guests, replace the all-purpose flour with a gluten-free flour blend such as almond flour or a store-bought mix. Ensure all other ingredients are GF certified. The brownies will still be delectably rich and fudgy, satisfying everyone in attendance!
Vegan Brownies: For a completely plant-based option, substitute eggs with a flaxseed mixture—a tablespoon of flaxseed meal mixed with three tablespoons of water works wonders. Use a vegan butter or coconut oil in place of regular butter, and ensure your chocolate bunnies are dairy-free. This variation allows everyone to enjoy these delightful brownies, no matter their dietary restrictions.
Common Mistakes to Avoid
When embarking on your journey to create the perfect Easter Chocolate Bunny Brownies, there are a few common pitfalls you should be wary of. One of the most frequent issues is overmixing the batter. Doing so can lead to dense and cakey brownies instead of the rich, fudgy texture you desire. Remember to mix until just combined, allowing for a little streak of flour here and there. They will bake perfectly without the additional blending.
Another mistake involves baking time. Every oven is slightly different, so keep an eye on your brownies towards the end of the baking time. Pull them out when a toothpick comes out with a few moist crumbs, as this ensures the best texture. If you let them bake too long, you risk ending up with dry brownies.
Lastly, using the wrong pan can significantly affect how your brownies turn out. Opt for an 8×8-inch baking pan, as a larger pan will yield thinner brownies, which may bake too quickly and become dry. Always line your pan with parchment paper, allowing for easier removal.
Storage, Freezing & Reheating Tips
When it comes to storing your delightful Easter Chocolate Bunny Brownies, cool them completely before placing them in an airtight container to ensure freshness. They can last at room temperature for up to three days. However, if you’d like to prolong their life, consider refrigerating them for up to a week.
For those who prefer to save some for another occasion, freezing is an option! Wrap the brownies tightly in plastic wrap and then store them in a freezer-safe container. They can be kept in the freezer for up to three months. When you’re ready to enjoy them, allow them to thaw in the refrigerator overnight or at room temperature for a few hours.
Reheating brownies is simple. If you wish to warm them slightly before serving, place a brownie in the microwave for about 15-20 seconds. This will revive their fudgy texture and enhance the rich chocolate flavor.
Frequently Asked Questions
Can I use chocolate chips instead of melted chocolate for the brownies?
Yes, you can use chocolate chips in place of melted chocolate! However, keep in mind that they may not melt down as smoothly as bar chocolate, and you won’t achieve the same rich texture. If you prefer using chips, consider incorporating them into the batter as well for added chocolate goodness.
How can I tell when the brownies are fully baked?
A simple way to check is to insert a toothpick into the center of the brownies. If it comes out with a few moist crumbs, they’re done! Keep in mind that the brownies will continue to cook slightly while they cool in the pan, so it’s better to take them out a bit early than late.
Can I make this recipe ahead of time?
Absolutely! These brownies can be made a day or two in advance. Just remember to store them in an airtight container to keep them moist. If you’re planning to serve them on a specific day, consider decorating them with chocolate bunnies closer to the serving time for the best presentation.
What type of chocolate bunnies should I use?
You can use any type of chocolate you like! Milk chocolate is a favorite among many, but dark or even white chocolate adds a delightful contrast to the rich brownie base. Choose a brand that you love, as it will make a significant difference in taste.
Are these brownies suitable for young children?
Yes, these brownies are perfect for kids! They are fun and visually appealing, especially with the bunny decorations. Just be cautious with younger children regarding the chocolate, as it can be quite sweet. You can also consider a less sweet version if desired.
Conclusion:
In summary, the Easter Chocolate Bunny Brownies combine rich, fudgy goodness with whimsical charm, perfect for celebrating the holiday. With easy steps and various ways to customize them, this recipe is ideal for bakers of all levels. I encourage you to start gathering your ingredients and give this delightful recipe a try; you won’t regret it! Don’t forget to share the joy by inviting friends and family to enjoy the delicious results with you. Happy baking!