Prep time: 30 minutes
Cook time: 35 minutes
Total time: 1 hour 5 minutes
Servings: 12
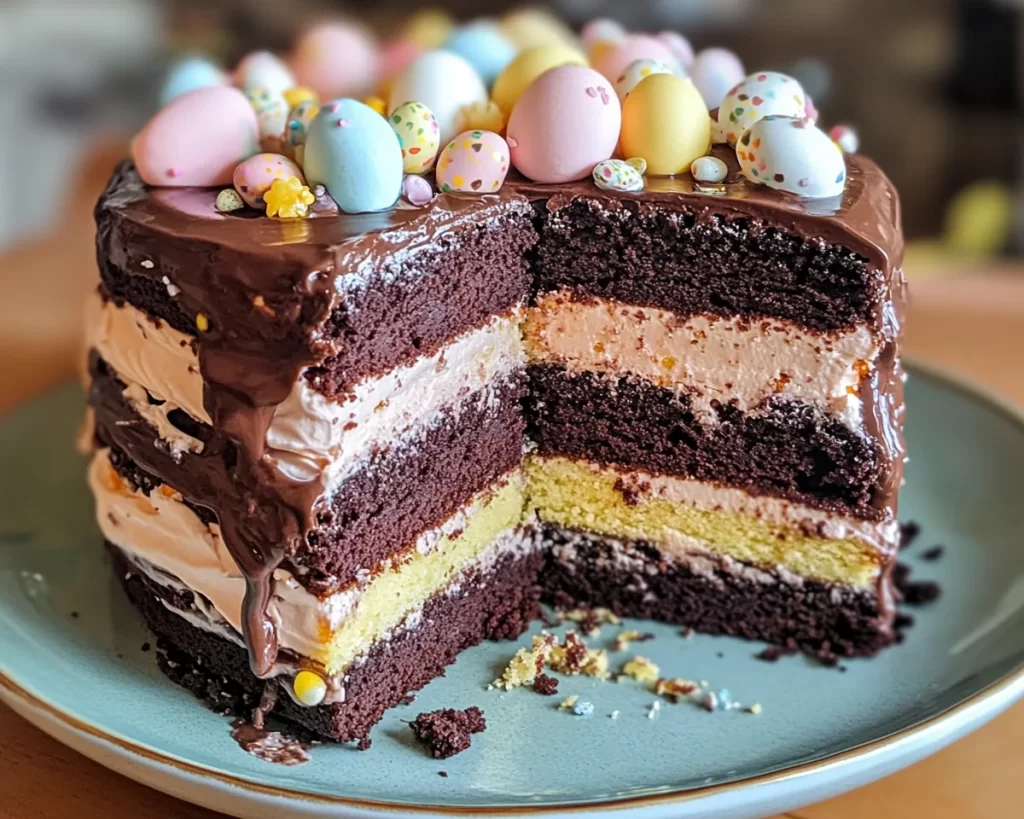
Imagine walking into your home during a festive gathering and being greeted by the intoxicating scent of warm chocolate cake. That’s the essence of the Easter Chocolate Layer Cake. It’s not just a dessert; it’s a celebration on a platter, a showstopper that combines rich cocoa flavor with creamy frosting, perfect for any occasion. This cake holds deeper meaning as it brings families together, evokes nostalgia, and often becomes a family favorite. Whether you’re celebrating Easter, a birthday, or simply indulging in a weekend baking project, this cake will impress.
In this article, you’ll discover not only how to prepare this delightful cake but also some helpful tips, variations, and answers to frequently asked questions. Let’s embark on this delicious journey together, ensuring each slice is a piece of heaven!
What Is Easter Chocolate Layer Cake?
Easter Chocolate Layer Cake is an indulgent dessert that captures the essence of springtime celebrations. Traditionally, this cake features multiple layers of moist chocolate sponge cake, sandwiched with rich chocolate ganache or buttercream frosting. The cake is often decorated with vibrant spring-themed decor, making it visually appealing as well as delicious. Chocolate is a beloved flavor that tends to unite families and friends, and during Easter celebrations, it symbolizes new beginnings, much like the season itself.
The texture of this cake is incredibly inviting; you will notice a soft and fluffy crumb that melts in your mouth. The combination of rich cocoa and sweet frosting creates a wonderful balance, making each bite a heavenly experience. You can personalize it further by adding complementary flavors, ensuring your version of the Easter Chocolate Layer Cake is distinctively yours. This recipe not only caters to chocolate lovers but also serves as an ideal dessert for various occasions, ensuring a delightful experience for everyone.
Why You’ll Love This
There are numerous reasons why you’ll fall in love with making Easter Chocolate Layer Cake. Firstly, the flavor profile is absolutely divine; this cake combines rich, velvety chocolate with sweet frosting that creates a delightful balance. Secondly, it’s also quite easy to prepare. Even if you are a beginner in the kitchen, the step-by-step process allows anyone to create a masterpiece without much trouble.
Cost-wise, this cake is quite economical. The ingredients are typically pantry staples, making it easy to whip up without breaking the bank. You can also tailor the recipe to cater to dietary preferences by incorporating gluten-free flour or dairy-free alternatives. The versatility of this cake extends beyond mere ingredients; it can be decorated to suit any theme, making it a wonderful choice for holidays, birthdays, or just a casual dessert to enjoy with your loved ones.
Ingredients You’ll Need
- All-purpose flour: Provides structure to the cake. If gluten-free is your preference, consider gluten-free all-purpose flour.
- Cocoa powder: Offers the rich chocolate flavor. Dutch-processed cocoa can be used for a deeper flavor.
- Baking powder: This is essential for helping the cake rise and achieve a fluffy texture.
- Baking soda: Similar to baking powder, it helps your cake rise.
- Salt: Enhances the flavors of the other ingredients.
- Unsweetened butter: Adds moisture and richness. Use unsalted butter for better control over salt levels.
- Sugar: Typically granulated, it sweetens the cake beautifully.
- Eggs: Acts as a binding agent while adding moisture; you can use flax eggs for vegan options.
- Milk: Contributes to the cake’s moisture; buttermilk can be used for a tangy flavor.
- Vanilla extract: Adds depth of flavor.
- Heavy cream: Necessary for creating a luscious chocolate ganache. Coconut cream is a great substitute for a dairy-free option.
- Powdered sugar: Used for frosting; it creates a smooth, sweet finish.
How to Make
- Preheat your oven to 350°F (175°C). Prepare your cake pans by greasing them with butter and then dusting them lightly with flour. This prevents the cake from sticking, ensuring a smooth release.
- In a mixing bowl, whisk together the dry ingredients: all-purpose flour, cocoa powder, baking powder, baking soda, and salt. This step not only combines the ingredients but also aerates the flour, leading to a lighter cake.
- In a separate large mixing bowl, beat the unsweetened butter and sugar until light and fluffy. This usually takes about 3-4 minutes. The mixture should appear pale and have a creamy texture.
- Add the eggs, one at a time, mixing well after each addition. Include the vanilla extract here as well. Make sure to mix thoroughly until the batter appears homogenous; this ensures an even texture.
- Gradually add the dry mixture to the wet mixture, alternating with the milk. Start and end with the dry ingredients. Mix until just combined, being careful not to overmix—this helps maintain the cake’s fluffiness.
- Divide the batter evenly between the prepared cake pans. Smooth the tops with a spatula for even baking. Bake in the preheated oven for approximately 30-35 minutes, or until a toothpick inserted into the center comes out clean.
- Once baked, let the cakes cool in the pans for about 10 minutes before transferring them to wire racks to cool completely. This cooling period prevents the cakes from becoming soggy.
- While the cakes cool, prepare your frosting. To make the chocolate ganache, heat the heavy cream in a saucepan over low heat until simmering, then remove it from the heat and add in the chocolate. Stir until melted and smooth. Allow it to cool slightly and thicken.
- Once the cakes are completely cool, place one layer on a cake stand or a serving plate. Spread a generous amount of chocolate ganache over the first layer. Place the second layer on top and repeat with the ganache. Use any remaining ganache to cover the sides of the cake.
- You can decorate the top with chocolate shavings, sprinkles, or fresh berries for additional flair. Finally, slice and serve your sumptuous Easter Chocolate Layer Cake, ready to delight your guests!
Variations & Substitutions
Coconut Chocolate Layer Cake: If you want a tropical twist, you can add shredded coconut to the batter and use coconut cream for the frosting. The combination of rich chocolate and creamy coconut offers a unique flavor that elevates this classic dessert. This variation is great if you love tropical flavors or simply want to impress someone who enjoys coconut-rich desserts. Make sure to adjust the baking time slightly if you add a significant amount of coconut to keep the texture consistent.
Gluten-Free Chocolate Layer Cake: To make this cake gluten-free, substitute regular flour with gluten-free all-purpose flour. This option allows those with gluten sensitivities to enjoy the same delightful taste without the gluten. Blend in some almond meal for added texture; just be cautious with the moisture levels, as gluten-free flours may absorb liquid differently. The key to success here is to monitor the cake as it bakes, checking for doneness a few minutes earlier than the original recipe.
Vegan Chocolate Layer Cake: By replacing eggs with flax or chia seeds mixed with water, and using almond milk instead of regular milk, you can easily transform this dessert into a vegan-friendly version. The use of vegan butter for frosting will also keep it dairy-free. The chocolate flavor often remains intense and satisfying, so you won’t miss the dairy. The texture may vary slightly but will still provide a delectable cake experience.
Mint Chocolate Layer Cake: For a refreshing twist, infuse your frosting with mint extract. This combination offers a delightful contrast to the rich chocolate flavor and creates a festive atmosphere. You can also add chocolate mint candies or fresh mint leaves as a garnish to enhance the look and taste. This variation works particularly well for spring celebrations, giving your cake that extra hint of freshness.
Common Mistakes to Avoid
One common mistake when making chocolate layer cake is using cold eggs directly from the refrigerator. Room temperature eggs incorporate better and contribute to a fluffier batter. To quickly warm eggs, you can place them in a bowl of warm water for about 10 minutes.
Another pitfall is overmixing the batter. This can result in a dense cake rather than a light and airy one. Once you add the dry ingredients to the wet mixture, blend until just combined. Finally, never skip cooling the cakes before frosting; frosting warm layers can lead to melted frosting and a messy final product.
Storage, Freezing & Reheating Tips
For storing your Easter Chocolate Layer Cake, cover it tightly with plastic wrap or aluminum foil and place it in the refrigerator. This will help preserve its moisture and flavor for up to five days. If you wish to keep it longer, consider freezing the cake. Wrap it tightly in plastic wrap and then aluminum foil, ensuring it’s airtight. A well-wrapped cake can be frozen for up to three months.
When you’re ready to enjoy a frozen slice, simply remove it from the freezer and let it thaw in the refrigerator for several hours or overnight. If you want to refresh the cake, lightly warm slices in the microwave for a few seconds or place them in a preheated oven for a quick warm-up. Remember, never refreeze thawed cake, as this compromises texture and taste.
Frequently Asked Questions
Can I use a different frosting for this cake?
Absolutely! While chocolate ganache is a classic choice, you can experiment with various frosting options such as cream cheese frosting, peanut butter frosting, or even a light whipped cream topping. Each frosting will impart a different flavor profile, allowing you to customize your cake according to your preference.
How can I make this cake more festive for Easter?
You can decorate the cake with colorful sprinkles, edible flowers, or even small Easter-themed figurines or candies. Adding bunny-shaped chocolates or pastel-colored decor can transform it from a regular dessert into a festive centerpiece for your Easter celebration.
What can I serve with the Easter Chocolate Layer Cake?
This cake pairs well with a variety of sides. A dollop of whipped cream or a scoop of vanilla ice cream complements the rich chocolate flavor wonderfully. Alternatively, fresh berries like strawberries or raspberries can add a refreshing contrast to the cake’s sweetness.
Can I bake this cake as cupcakes instead?
Yes, you can convert this layer cake into cupcakes! Simply pour the batter into cupcake liners and bake for about 18-20 minutes or until a toothpick inserted into the center comes out clean. This method makes it easier to serve individual portions.
Is there a way to reduce the sugar content?
Yes, you can reduce the amount of sugar in the recipe by substituting half of it with unsweetened applesauce or mashed bananas. Keep in mind that by altering sugar content, you may need to adjust other ingredients slightly to maintain texture and moisture in the cake.
Conclusion:
In summary, the Easter Chocolate Layer Cake encompasses all that is delightful about baking: rich flavors, a gorgeous presentation, and the joy of sharing with family and friends. Whether you choose to follow the recipe precisely or add your unique twists, you will be creating a memorable dessert sure to please everyone. So gather your ingredients, roll up your sleeves, and embark on this delicious baking adventure. Don’t forget to share this treat with loved ones, as nothing warms the soul quite like a slice of homemade cake. Enjoy the process and let your creativity shine!