Prep time: 30 minutes
Cook time: 35 minutes
Total time: 1 hour 5 minutes
Servings: 12
Are you dreaming of a cake that dives into the tropics with every bite? The **Easter Coconut Cake** conjures up memories of sweet indulgence, bright flavors, and family gatherings where laughter dances in the air. This cake is not just dessert; it’s a celebration that transforms any occasion into a memorable feast. Imagine the soft sponge enveloped in a delicate coconut flavor, paired with luscious frosting that will have your taste buds celebrating long after the last slice is gone. In this article, you’ll learn how to create this delightful cake, ensuring each layer is a burst of coconut flavor with a heavenly texture.
What makes this cake particularly special is the balance between moistness and fluffiness, and the rich yet light frost that seems to melt on your tongue. And don’t worry if you’ve never baked before; I’ll guide you through every step, with helpful tips along the way, and options for variations to suit everyone’s taste.
What Is Easter Coconut Cake?
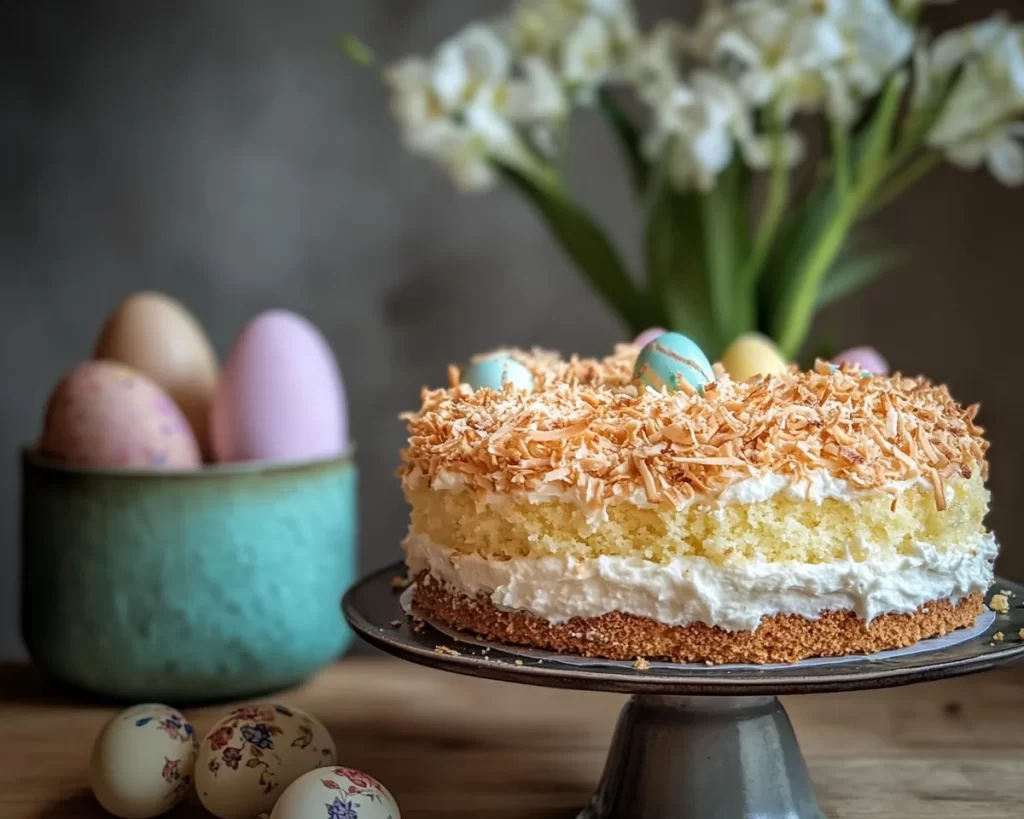
The **Easter Coconut Cake** is a delightful dessert that finds its roots in American baking traditions. This cake incorporates shredded coconut into the batter, which adds both flavor and texture. The standard version generally features a soft, vanilla-flavored cake that is layered with a creamy coconut frosting. Some variations even include coconut milk for moisture and additional flavor, giving each bite a tropical essence.
Not only does this cake deliver an incredible taste, but it also offers a visually appealing presentation. Frosted with a rich coconut cream icing and generously topped with flaked coconut, it stands tall and proud on any dessert table. With its delicate yet satisfying crumb, the **Easter Coconut Cake** becomes a centerpiece that guests will reach for time and again. The sheer aroma of coconut mingling with the buttery notes is enough to make any room feel like spring.
Baking an Easter Coconut Cake isn’t just about whipping up ingredients; it’s about creating a slice of joy that captures the essence of the season. This cake often graces tables during Easter, symbolizing rebirth and plenty. However, its delightful flavors make it perfect for any occasion or simply a sweet treat for yourself.
Why You’ll Love This
You’re going to love this **Easter Coconut Cake** for many reasons! First, the taste truly shines with its soft sponge packed with the flavor of fresh coconuts. If you’ve ever found yourself longing for a dessert that captures both warmth and festivity, this cake fits that bill perfectly. Beyond the flavor, it’s also relatively easy to make, making it suitable for beginners or busy parents looking to whip up something special without spending hours in the kitchen.
Another aspect that makes this cake appealing is its versatility. You can customize it according to your family’s preferences, whether that’s selecting a sugar-free option or expressing creativity with toppings and fillings. Many people worry about baking cakes, thinking it’s a complicated process, but this recipe breaks it down through simple instructions and helpful tips.
The overall cost is manageable too, proving that you don’t have to break the bank to bake a showstopper. You’ll be pleasantly surprised at how economical the ingredients are when purchased from local grocery stores. This cake will not only fill the room with delicious aromas but also your hearts with joy, making it a delightful addition to any family gathering.
Ingredients You’ll Need
- All-purpose flour: The base of your cake. It helps create that delightful structure. For gluten-free options, consider almond or coconut flour.
- Granulated sugar: Sweetens your cake beautifully. You can substitute with coconut sugar for a more caramel-like taste.
- Baking powder: This provides the necessary lift for a fluffy texture, so ensure it’s fresh!
- Unsalted butter: Adds richness and moisture. You can use margarine as an alternative, but for the best flavor and texture, stick to butter.
- Coconut milk: Deepens the coconut flavor significantly. If unavailable, regular milk can work, but it won’t have the same tropical punch.
- Eggs: Eggs help bind the ingredients together while adding moisture. For a veg-friendly option, chia seeds or flaxseed meal can be good substitutes.
- Vanilla extract: Enhances the overall flavor profile with warmth. Don’t skimp on quality; pure vanilla extract makes a difference!
- Shredded coconut: This is the star of the show! You can use sweetened or unsweetened depending on your preference.
- Powdered sugar: Used in the frosting, it provides a lovely, delicate sweetness. Remember to sift it for a smooth texture.
- Cream cheese: Adds a luscious richness to the frosting. For a lighter version, Greek yogurt can sometimes substitute.
How to Make
1. **Preheat your oven** to 350°F (175°C). Preparing your oven in advance ensures even baking. While the oven heats up, grease and flour two 9-inch round cake pans. This step is crucial as you want to ensure that the cakes release easily once baked. If you prefer, you can also line the bottoms of the pans with parchment paper for added assurance.
2. **Combine your dry ingredients**. In a bowl, whisk together the all-purpose flour, baking powder, and a pinch of salt. This promotes even distribution of the leavening agents, which is key for achieving a fluffy texture. Set this bowl aside while you focus on the wet ingredients.
3. **Mix the wet ingredients**. In a separate bowl, cream together the unsalted butter and granulated sugar until the mixture is light and fluffy. This usually takes about 4-5 minutes with an electric mixer. Add in each egg one at a time, ensuring they’re fully incorporated before adding the next. The batter will begin to look fluffy and airy at this stage.
4. **Incorporate the coconut**. Tap in the vanilla extract and pour in the coconut milk. Mix until fully integrated. Next, slowly add the dry ingredients to this wet mixture about a cup at a time. Overmixing at this point can lead to a dense cake, so stop as soon as you see no dry flour.
5. **Fold in shredded coconut**. This final step adds that wonderful texture and flavor we crave. Gently fold it into the batter, ensuring it’s evenly distributed. The mixture should now be thick but smooth, with visible flecks of coconut throughout.
6. **Bake your cakes**. Divide the batter evenly between the two prepared pans, smoothing the tops with a spatula. Place them in the center of the oven and bake for 30-35 minutes. You can check for doneness by inserting a toothpick into the center – it should come out clean or with a few crumbs attached.
7. **Cool the cakes**. Once baked, remove the pans from the oven. Allow them to cool in the pans for about 10 minutes. Then, run a knife around the edges to loosen and invert them onto a cooling rack. Let the cakes cool completely before frosting, as warm cake can lead to melted frosting.
8. **Prepare your frosting**. While the cakes are cooling, it’s time to whip up that creamy coconut frosting. Beat together the cream cheese and powdered sugar until smooth. Add a bit of coconut milk for consistency, and fold in shredded coconut until mixed well.
9. **Assemble your cake**. Once cooled, place one layer on a serving platter. Generously spread a layer of coconut frosting on top before adding the second cake layer. Frost the top and sides of the cake, adding additional shredded coconut on the exterior for that beautiful, textured look.
10. **Chill and serve**. For best flavor and texture, allow the cake to chill in the refrigerator for about an hour before serving. This resting time lets all the flavors meld beautifully. When ready, slice and serve!
Variations & Substitutions
Chocolate Coconut Cake: If chocolate is your weakness, you can easily convert the traditional recipe into a **Chocolate Coconut Cake**. Simply add cocoa powder to the flour mixture – about ½ cup should do the trick. This variation provides a luxurious chocolate flavor, and the coconut frosting pairs beautifully with the rich chocolate sponge.
Vegan Coconut Cake: For those who prefer plant-based options, you can make a **Vegan Coconut Cake**. Substitute eggs with flaxseed meal (1 tablespoon of flaxseed meal mixed with 2.5 tablespoons of water for each egg). Use coconut oil instead of butter and almond or soy milk to keep the moisture up. The result is surprisingly light and just as delicious!
Layered Fruit Coconut Cake: For something a bit more indulgent, try a **Layered Fruit Coconut Cake**. Add fresh fruits like strawberries or pineapple slices between layers or even mixed into the frosting. It adds a delightful burst of freshness that can balance the sweetness of the coconut frosting, making each slice a wonderful surprise.
Gluten-Free Coconut Cake: To cater to gluten sensitivities, make a **Gluten-Free Coconut Cake**. Replace the all-purpose flour with a gluten-free blend. It’s crucial to ensure that your baking powder is also gluten-free. The resulting cake will be just as soft and flavorful, allowing everyone to indulge without worry.
Common Mistakes to Avoid
While baking the **Easter Coconut Cake**, there are some pitfalls to keep an eye on. One common mistake is skipping the prep work, especially greasing and flouring the cake pans properly. If you don’t take this essential step, you risk having your cake stick to the pan, ruining its beautiful shape. Always make sure to line the pans with parchment paper for optimal results.
Another issue can arise from not sifting the powdered sugar when making the frosting. If the sugar is clumpy, the frosting may become grainy, which detracts from the smooth texture you’re aiming for. Take the time to sift for a better culinary experience.
Overmixing the batter is another common error. While it’s comforting to see a well-mixed batter, overmixing can develop gluten, leading to a dense cake. Mix until just combined for the best results.
Storage, Freezing & Reheating Tips
To ensure your **Easter Coconut Cake** stays fresh, it’s best to store it in an airtight container at room temperature for up to 3 days. If you’re in a warmer climate, consider refrigerating it to keep the frosting stable. When properly stored, it can last up to a week in the fridge.
If you plan to freeze the cake, wrap it tightly in plastic wrap and foil. It can be frozen for up to 3 months, maintaining its flavor and texture remarkably well. To defrost, simply place it in the refrigerator overnight before serving. For excellent **food safety**, ensure that any leftover cake is stored properly and consumed within safe timeframes to avoid spoilage.
Frequently Asked Questions
Can I use fresh coconut instead of shredded coconut?
Absolutely! Using fresh coconut can enhance your cake’s flavor and texture. Just be sure to finely shred or grate it before adding it to the batter or frosting. You may also need to adjust the moisture content slightly, as fresh coconut has natural oils.
How can I make this cake less sweet?
If you’re looking to tone down the sweetness, consider reducing the amount of granulated sugar. Additionally, you can use unsweetened shredded coconut instead of sweetened. Lastly, serving it with a side of fresh fruit can alleviate some of the cake’s sweetness while complementing its flavors.
Can I bake this cake as cupcakes?
Yes, definitely! This **Easter Coconut Cake** recipe can easily be adapted into cupcakes. Fill your cupcake liners about two-thirds full and bake them for 18-20 minutes, or until a toothpick inserted comes out clean. This creates delicious bite-sized treats that are perfect for sharing!
What type of coconut should I use for the best flavor?
For maximum coconut flavor, using unsweetened shredded coconut is often preferred. It keeps the cake rich and less sugary while allowing the natural coconut essence to shine through. Toasting the coconut before adding it can also elevate the flavor profile.
Can I make this cake ahead of time?
Absolutely! You can bake the layers a day in advance and store them wrapped tightly in plastic wrap at room temperature. Frost the cake on the day you plan to serve it to ensure that the frosting stays fresh and fluffy.
Conclusion:
The **Easter Coconut Cake** is not just a delicious dessert; it’s a rich, memorable experience that makes every slice a celebration of flavor and joy. With its remarkable taste and inviting texture, there’s no doubt that this cake will become a cherished part of your baking repertoire. I encourage you to try making it soon, experiment with the variations, and make it your own. Gather your loved ones around the table and share this delightful creation; you won’t regret it! Get baking and let this joyous cake brighten your day!