Prep time: 30 minutes
Cook time: 20 minutes
Total time: 50 minutes
Servings: 24 cake pops
In the world of desserts, few treats evoke joy as effortlessly as **Easter Vanilla Cake Pops**. Picture a sunny Easter morning, the vibrant colors of spring surrounding your home, and a delightful aroma wafting from your kitchen. These cake pops are more than just a tasty treat; they are an experience, a sweet embrace of nostalgia and celebration. Perfect for family gatherings, kids’ parties, or casual get-togethers, they embody the cheerful spirit of Easter in every bite. In this article, you’ll learn the secrets to crafting the perfect cake pops, from selecting the right ingredients to mastering the art of decoration.
The charming allure of these cake pops is their delightful burst of **vanilla flavor**, complemented by a **luscious coating** of chocolate and colorful sprinkles. They are moist, tender, and just sweet enough to satisfy your cravings without overwhelming your palate. Beyond their taste, the fun aspect of shaping and decorating them transforms a simple baking endeavor into a creative activity you can share with loved ones, making it a wonderful project for busy parents, beginners in the kitchen, or anyone looking to spread joy through food.
What Is Easter Vanilla Cake Pops?
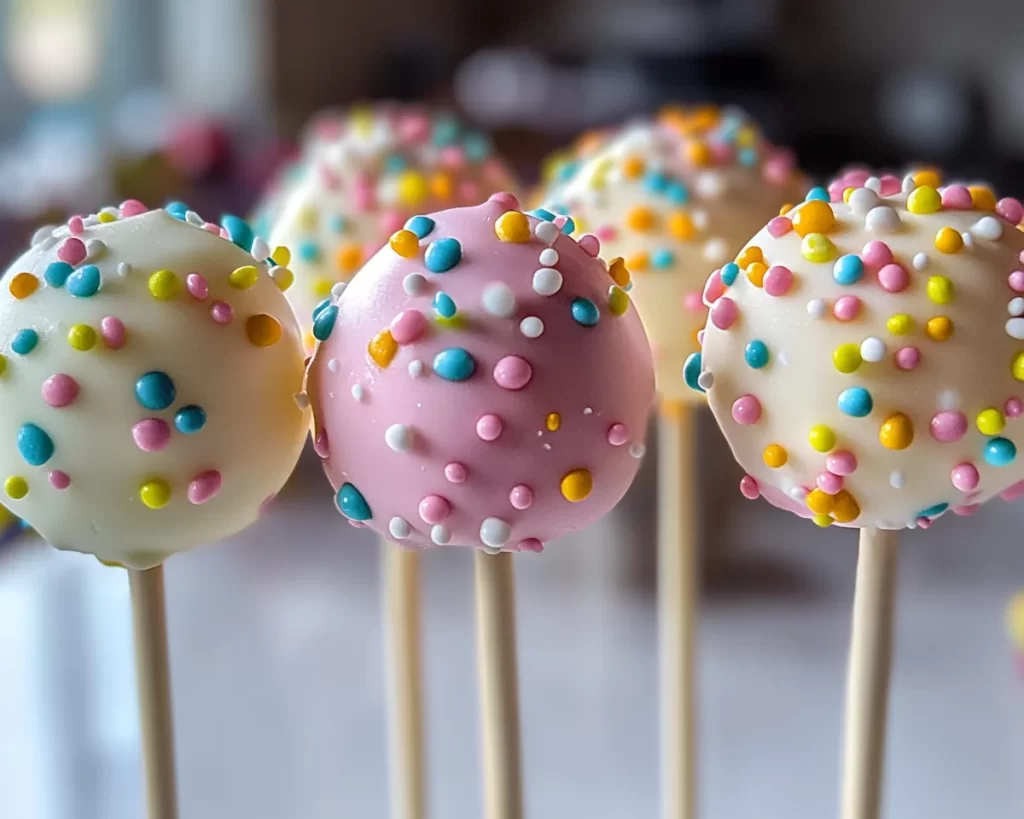
**Easter Vanilla Cake Pops** are small, round bites made from crumbled cake mixed with frosting, shaped into balls, and coated in chocolate. Originating from the idea of []cake balls[], these treats have become a dessert phenomenon embraced at celebrations and gatherings. The crumbling and binding process creates a pleasant **texture** that is both soft and slightly chewy, with each morsel delivering a satisfying combination of sweetness and creaminess.
The beauty of cake pops lies in their versatility. While this recipe focuses on a classic **vanilla flavor**, you can easily adapt it for various preferences and occasions. The exterior is often adorned with colorful coatings and sprinkles, making them not just a treat for the tastebuds, but also a feast for the eyes. This makes Easter Vanilla Cake Pops an ideal choice for festivities, as they can be easily customized with seasonal decorations, adding an extra layer of fun.
When you taste these cake pops, expect the warmth of vanilla to envelop you, complemented by the richness of chocolate and the playful crunch of toppings. Each bite is like a little celebration, reminding you of brighter days, family gatherings, and the joy that comes from sharing good food with great company.
Why You’ll Love This
There are many reasons why you’ll adore making Easter Vanilla Cake Pops. First and foremost is their **taste**; the combination of moist vanilla cake and rich chocolate coating makes them irresistible. Whether you’re serving them at a spring celebration or just craving something sweet, these cake pops will satisfy your sweet tooth.
Another reason these cake pops shine is their ease of preparation. Unlike traditional cakes that require monitoring bake times and complicated layers, these pops come together relatively quickly. This makes them an excellent project for busy parents or beginner bakers who may feel intimidated by more complex dessert recipes. You can achieve impressive results without the need for professional baking skills, which fosters a sense of accomplishment.
Cost is another benefit; with simple and accessible ingredients, you can whip up a batch without breaking the bank. And let’s not forget their versatility; you can customize cake pops to fit various dietary needs and preferences—there’s something for everyone!
Some may think that cake pops are too difficult or time-consuming to make, but the misconception couldn’t be further from the truth. It’s all about following the right steps and allowing yourself to experiment. The joy of creating these treats lies not only in the final product but in the entire experience, making them a delightful addition to any gathering.
Ingredients You’ll Need
To make perfect Easter Vanilla Cake Pops, gather the following ingredients:
- Vanilla cake mix: This is the base of your cake pops. For a homemade touch, consider making a cake from scratch.
- Eggs: Essential for binding everything together, eggs add richness and moisture.
- Vegetable oil: Adds moisture to the cake, ensuring it stays tender and wonderful.
- Water: Necessary for mixing the cake batter and keeping it the right consistency.
- Frosting: A key ingredient for binding the cake crumbs together. Use vanilla frosting for a classic flavor or any frosting you prefer.
- Chocolate melts or candy coating: To coat the cake pops, these melts provide a sweet and creamy outer shell.
- Sprinkles: These colorful toppings are for decoration and add a festive touch; feel free to choose different shapes and colors!
- Lollipop sticks: Essential for holding and displaying your cake pops.
- Styrofoam block: This is helpful for drying and standing your cake pops upright.
Each ingredient plays a critical role; for instance, if you’re looking to substitute the frosting, consider using Greek yogurt for a lighter option or a vegan frosting if you have dietary restrictions. You want to find the right balance that retains the delightful texture while accommodating the flavor profiles you enjoy.
How to Make
Making Easter Vanilla Cake Pops is a straightforward process that yields delicious results, perfect for sharing with family and friends. Follow these steps for success:
- Prepare the cake: Start by preheating your oven to 350°F (175°C). Grease and flour a **9×13-inch baking pan**. In a mixing bowl, combine the cake mix, eggs, vegetable oil, and water according to the package instructions. Once all ingredients are mixed, pour the batter into the prepared pan. Bake for approximately **20-25 minutes**, or until a toothpick inserted into the center comes out clean. After baking, allow the cake to cool completely in the pan.
- Make the cake crumbs: Once the cake has cooled, crumble it into a large mixing bowl using your hands. The texture should be fine, resembling sand. Avoid large chunks to ensure proper binding with the frosting. This step is essential; the cake crumbs need to be uniform to maintain the integrity of your cake pops.
- Mix in the frosting: Add about **¾ cup** of frosting to the bowl of crumbled cake. Mix it thoroughly until the texture becomes moldable; it should be moist but not overly sticky. Use your hands for better control. If the mixture feels too dry, you can add a bit more frosting. The right consistency is crucial—we want it to hold together without being too soggy.
- Shape the cake pops: With your hands, take small portions of the mixture and roll them into balls, about 1 inch in diameter. This is a fun step for you or any kids helping in the kitchen! Place the formed balls onto a parchment-lined baking sheet, leaving space between each pop. This is also a good time to check and make sure you are getting even sizes for uniform baking.
- Chill the cake pops: Once all your balls are formed, place the baking sheet in the refrigerator for at least **30 minutes**. This helps them set and firm up, making them easier to coat later and preventing them from falling apart.
- Melt the chocolate: While your cake pops are chilling, melt the chocolate coating. You can do this using the microwave or a double boiler. If using the microwave, place your chocolate melts in a microwave-safe bowl and heat in **30-second intervals**, stirring in between until fully melted and smooth. Be careful not to overheat, as this will cause the chocolate to seize. A smooth consistency is essential for even coating.
- Insert lollipop sticks: Once the cake pops are firm, take them out of the refrigerator. Dip the tip of each lollipop stick into the melted chocolate before inserting it into the center of each cake ball, about halfway through. This helps secure the stick in place.
- Coat the cake pops: Now, dip each cake pop into the melted chocolate, ensuring it’s fully covered. Allow any excess chocolate to drip off, and quickly sprinkle your desired decorations on top before the chocolate sets. You have the option to be creative here—use a variety of sprinkles, or even drizzle contrasting colors of chocolate over the pops for a special touch.
- Set and dry the cake pops: Once coated, stand the cake pops upright in a Styrofoam block or place them back on the parchment-lined baking sheet. Allow them to set at room temperature for about **30 minutes** or until the chocolate hardens completely.
- Serve and enjoy: Once the chocolate has set, your Easter Vanilla Cake Pops are ready to be served! Arrange them on a platter and watch as they disappear from the table. Don’t forget to share them at gatherings; they’re bound to be a hit!
These steps provide you with a clear pathway to creating delightful cake pops. Keep in mind that practice makes perfect; if you feel the first batch didn’t turn out perfectly, don’t hesitate to try again. Each attempt is an opportunity to learn, and the joy of cake pops is in the process as much as in the outcome.
Variations & Substitutions
Chocolate Cake Pops: If you prefer a richer flavor, you can easily swap the vanilla cake mix for a chocolate cake mix. The process remains the same, but the chocolatey goodness will offer a delightful contrast to the sweet chocolate coating.
Red Velvet Cake Pops: For a festive twist, try using red velvet cake mix. Not only will these cake pops have a unique flavor profile with cream cheese frosting, but their vibrant red color adds a stunning visual impact, making them perfect for holiday festivities.
Gluten-Free Cake Pops: To make these pops gluten-free, you can substitute regular cake mix with a gluten-free blend. Ensure your frosting is also gluten-free to keep the entire recipe compliant. Many people are looking for gluten-free treats, and these will be a hit at gatherings.
Vegan Cake Pops: For a vegan option, use egg substitutes like applesauce or flaxseed meal, and choose plant-based frosting and chocolate melts. The flavor and texture will still be rewarding, and your vegan friends will thank you!
Flavor Variations: Sprinkle in different extracts to personalize your cake pop flavor! Replace some of the vanilla extract with almond, mint, or even lemon extract for a refreshing twist.
Each variation allows you to explore new flavors and cater to different dietary restrictions while still enjoying the festive spirit of Easter Vanilla Cake Pops. Customization is part of the fun, so feel free to get creative with your ingredients!
Common Mistakes to Avoid
Baking can sometimes lead to *missteps*, but learning from these mistakes will enhance your skills. One common issue is **overbaking** the cake. Make sure to follow the baking time closely and check for doneness. Using a toothpick to test if the cake is done is key; if it comes out clean, it’s time to take it out!
Another pitfall is using **excess frosting**. While adding frosting is necessary for binding your cake pops, using too much can lead to overly sweet and gooey pops that crumble apart. Aim for just enough to hold the crumbs together without making the mixture wet.
Additionally, when melting chocolate, ensuring it does not overheat is critical. **Burnt chocolate** will harden and become unusable. Use low-medium heat and stir frequently to achieve a silky texture that’s perfect for dipping.
Finally, patience is essential when it comes to **setting** the coated cake pops. Rushing this step can lead to pops falling off the lollipop sticks or a mess on your serving platter. Allow them to set in a cool, dry place until fully hardened to achieve the best results.
By avoiding these common mistakes, you’ll enhance your cake pop-making skills and ensure delightful treats each time.
Storage, Freezing & Reheating Tips
Proper storage is key to maintaining the freshness and quality of your Easter Vanilla Cake Pops. If you have any leftovers (though they might disappear quickly!), store them in an airtight container at room temperature for up to **3 days**. Make sure to keep them cool and away from direct sunlight to prevent the chocolate from melting.
If you want to store cake pops for an extended period, consider **freezing** them. To do this, place the pops on a parchment-lined baking sheet in a single layer and freeze them for about **2 hours**. Once they are firmly frozen, transfer them to an airtight container or freezer bag, separating layers with parchment paper. They can be stored in the freezer for up to **3 months**. When you’re ready to enjoy them, simply move the desired amount to the refrigerator to thaw for a few hours or leave them at room temperature for about **30 minutes**.
**Reheating** is typically not necessary, but if you want to restore their original appearance, you can lightly warm the chocolate coating by placing the cake pops in a warm oven (not heated) for a few minutes. Keep an eye on them to ensure they do not melt.
Lastly, always adhere to **food safety guidelines**. If you’re sharing with guests, remind them to consume cake pops within a few days to guarantee optimal flavor and freshness. Enjoying these treats while they are at their best will ensure maximum satisfaction!
Frequently Asked Questions
Can I use leftover cake to make cake pops? Yes! Leftover cake is a fantastic way to make cake pops. Just crumble the cake into fine crumbs and follow the same steps for mixing with frosting. It’s a great way to minimize waste and create something delicious from what might otherwise be discarded.
What type of chocolate is best for coating? Using chocolate melts or candy coating is highly recommended since they melt smoothly and set well. If you’re feeling adventurous, you can also use high-quality chocolate, but make sure to temper it correctly for best results.
How can I make cake pops less sweet? If you find that cake pops are too sweet for your liking, consider reducing the amount of frosting you use to bind the cake crumbs. You can also experiment with adding a pinch of salt to balance the sweetness, or use a less sweet type of chocolate coating.
Can I use a different cake flavor? Absolutely! The beauty of cake pops lies in their versatility. Feel free to experiment with different cake mixes, such as lemon, red velvet, or even almond cake. Just adjust the accompanying frosting flavors accordingly.
How can I customize my cake pops for different occasions? You can customize them in countless ways! Change the colors and shapes of your sprinkles to match seasonal holidays, birthdays, or themed parties. You can also use flavor extracts or even add edible glitter for an even more festive look!
Conclusion:
Easter Vanilla Cake Pops are more than just a dessert; they represent the joy of togetherness and creativity in the kitchen. With their delightful taste and charming appearance, they are perfect for any celebration or just a sweet treat at home. By following the detailed steps and incorporating variations, you can create your special version of this classic treat.
I encourage you to try making these delicious cake pops, whether for a special occasion or simply to satisfy your sweet cravings. Share them with friends, family, or even your little ones, and enjoy the joyful process of baking together. Let the essence of spring and sweetness fill your home—get started on your cake pops today!