Let’s Get Real
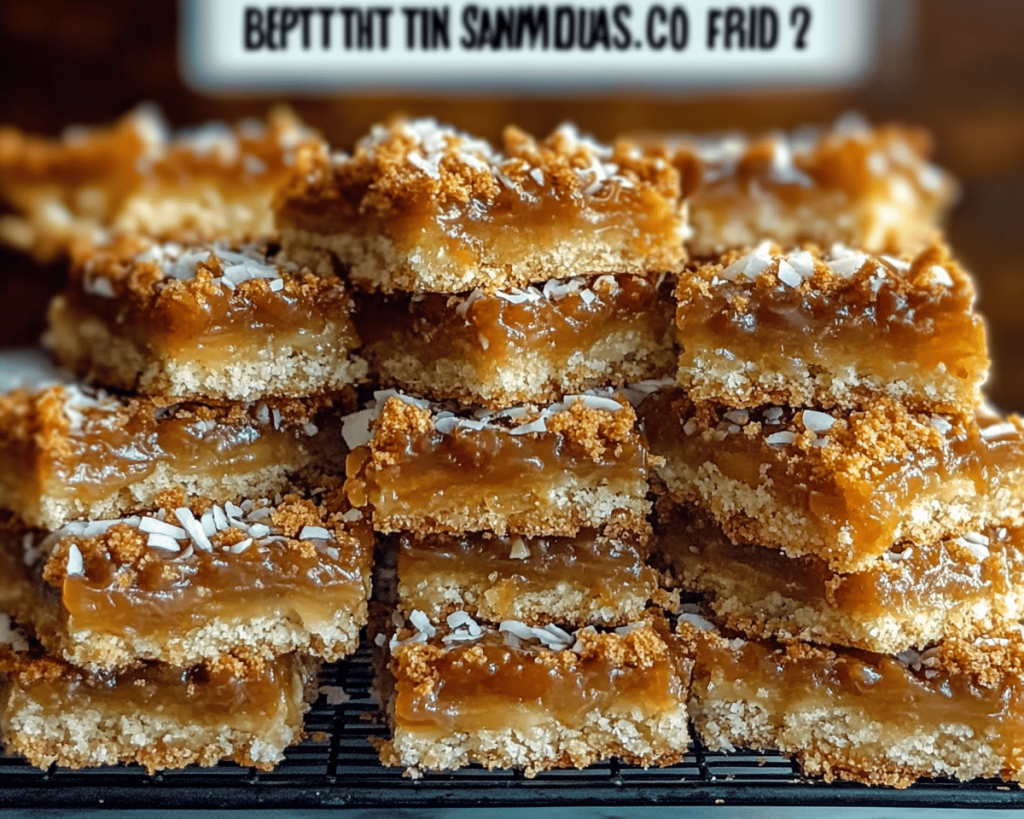
Alright, friends. Gather ‘round because I need to confess something monumental: I have a love-hate relationship with Girl Scout cookies. Specifically, Samoas. You know the ones—crunchy, chewy, coconutty circles of bliss topped with caramel and drizzled in chocolate? Yeah, those. When I was a kid, I ate them like they were going out of style. But something changed as adulthood crept in, and now I’m all about that homemade vibe. Why? Because there’s no way I’m shelling out $4 a box for those beauties when I can whip up a batch that’s easier, tastier, and let’s be honest, cheaper. Cue the *Easy Better Than Samoas Caramel Coconut Bars*.
The winter weather out there is no joke. I mean, I’m up to my ankles in snow, and my craving for a warm cozy treat just skyrockets every time I see a single flake fall. Enter these bars: the perfect antidote to the winter blues while also letting me tap into my inner baker. No fancy rolling techniques or wasting time contemplating life decisions while waiting for them to bake. The best part? I can eat them without guilt, knowing I made them from scratch—because let’s face it, *everything* tastes better when you make it yourself (and it’s like a free workout mixing that batter!).
So, grab your apron and let’s dive into this caramel-y, coconutty adventure that’ll leave you wondering why you ever settled for boxed cookies. Seriously, this is going to become your new obsession.
Ingredients, Unfiltered
Let’s break down what you’ll need for these delicious bad boys. I’ll even throw in my two cents about each ingredient, because y’all know I’m all about that personal touch.
What’s Really in Easy Better Than Samoas Caramel Coconut Bars
Butter: We’re gonna need a cup of this creamy goodness to form the base of our bars. Trust me; don’t even think about substituting it with margarine or anything else. Butter is life, people.
Sugar: This is where the magic happens—sugar sweetens your life and, more importantly, gives texture to the bars. Plus, can we talk about that satisfying crunch when you bite into one of these? That’s sugar doing its thing. I mean, if you’re on a health kick, just accept that these are not your friend, but they sure will make your taste buds sing.
Brown Sugar: This little gem adds a deeper flavor to our caramel and makes the bars extra chewy. I always go for light brown sugar; it’s my comfort zone. Dark brown sugar will turn the flavor up a notch if you’re feeling adventurous.
All-Purpose Flour: You’re gonna need this to hold everything together. Seriously, we can’t have a bunch of gooey goodness without some structure.
Baking Soda: Life is full of ups and downs. Baking soda gives the bars that lift we all need from time to time—both in baking and life.
Salt: Just a pinch. Salt is the unsung hero in any sweet recipe; it balances out the sweetness and enhances those glorious flavors. Plus, it adds a little drama to our bars, which is essential.
Coconut Flakes: Here’s where the island magic comes in. Go for unsweetened if you want to feel like a true culinary warrior, but sweetened adds a nice bite and brings you that classic Samoa flavor. You do you.
Coconut Oil: Some recipes swear by it, and I’m kind of obsessed. It makes the bars softer and gives that milky richness that slathers on that coconut goodness. It’s a vibe.
Caramel Sauce: Please, for the love of all things holy, buy this stuff or make it from scratch! If you feel ambitious, I salute you. Otherwise, I won’t judge you for taking the shortcut—just make sure it’s a good quality sauce, so it’s not too runny.
Chocolate Chips: Apparently, adding chocolate fixes everything, and I 100% support this idea. Dark chocolate, milk chocolate, or even semi-sweet—pick your poison and drizzle generously over the top.
Let’s Talk Health (or Not)
Is This Even Healthy? Let’s Discuss
So, here’s the deal: if you’re making *Easy Better Than Samoas Caramel Coconut Bars*, you’re probably not on a cleanse, and you’re probably okay with that. I mean, come on. This isn’t a salad with a side of quinoa; this is a decadent treat loaded with sugar, butter, and sparkle. To say it’s healthy would be a stretch. Sure, we’ve got coconut, and I guess there’s some fiber in there… but this is dessert territory, folks!
Let’s get real: there’s a solid amount of butter and sugar in these gems, and you won’t hear me complaining about it. Sure, I could work out more, maybe even cut back on the chocolate chips, but who wants to do that when these bars make life so much sweeter? So embrace the chaos, enjoy the sweet simplicity, and remember—treat yourself with good, old-fashioned cookies.
Your Grocery List
Here’s What You’ll Need
– ½ cup unsalted butter, softened
– 1 cup granulated sugar
– 1 cup light brown sugar, packed
– 2 cups all-purpose flour
– 1 teaspoon baking soda
– ½ teaspoon salt
– 1 ½ cups unsweetened coconut flakes (or sweetened, if that’s your thing)
– ½ cup coconut oil (melted)
– 1 cup caramel sauce (store-bought or homemade)
– 1 cup chocolate chips (dark, milk, semi-sweet—whatever floats your boat)
– 12 servings (or more if you need a personal stash)
The Actual Cooking Part
Okay, Let’s Make This
1. **Preheat that oven!** First things first: get your oven preheating to 350°F (that’s 175°C if you’re one of my international friends). I like to get this going early so I can focus on mixing without any interruptions.
2. **Mix it up.** Grab a large mixing bowl and toss in your softened butter, granulated sugar, and brown sugar. Using a hand mixer or a good old whisk (if you need to work out some frustrations—whoops, did I just type that?), cream these together until fluffy and combined. It should look like fluffy clouds of happiness!
3. **Add the dry ingredients.** Next, you’re going to sift in your flour, baking soda, and salt. If you want to get fancy, use a sieve; if you’re like me, just whip it all in there and mix until it’s combined. It’s okay if there are a few clumps; we’re not running for a cooking competition here.
4. **Coconut party!** Now, introduce the coconut flakes into the mix, folding them in gently. This is where the magic begins to happen. You should smell it already. If you don’t, check your nose; it might be winter-dulled.
5. **Add the coconut oil.** Pour in that glorious melted coconut oil, and mix until combined. This is a perfect time to taste the batter. Just a smidge—but don’t go overboard! Save some for the actual bars.
6. **Spread it out.** Grab a parchment-lined baking dish (13×9 inches works great) and press the dough evenly into the bottom. Don’t panic if this looks messy—it’s supposed to feel a little sticky. Channel your inner zen and spread it out evenly. It doesn’t need to be perfect; imperfections make it perfect. Did I mention that accidentally hitting the oven mitt off the counter and sending it flying across the room is a classic kitchen move? Just me? Okay then.
7. **Bake it.** Pop it into your preheated oven and bake for about 25 to 30 minutes. While that’s happening, clean up your unholy mess; I swear the kitchen looks like a flour bomb exploded.
8. **Caramel time.** While your base is baking, let’s prepare the best part: the caramel! If you’re using store-bought, just heat it on low. If you’re feeling like a Martha Stewart wannabe, make it from scratch. Either way, pour that goodness all over the baked base as soon as it comes out of the oven, and then spread it evenly. You want every inch to be covered in sticky glory.
9. **Chill out.** Allow those bars to cool for about 15 minutes. This is crucial because if you don’t, the chocolate will melt uncontrollably, and trust me, melted chocolate on half-baked bars just isn’t a good look.
10. **Chocolate drizzle.** Speaking of chocolate, melt those chocolate chips either in the microwave or over a double boiler (that’s fancy talk for putting a bowl over a pot of simmering water). Once melted, drizzle it generously over the caramel-coated bars using a fork or piping bag. Don’t hold back; life is too short to be stingy with chocolate.
11. **Let it set.** Allow these beauties to set completely at room temperature or pop them in the fridge for up to an hour so they can firm up. Pro-tip: Patience is key here; cutting too early will result in a hot mess.
Side Notes & Sassy Hacks
Bonus Tips You Didn’t Ask For
– **Swaps Galore:** Got a coconut allergy? Fear not; you can swap in graham cracker crumbs for a delightful twist, or mix in some crushed nuts instead of coconut.
– **Caramel vs. Toffee:** Not feeling like cracked caramel? Consider using toffee bits for an equally sweet topping. Who doesn’t love that crunch?
– **Flavor Adventure:** Challenge your taste buds by swapping in different types of chocolate! White chocolate on top brings a whole new vibe. Trust me; your guests will be singing your praises.
– **Storage Magic:** These bars will stay fresh in an airtight container for up to a week—if they last that long. I’ve eaten mine sooner simply because they taste better when they’re fresh.
– **Freezer Friendly:** You can also freeze the baked bars! Just be sure to wrap them tightly in plastic wrap, and they’ll keep up to three months. I mean, life gets busy, and nothing feels better than having a stash of homemade treats waiting for you.
Final Words of (Culinary) Wisdom
And just like that, you’ve made the most incredible *Easy Better Than Samoas Caramel Coconut Bars*! If you’ve made it this far, congratulations—you just leveled up your dessert game. Now, I want to hear from you! If you try these, tag me on social media. If you can’t be bothered to do that, just send me a virtual high-five and savor every single chewy, chocolatey bite. Remember, life is too short for boring desserts, so live it up with these delicious bars! Enjoy!