### Meta Title: Easy Cherry Danish Pastry Recipe
### Meta Description: Dive into this easy Cherry Danish pastry recipe – flaky, fruity, and irresistibly sweet. Perfect for breakfast or as a delightful treat!
—
You know that feeling when you bite into something flaky, sweet, and comforting, and all your worries melt away? That’s the magic of homemade pastries, especially when they’re filled with vibrant cherry goodness. Imagine waking up to the aroma of melted butter and baking dough wafting through your kitchen, enticing everyone to gather around the table. Today, I’m thrilled to share with you an easy Cherry Danish pastry recipe that will leave you and your loved ones craving more. This delightful concoction combines flaky layers with a fruity cherry filling, drizzled with a simple glaze that ties it all together perfectly.
In this recipe, I promise you’ll uncover the harmony between delicate pastry and juicy fruit, all in just a few playful steps. Whether you’re impressing guests at brunch or savoring a quiet moment with fresh coffee, this dish perfectly balances comfort and elegance.
What is Easy Cherry Danish Pastry?
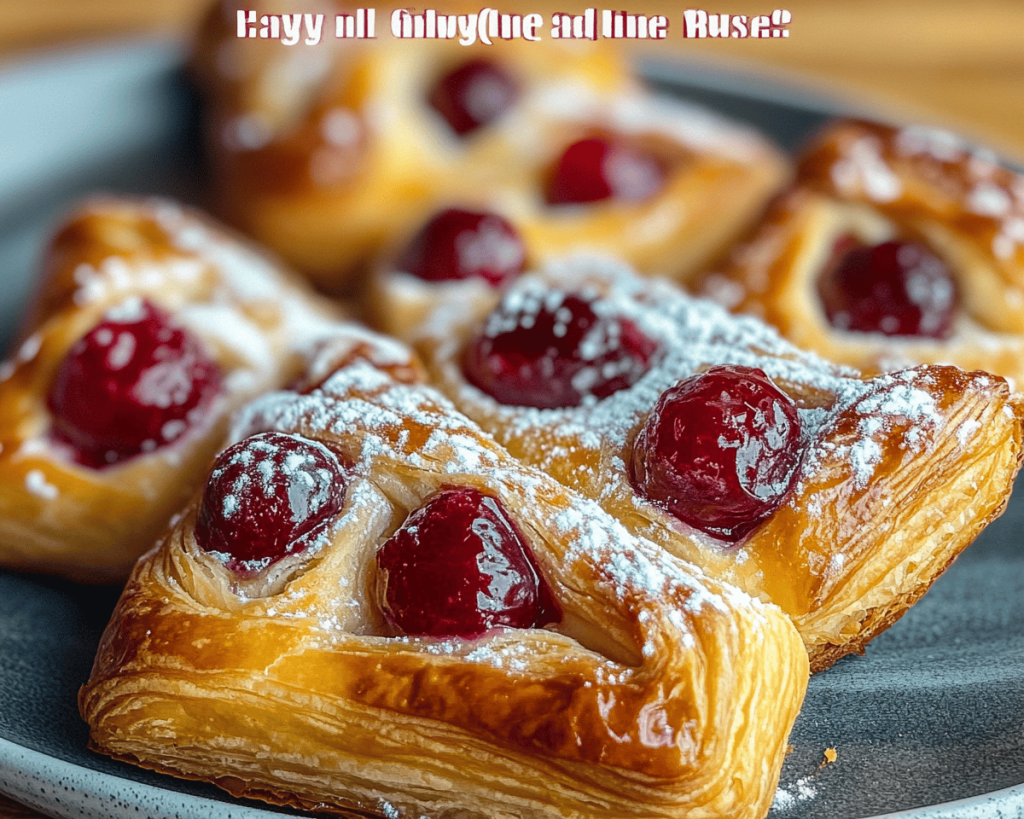
A Cherry Danish pastry is more than just a treat—it’s a beautiful confection that’s a staple in many bakeries around the world, particularly in Denmark, where the art of pastry-making reigns supreme. It features layers of buttery, flaky dough that provide the perfect contrast to a sweet and tart cherry filling, creating a symphony of flavors and textures.
Often, the pastry is topped with a glaze or icing that adds an extra touch of sweetness, making it not just a delight for the taste buds but a feast for the eyes as well. The light, flaky texture of the dough is achieved through a technique known as *lamination*, where layers of butter and dough are folded and rolled several times to create those signature flaky layers. The resulting pastry is crisp on the outside while remaining soft and tender within, with the cherry filling bursting through, adding a pop of fruity goodness.
Why You’ll Love This Easy Cherry Danish Pastry
1. **Simplicity**: This recipe uses store-bought puff pastry, making it accessible even for beginner bakers. You won’t need to spend all day in the kitchen, but you’ll still achieve impressive, bakery-style results.
2. **Flavorful Filling**: Tart cherries provide a delightful contrast to the sweet pastry. You can use fresh, frozen, or even canned cherries based on what’s available. Each bite is loaded with fruity goodness, making it a perfect dessert or breakfast treat.
3. **Flexible and Fun**: You can customize the filling to suit your tastes. If cherries aren’t your favorite, consider swapping them for blueberries, cream cheese, or even almond paste for an equally scrumptious version.
4. **Perfect for Sharing**: This Cherry Danish pastry is great for gatherings or coffee dates. It’s impressive enough to show off yet comforting enough for a cozy brunch.
5. **Leftover Potential**: The leftovers (if there are any!) can be stored and enjoyed the next day—simply pop them in the oven for a few minutes to re-crisp.
Let’s get started because once you’ve made your first batch of these pastries, you’ll understand that they are a true labor of love, perfect for brightening up your day!
Ingredients You’ll Need
Here’s what you’ll need to create your mouthwatering Cherry Danish pastry:
– **1 sheet of puff pastry**: This will be the flaky base for your pastry. Always opt for high-quality puff pastry, ideally butter-based for the richest flavor.
– **1 cup fresh or frozen cherries**: If using fresh cherries, look for ones that are plump and firm. Frozen are a fantastic alternative if fresh is out of season—just be sure to thaw and drain them well before using.
– **1 tablespoon sugar**: To sweeten the cherry filling. You can adjust this based on the sweetness of the cherries.
– **1 tablespoon cornstarch**: This will help thicken the filling, creating a nice consistency that won’t ooze out of the pastry.
– **1 egg**: This is for an egg wash that gives the pastry a beautiful, golden-brown finish.
– **Powdered sugar for glaze**: Once baked, you’ll whisk this with a little milk or water for a finishing touch that enhances both flavor and presentation.
– **A splash of vanilla extract**: Optional, but it adds aromatic depth to the filling!
This simple line-up of ingredients packs a flavorful punch and transforms into a stunning treat.
How to Make Easy Cherry Danish Pastry
Now, let’s dive into the delightful process of creating your very own Cherry Danish pastry!
1. **Preheat Your Oven**: First, make sure your oven is preheating to 400°F (200°C). This initial heat will ensure your pastry puffs up beautifully and gets that perfect golden color.
2. **Prepare the Filling**: In a medium bowl, combine the cherries, sugar, cornstarch, and vanilla extract if you’re using it. Gently mix until the cherries are well-coated, and let them sit for about 10 minutes. This allows the sugar to draw out some juices while the cornstarch gets activated, ensuring that your filling is luscious but not runny.
3. **Roll Out the Puff Pastry**: On a lightly floured surface, roll out your puff pastry sheet to about 1/8 of an inch thick. This will help it puff even more in the oven and give you a lovely flaky texture.
4. **Cut the Pastry**: Use a sharp knife or a pizza cutter to cut the pastry into squares, about 5×5 inches in size. Don’t worry if they aren’t perfectly even; the charm of homemade baking is its unique imperfections.
5. **Fill the Pastry**: In the center of each square, place a spoonful of the cherry filling. Be careful not to overfill; about a tablespoon per square is perfect to prevent any spillage.
6. **Fold and Seal**: Carefully fold the corners of the pastry square toward the center, creating a beautiful envelope around your filling. Gently pinch the seams to secure them, ensuring the filling stays snug while baking.
7. **Egg Wash**: Beat the egg in a small bowl and brush it over the tops of the pastries. This step is crucial! It gives your Danish that irresistible golden hue, making them turn heads as they come out of the oven.
8. **Bake**: Transfer the filled pastries onto a parchment-lined baking sheet and bake in the preheated oven for 15-20 minutes, or until they puff up and turn golden brown. Keep an eye on them; you want that perfect balance of flaky and crispy!
9. **Cool and Glaze**: Once out of the oven, let the pastries cool for a few minutes. In the meantime, whisk together your powdered sugar and a couple of teaspoons of milk to create a simple glaze. Drizzle this over the cooled pastries for an elegant touch.
10. **Serve and Enjoy**: Finally, it’s time to dig in! Serve warm, alongside freshly brewed coffee or tea, and watch as your family or friends marvel at your culinary creation.
Tips, Tricks & Variations
1. **Use Quality Ingredients**: If you opt for store-bought puff pastry, make sure to choose a high-quality brand. The flavor and texture can seriously elevate your Danish.
2. **Avoid Soggy Pastry**: Make sure your cherry filling isn’t too juicy. Always drain any excess liquid, especially if you’re using frozen cherries, to prevent a soggy bottom.
3. **Make Ahead**: You can assemble the Danish pastries and refrigerate them for a few hours or overnight before baking. This is perfect if you want to prep for a special brunch without a morning rush.
4. **Scaling Up**: This recipe easily doubles! If you’re expecting a crowd, just increase the quantity and bake in batches as necessary.
5. **Experiment with Flavors**: Love almond flavor? Try adding a teaspoon of almond extract to the filling. Prefer other fruits? Apples, cream cheese, or mixed berries work wonderfully too.
What to Serve With Easy Cherry Danish Pastry
When enjoying these delightful Cherry Danish pastries, consider pairing them with:
– **Fresh Coffee or Tea**: The aromatic warmth of a freshly brewed cup complements the pastries perfectly. A hint of cream in your coffee enhances the buttery goodness of the pastry.
– **Vanilla Ice Cream**: On warmer days, serve with a scoop of vanilla ice cream or whipped cream for an elegant dessert centerpiece.
– **Fruit Salad**: A side of fresh fruit salad adds a refreshing contrast to the sweetness of the pastry, balancing flavors beautifully.
– **Fruit Compote**: Serve warm with a dollop of homemade fruit compote for an added layer of flavor and texture.
Nutrition & Health Benefits
These easy Cherry Danish pastries are a delightful treat, but moderation is key. On average, one pastry contains approximately 250–300 calories, depending on your ingredients and serving size.
They can be a great occasional delight, offering a source of carbohydrates for energy, and cherries themselves provide antioxidants, vitamins, and minerals. If you’re interested in the nutritional benefits of cherries, you can find more about them [here](https://www.healthline.com/nutrition/cherries).
However, they are certainly a fun way to treat yourself or surprise your guests and bring a slice of joy to any occasion!
Frequently Asked Questions
**1. Can I use different fruits?**
Absolutely! While cherries are a delightful choice, you can experiment with other fruits like blueberries, raspberries, or peaches. Just ensure they have a similar sweetness level or adjust the sugar accordingly.
**2. How should I store leftovers?**
If you have any leftovers, store them in an airtight container at room temperature for up to 2 days. For longer storage, refrigerate them for up to a week or freeze for a month. Just remember to reheat in an oven to regain that crispy texture!
**3. Can I make the pastry dough from scratch?**
Of course! If you’re feeling adventurous, you can make your pastry from scratch. However, I recommend this easy version unless you’re experienced with dough-making, as it’s quite labor-intensive.
**4. How do I know when the pastries are done?**
Your pastries are done when they’ve puffed up and turned a beautiful golden-brown color. You can also lightly tap the bottom; if it sounds hollow, they’re ready!
**5. Is it possible to freeze the assembled pastries?**
Yes, you can! Assemble the pastries and place them on a baking sheet to freeze individually before transferring them to a freezer-safe bag. Bake from frozen when you’re ready; just add a few extra minutes to the cooking time.
—
Making Easy Cherry Danish pastries is not only about the ingredients but also about the joy of sharing something delicious. As they come out of the oven, let the enticing aroma envelop your kitchen, filling it with warmth and happiness. Whether served at a gathering or enjoyed quietly with a great cup of coffee, they’re sure to steal the show.
So, gather your ingredients and let your inner pastry chef shine! If you loved this recipe, leave a comment or tag me on Instagram with your delightful creations. Happy baking!