# Easy No-Bake Butterfinger Balls Recipe
**Meta Title:** Easy No-Bake Butterfinger Balls Recipe
**Meta Description:** Discover the delight of Easy No-Bake Butterfinger Balls! This simple recipe is perfect for a quick treat or a family dessert.
There’s something downright magical about the combination of chocolate and peanut butter, isn’t there? Remember those childhood moments when you’d sneak bites of your favorite candy bars, the ones that made your taste buds dance with joy? If you’re anything like me, you probably have a soft spot for Butterfingers. The crispy, crunchy peanut butter center coated in a sweet, creamy chocolate is the ultimate indulgence. Now, imagine being able to recreate that iconic flavor in the form of bite-sized balls that require no baking. Yes, you read that right!
This Easy No-Bake Butterfinger Balls recipe is your golden ticket to nostalgia, and it’s surprisingly simple to whip up. Whether you’re looking for a party treat, a quick snack, or a fun project to enjoy with kids, these creamy, dreamy balls of goodness are just the ticket. Not only will you learn how to make these delicious treats, but I’ll also share some tips and tricks to elevate your cooking game. So, let’s dive into the sweet world of no-bake desserts!
What are No-Bake Butterfinger Balls?
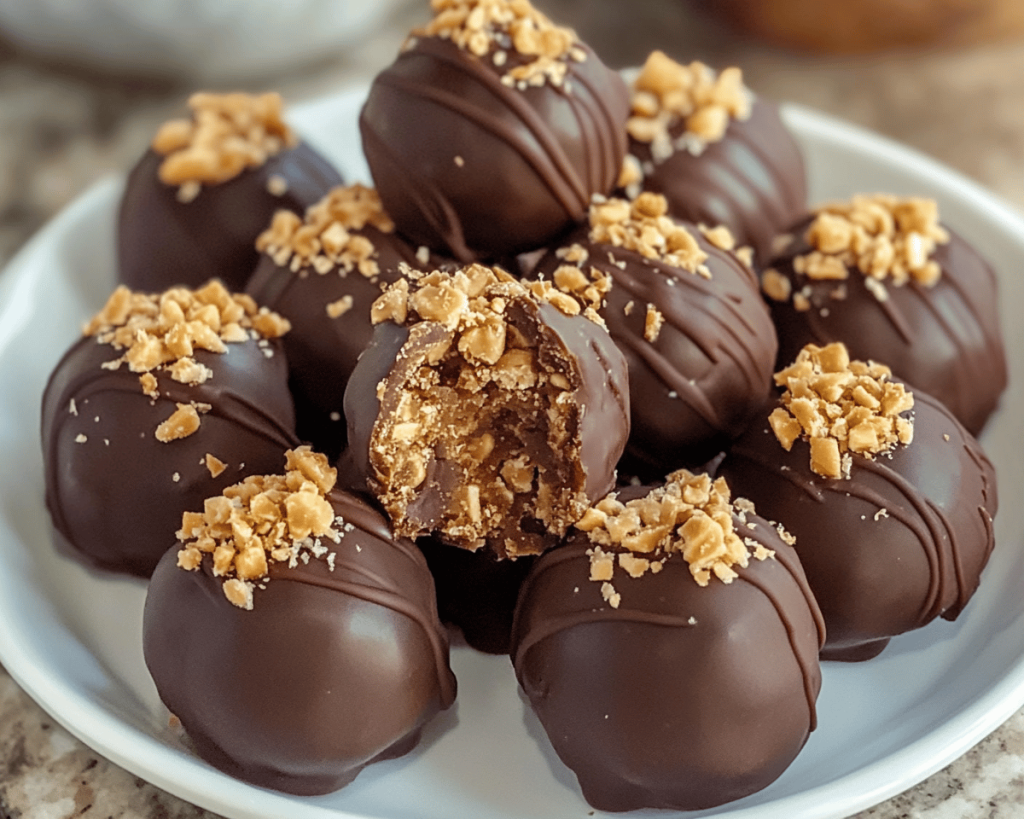
No-Bake Butterfinger Balls are delightful little confections that capture the essence of the beloved Butterfinger candy bar but in a simpler, homemade form. These balls consist of crushed **Butterfinger candy bars** or a Butterfinger-like mixture, mixed with cream cheese and rolled into bite-sized snacks. They’re then coated in luscious melted chocolate, making for a treat that’s creamy on the inside, crispy on the outside, and utterly irresistible.
Originating from the creativity of home cooks looking to replicate their favorite store-bought goodies, these treats have become a staple at parties and potlucks. What people love most about them is the delightful contrast of flavors and textures — the crunchiness from the crushed candy, the creamy richness of cream cheese, and the sweet, smooth chocolate coating. They’re the perfect finger food to satisfy that sweet tooth and are sure to impress anyone who takes a bite.
Why You’ll Love This Easy No-Bake Butterfinger Balls Recipe
This recipe stands out for so many reasons — perhaps the biggest is its **simplicity**. You don’t have to worry about the oven or complicated baking techniques. In less than 30 minutes, you can have these decadent treats ready to go. They’re perfect for last-minute gatherings since they set up quickly in the refrigerator, meaning you’ll have a delicious dessert on hand in no time.
Another reason to cherish this recipe is its **versatility**. You can customize these Butterfinger balls with different types of chocolate coatings. Milk chocolate, dark chocolate, or even white chocolate will give you different flavor profiles, making this a fun treat to tailor to your taste preferences.
Lastly, these treats are **fun for the whole family**. Involve the kids in the process — they can help crush the candy, roll the balls, and coat them in chocolate, creating a wonderful bonding experience. Not to mention, the satisfaction of creating something delicious together will create lasting memories.
Ingredients You’ll Need
To make your Easy No-Bake Butterfinger Balls, gather the following ingredients:
1. **Butterfinger candy bars (or Butterfinger baking bits)** – 10 to 12 pieces, crushed – These are the star ingredient, bringing that signature crunchy texture and sweet peanut butter flavor. If you’re in a pinch, Butterfinger bits work well, saving you from having to crush the bars.
2. **Cream cheese** – 8 ounces, softened – This creates a rich, creamy filling that binds the crushed candy bars together. Make sure it’s soft for easy mixing! If you’d like a lighter version, consider using Neufchâtel cheese.
3. **Powdered sugar** – 1 cup – This adds sweetness without compromising the smooth texture. The powdered form blends seamlessly with the cream cheese.
4. **Chocolate chips** – 1 cup – Semi-sweet or milk chocolate is ideal for the coating. They’ll melt beautifully, creating a luscious shell. You can experiment with different chocolate types based on your preferences.
5. **Coconut oil (optional)** – 1-2 tablespoons – Adding coconut oil to your chocolate makes it smoother and helps it adhere better to the ball, but it’s entirely optional.
Gathering these ingredients will take you less than 10 minutes, bringing you one step closer to indulging in your homemade butterfinger bliss!
How to Make Easy No-Bake Butterfinger Balls
Follow these steps to create your Easy No-Bake Butterfinger Balls:
1. **Prepare Your Workstation**: Start by crushing the Butterfinger bars. If you have a food processor, simply pulse the bars until they become fine crumbs. If you’re doing this by hand, place the bars in a zip-lock bag and use a rolling pin to crush them. You want them to resemble coarse sand — not too fine, as you want some crunch!
2. **Mix the Filling**: In a large mixing bowl, combine the crushed Butterfinger bars with the softened cream cheese and the powdered sugar. Use a hand mixer or a sturdy spatula to blend the ingredients together until it becomes a homogenous mixture. Aim for a smooth, pliable dough. If the mixture feels too sticky, don’t hesitate to add more powdered sugar a tablespoon at a time until you achieve the desired consistency.
3. **Shape the Balls**: Once your mixture is well-combined, it’s time to roll it into balls. Scoop out a tablespoon of the mixture, roll it into your palms, and place it on a parchment-lined baking sheet. You can make them as small or large as you desire, but a tablespoon size is just right for a bite-sized treat. Repeat until all the mixture is shaped into balls.
4. **Chill**: Refrigerate the rolled balls for at least 30 minutes. This helps them firm up, making them easier to handle when you’re ready to coat them in chocolate. Plus, the chilling will enhance the flavors as they meld together.
5. **Melt the Chocolate**: While your balls are chilling, it’s time to prep your chocolate coating. In a microwave-safe bowl, melt the chocolate chips (and coconut oil, if using) in short intervals — about 20-30 seconds at a time. Stir between each interval until your chocolate is smooth and glossy. If it seems too thick, you can add a bit more coconut oil.
6. **Coat the Balls**: Remove the balls from the fridge. Use a fork or a toothpick to dip each ball into the melted chocolate, allowing any excess to drip off before placing it back on the baking sheet. You want a nice, even coating, so a gentle tap will help!
7. **Set and Enjoy**: Once all the balls are coated, place them back in the refrigerator to set for about 15 to 20 minutes. After they’ve hardened, they’re ready to enjoy! You can even drizzle some extra melted chocolate on top for a decorative touch.
Tips, Tricks & Variations
1. **Storage**: Store your Easy No-Bake Butterfinger Balls in an airtight container in the refrigerator for up to two weeks. If you want to make them ahead of time, you can freeze them for up to three months. Just ensure they’re well-wrapped to prevent freezer burn.
2. **Chocolate Variations**: Try different chocolate coatings for fun variations. Consider dark chocolate for a more intense flavor or white chocolate for a sweeter touch. You can also sprinkle crushed nuts or sea salt on top of the chocolate for an extra flavor punch.
3. **Flavor Enhancements**: Try adding a teaspoon of vanilla extract to the cream cheese mixture for a subtle flavor boost. For the adventurous, a pinch of sea salt in the mixture can enhance the overall sweetness.
4. **Make it Vegan**: Substitute the cream cheese with a vegan cream cheese alternative, and use dairy-free chocolate for a delicious vegan version of this treat.
5. **Serving Suggestions**: Serve these treats with a glass of cold milk or a warm cup of coffee for a delightful pairing. They also make great additions to dessert platters at parties!
What to Serve With Easy No-Bake Butterfinger Balls
These indulgent bites can be enjoyed on their own, but they’re also a fantastic complement to various drinks and desserts. Consider serving them alongside a rich cup of coffee, hot chocolate, or even a chilled glass of almond milk.
For a more elaborate dessert table, pair them with fresh fruit like strawberries or bananas, which contrast beautifully with the sweetness of the balls. If you’re hosting a party, consider offering an assortment of other no-bake treats alongside them, such as chocolate-covered pretzels or rice krispie treats. The combinations are endless, and this versatility only adds to their charm!
Nutrition & Health Benefits
Each Easy No-Bake Butterfinger Ball contains approximately 110 calories and provides a balance of carbohydrates, fats, and protein, particularly thanks to the peanut butter flavor in the Butterfinger bars and the protein found in the cream cheese. Although they are a treat, they are made with simple, recognizable ingredients without artificial preservatives, allowing for a more wholesome indulgence. If you want to delve deeper into the nutritional benefits of peanut butter and chocolate, check out [Healthline’s nutritional insights on peanut butter](https://www.healthline.com/nutrition/peanut-butter-health-benefits).
However, keep in mind that while they are fun, these treats are still high in sugar and should be enjoyed in moderation. For a healthier twist, consider substituting some of the sugar with a natural sweetener or using dark chocolate, which offers more antioxidants.
Frequently Asked Questions
1. **How do I store No-Bake Butterfinger Balls?**
Store your Butterfinger balls in an airtight container in the fridge for up to two weeks. If you freeze them, ensure they’re well-wrapped to avoid freezer burn; they can last up to three months.
2. **Can I make these without cream cheese?**
Yes! For a dairy-free option, you can use vegan cream cheese or even peanut butter instead. Just be mindful that the texture and taste will vary slightly, but the peanut butter flavor will be more pronounced.
3. **How long does it take to make these?**
The preparation time is roughly 20 minutes, plus an additional 30 minutes for chilling. So, you can whip up a batch in under an hour!
4. **What can I use instead of Butterfingers?**
If you want to change it up, consider using crushed Oreos or another crunchy candy bar. These replacements will create a different flavor profile but can still yield delicious results.
5. **Can I add more flavors or ingredients?**
Absolutely! Feel free to add a splash of vanilla extract, mix in some chopped nuts, or add a sprinkle of sea salt for extra flavor. The world is your oyster with these treats!
In conclusion, the journey you’ll take while making these Easy No-Bake Butterfinger Balls will not only satisfy your sweet cravings but also remind you of the simple joy found in cooking. The next time you’re looking for a stress-free dessert that promises smiles and satisfaction, remember this recipe. So, gather your ingredients, roll those balls, and dive into a nostalgic treat that’s always a hit! If you loved making these, I’d love to hear about it! Leave a comment below or tag me on Instagram. Happy baking!