Let’s Get Real
So, here’s a little confession: I used to totally detest cake balls. “What even are these spherical abominations?” I would scoff, holding a limp, frosting-coated creation between my thumb and forefinger like it was some kind of culinary crime scene evidence. I couldn’t quite wrap my head around the idea that something so round could pack such a whammy of sweetness. Sure, I loved cake. I loved icing. But mashing them together and rolling them into little balls? Hard pass, thank you very much!
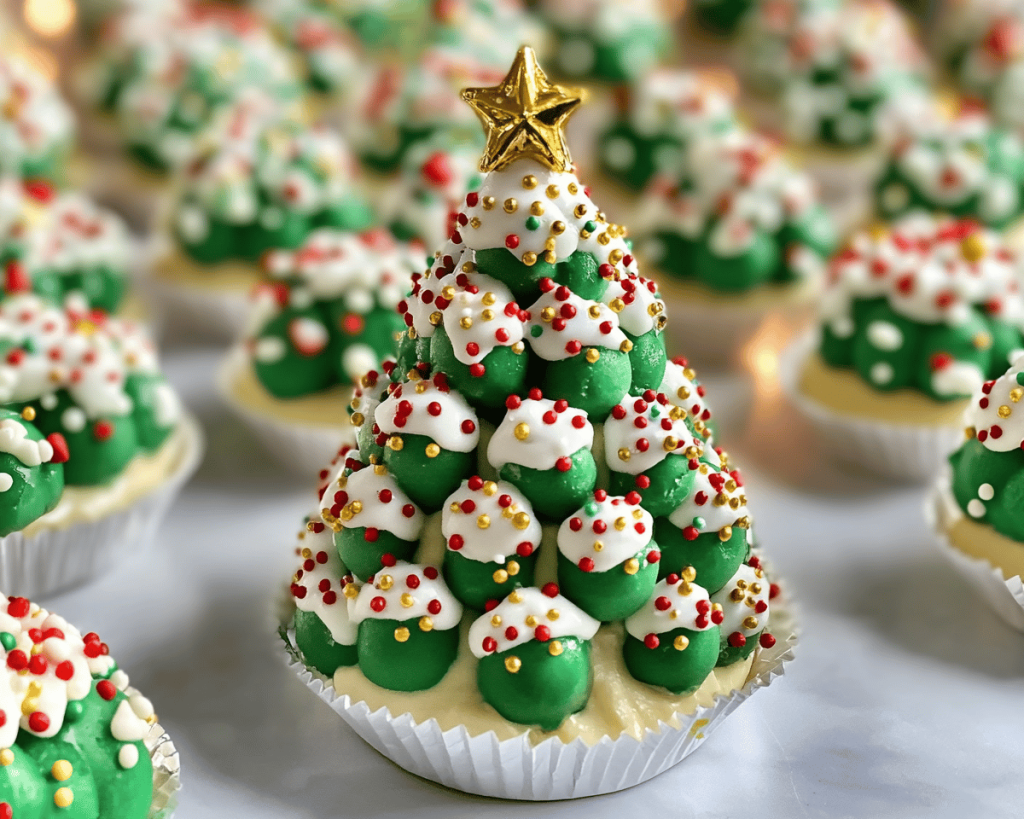
But then it happened. One fateful holiday season, I wandered into a friend’s living room, and there they were—these utterly festive and Pinterest-worthy Christmas Tree Cake Truffles, looking as if they had just jumped off the cover of a holiday magazine. I was skeptical, but hey, ’tis the season for indulgence, right? To my surprise, with one perfect bite, I transformed from a cake ball hater to an unrepentant cake ball enthusiast. They were magical! Sweet little orbs of joy just waiting to be devoured, and I couldn’t get enough. So here I am, ready to share the love (and the recipe), as I dive into the sugary abyss once again.
What’s Really in Festive Christmas Tree Cake Truffles
Let’s break down this indulgent concoction of holiday cheer, shall we? You’ll be pleasantly surprised at how simple the ingredients are.
Cake Mix: The backbone of this recipe! I use a classic vanilla or white cake mix because I like to keep the flavor profile light and fluffy. It’s Christmas, not a heavy family reunion dinner. But you do you. Want red velvet? Go wild!
Eggs: It’s true; we’re going to need these little guys to help bind everything together while adding some much-needed moisture. Yes, eggs belong here; we’re not throwing eggs into the trenches of battle; we’re inviting them to the party.
Butter: Oh, glorious butter! I typically go for unsalted—because let’s keep tabs on our salt levels—and I like to USE A LOT! In my world, every holiday dessert deserves an over-the-top amount of butter. It’s what dreams are made of.
Milk: Gotta hydrate while we bake! It somehow manages to elevate everything from cake to ice cream. And don’t forget, if you’re feeling rebellious, feel free to switch in some eggnog during the holiday season. You’ll be the trendsetter in your baking circle.
Frosting: The fun part! You can be the coolest kid on the block and make your own buttercream or—shocker!—just buy a tub of your favorite store-bought frosting. I won’t judge. I mean, who has time for that when you could be binge-watching holiday movies instead?
Chocolate Melts or Bark: This is what makes our cake truffles festive! You can pick your poison with any color you desire; you’re creating art, darling! So grab those cute green melts or the sparkly gold sprinkles. Make it as dazzling as your holiday spirit!
Sprinkles: The pièce de résistance (yes, I did just call sprinkles that), because nothing says festive more than a cake truffle draped in colorful confetti-fetti that’ll make your other desserts feel like they don’t belong in the spotlight. Plus, if it doesn’t sparkle, is it even a holiday dessert?
Let’s Talk Health (or Not)
Okay, let’s get real for a second. We all know that festive desserts are NOT health foods. This isn’t a “let’s juice our kale” moment! We’re talking about cake mixed with frosting, rolled into a ball and drenched in chocolate. Sure, there’s butter. And yes, I sleep just fine at night.
Let’s just agree that this isn’t going to be the healthiest dessert in your arsenal. But then again, who actually cares about calories when you’ve got a mouthful of sugary joy? I mean, you are indulging during the holidays, right? Besides, these truffles are small, so you could totally convince yourself that a couple can’t be bad for you. Just ignore the reality of it all as you sneak back for seconds… or thirds.
Your Grocery List
Here’s what you’ll need to whip up a batch of these little gems. This recipe makes about 24 truffles, perfect for any holiday gathering—or for hoarding next to your couch as a personal winter stash. Who’s judging? Not me!
– 1 box (15.25 oz) vanilla or white cake mix
– 3 large eggs
– 1/2 cup unsalted butter, melted
– 1/2 cup milk (or eggnog)
– 1 tub (16 oz) store-bought frosting (or homemade if you’re feeling ambitious)
– 12 oz green candy melts or chocolate bark
– Festive sprinkles
Okay, Let’s Make This
1. **Prep Time!** Start off by preheating your oven to 350°F (175°C). I always seem to forget this step and end up rushing around in a full-blown panic. So, you know, learn from my cooking chaos.
2. **Bake the Cake!** Grab a mixing bowl and toss in the cake mix, eggs, melted butter, and milk. Give it all a good mix using a handheld mixer until you’re left with a beautifully smooth batter. Now, before you even think about adding any frosting, pour that batter into a greased baking pan. I typically use a 9 x 13 inch pan because I like the cake to be thin and easy to crumble. The thinner the layer, the easier it’ll be later when you crumble it into cake balls.
3. **Bake Time!** Pop that bad boy in the preheated oven for about 30-35 minutes. Here’s my pro tip: when your kitchen starts smelling like vanilla heaven, it’s usually a good indicator that the cake is getting close. Just remember that “the toothpick test” is your friend. Insert a toothpick into the center, and if it comes out clean, your cake is done. If it’s covered in doughy goodness, then you get the honor of waiting a few more minutes.
4. **Cool It!** Once that cake is baked to perfection, let it cool in the pan for about 10 minutes before transferring it to a wire rack. If you try to crumble it too early, you’ll end up in a crumb catastrophe of epic proportions. Trust me, I speak from experience!
5. **Crumble Time!** Now comes the fun part—once the cake is completely cool (because let’s not ruin our perfect truffles with melted frosting), crumble it into a large bowl. Seriously, take those cooled pieces and break them into tiny bits. The finer the crumble, the better!
6. **Add the Frosting!** After you’ve got those crumbles looking all fine and dandy, it’s time to fold in the frosting! Add a generous cup—more if you like your truffles extra rich. Mix that in with your hands, like you’re kneading dough. Don’t hold back! Your hands will be covered in sweet goodness, but you’ll be embracing the chaos.
7. **Roll It Out!** Take small portions of the cake-frosting mixture and roll them into balls about 1-inch in diameter. Pro tip: if you’re finding that your mixture is too soft to roll, pop it in the freezer for about 20 minutes to firm up a bit.
8. **Melt Those Candy Coatings!** Now it’s time to melt those candy melts or chocolate bark. You can do this the easy way by following the instructions on the package, often in the microwave. Just go in short intervals—20 seconds, stir, and repeat until melted. Please, don’t burn your chocolate! Nobody wants a bitter cake truffle.
9. **Dunk Time!** Take each cake ball, dip it in the melted chocolate, and make sure to coat it thoroughly. It’s like they’re taking a luxurious chocolate spa day! Allow the excess coating to drip off before placing them onto a parchment-lined baking sheet.
10. **Sprinkle Magic!** Here’s where we get fancy! While the chocolate coating is still wet (you’ve got to act fast!), go ahead and decorate these delightful bites with festive sprinkles. I did say it earlier, but it bears repeating: if it doesn’t sparkle, is it even a holiday dessert?
11. **Chill Out!** Once you’ve coated and decorated all the cake truffles, let them cool in the fridge for about 20-30 minutes. This helps the coating firm up nicely, so your sweet creations hold their shape when you serve them.
Bonus Tips You Didn’t Ask For
– **Flavor Experimentation:** Don’t stick exclusively to vanilla cake mix. I’ve done strawberry and chocolate cake mixes with great success! Get creative, people!
– **Frosting Faux Pas:** If you want a little kick, swap traditional buttercream frosting for cream cheese frosting. Holiday season? Hello, red velvet truffles!
– **Color Theme:** You can totally get a little extra with food coloring to dye your candy melts. Red, green, even blue for that festive pop (or just because).
– **Storage Secrets:** These truffles will last about one week in an airtight container but let’s be honest, they’re going to disappear way faster than that.
– **Gift-Worthy:** Package them up in cute tins or boxes, and you’ve got a perfect gift for your neighbor, co-worker, or that friend who always shows up empty-handed to your holiday soirees. Teach them a lesson!
Final Words of (Culinary) Wisdom
And there you have it! Festive Christmas Tree Cake Truffles that are as eye-catching as they are delicious. If you give these a shot, I’d love to hear about your baking adventures—seriously, tag me on Instagram or just send me a virtual high-five!
Remember, food is made for sharing. Enjoy the chaos of the kitchen this holiday season, experiment fearlessly, and don’t forget to let loose with the sprinkles—it’s the happiest confetti of them all! Now get in there and show that kitchen who’s the boss!