There’s something almost magical about popovers. For years now, they have held a special place in my heart—and my kitchen. I still vividly remember the moment I first tasted one. I was a young girl, visiting my grandmother’s home on a Sunday afternoon. The aroma of baked goods wafted through the air, mingling with laughter and warmth. There, sitting proudly on the dining table, was a tray of popovers, golden-brown and glistening. They were enchanting, their delicate, crisp exteriors giving way to a fluffy interior that was light as air. With each bite, I felt both comforted and euphoric. Those afternoons spent in my grandmother’s kitchen introduced me to the art of simple yet divine cooking, and popovers became synonymous with love and family gatherings.
As I grew older, the allure of popovers never dulled. Each time I attempted to bake them, I was reminded of the joy and laughter of those Sunday afternoons. What sets popovers apart from other baked goods is not just their unique texture but also the thrill of watching them rise in the oven. It’s a spectacle that feels almost magical, where the batter transforms into airy, hollow wonders, cloaked in a golden crust.
In my journey as a cook, I’ve learned that making the fluffiest popovers ever requires not just ingredients but a little bit of practice and possibly a sprinkle of patience. It’s a dish that serves as a canvas for creativity. You could enjoy them plain or dress them up with herbs, cheeses, or even sweet fillings. Each batch introduces new opportunities to explore flavors and creativity, and there’s a joy in sharing these creations with friends and family.
I’ve honed my recipe over the years, and I assure you these popovers are the fluffiest you will ever make. They are perfect for brunch, as an accompaniment to soups, or simply as a delightful snack. So, roll up your sleeves, and let’s dive into this whimsical adventure together!
Inside the Ingredients of Fluffiest Popovers Ever
All-purpose flour: This is the foundation for your popover batter. All-purpose flour provides the right balance of protein and starch needed to create our lovely structure. I’ve experimented with other flours, but none quite replicate that beautiful rise. If you need to substitute, whole wheat flour can add a nutty flavor, but do remember that it could affect the lightness.
Milk: Milk enriches the batter and contributes to a tender texture. I typically use whole milk for the rich flavor and creaminess it brings, but feel free to swap it for 2% or even almond milk if you’re looking for a dairy-free option. Just note the latter may lead to less fluffiness.
Eggs: Eggs are the secret weapon in achieving that airy consistency. They create steam as they cook, which is key to popover elevation. I recommend using large eggs; their size introduces just the right amount of moisture. While I’m certain of their necessity, I often wonder: could you try a chia egg for a vegan version? It’s worth investigating if you’re adventurous.
Salt: A touch of salt elevates the flavors in your popovers without making them salty. It enhances the overall taste, waking up the combined flavors.
Butter: A touch of melted butter in the batter adds flavor and richness. For those seeking an indulgent experience, incorporating melted herbs or garlic-infused butter can transport your popover experience to a whole new level of flavor.
Optional garnishes: While white flour popovers are classic, it’s lovely to personalize them with grated cheese, chives, or even freshly cracked pepper. I once added sharp cheddar for a surprise filling and watched as my guests’ eyes lit up with delight. The key is not to overstuff; a little bit goes a long way.
How Fluffiest Popovers Ever Fits Into a Balanced Life
When you think about enjoying popovers, it’s easy to imagine a decadent treat that dances on the edge of indulgence. However, I believe that popovers, like many comforting foods, can have a place in a balanced diet.
In terms of nutritional strength, popovers primarily consist of simple ingredients: flour, milk, and eggs. The combination offers protein and carbohydrates, while the fat from the butter helps with satiety. The key is balance. Pairing popovers with a fresh salad, some colorful roasted vegetables, or perhaps a savory soup can make for a harmonious meal.
However, it’s essential to consider moderation, especially since, when baked to perfection, popovers have a tendency to gather on plates faster than you can say “delicious!” They should be enjoyed, but also savored. If you find yourself diving into a second or third, that’s perfectly okay, too. Cooking has always been about balance, celebration, and simply enjoying the moment.
As someone who loves food but also leads a busy life, I try to incorporate light and nutritious meals throughout the week and save occasions to indulge in these lovely popovers for special breakfasts or brunches. They have become a favorite in my circle of friends and family—it’s a way to bring us together, and the joy of cooking with loved ones is an important cornerstone of my day.
What You’ll Need
– 1 cup all-purpose flour
– 1 cup whole milk (or your choice of milk)
– 3 large eggs
– 1/2 teaspoon salt
– 2 tablespoons melted butter (plus a little extra for greasing)
– Optional: 1/2 cup grated cheese, chives, or herbs of your choice for variations
This recipe yields about a dozen popovers—perfect for sharing and spreading joy around the table.
Preparing Fluffiest Popovers Ever Step by Step
1. Preheat your oven to 450°F (232°C). It’s crucial to have a hot oven to achieve that initial rise for your popovers. I’ve learned the hard way that a preheated oven makes all the difference, so don’t skip this step!
2. Place the popover pan (or a muffin tin, if you don’t have one) in the oven for about 10-15 minutes to warm up while you prepare your batter. This step ensures that your batter hits a hot surface, which is essential for the initial rise.
3. In a medium mixing bowl, whisk together the eggs and milk until they are fully incorporated. I love to watch the foam form as you mix—it’s such a beautiful sight.
4. In another bowl, whisk together the flour and salt. Adding your dry ingredients before mixing them with the wet ingredients helps distribute the salt and prevent any clumping.
5. Gradually combine the wet and dry mixtures, stirring gently to incorporate. Be cautious not to overmix! Leave a few lumps in the batter; they help create that dreamy, textured interior.
6. Finally, stir in the melted butter. This step imbues the popovers with richness and flavor. Let the mixed batter rest for about 20-30 minutes. I like to use this time to set my table or prepare a batch of scrambled eggs or a fresh salad; it’s essential to use this quiet moment creatively.
7. After the batter has rested and your oven is nice and hot, remove the pan from the oven and carefully grease each well with melted butter—don’t be shy! We want those popovers to slide right out when they’re done!
8. Next, gently pour the batter into each well, filling them about 3/4 full. If you’re adding cheese or herbs, do so now—just a sprinkling on top is enough!
9. Place the filled pan back in the oven and let them bake for 20-25 minutes. As the popovers bake, resist the urge to open the oven door—trust me, I’ve made the mistake of peeking too early, and it can interrupt that beautiful rise.
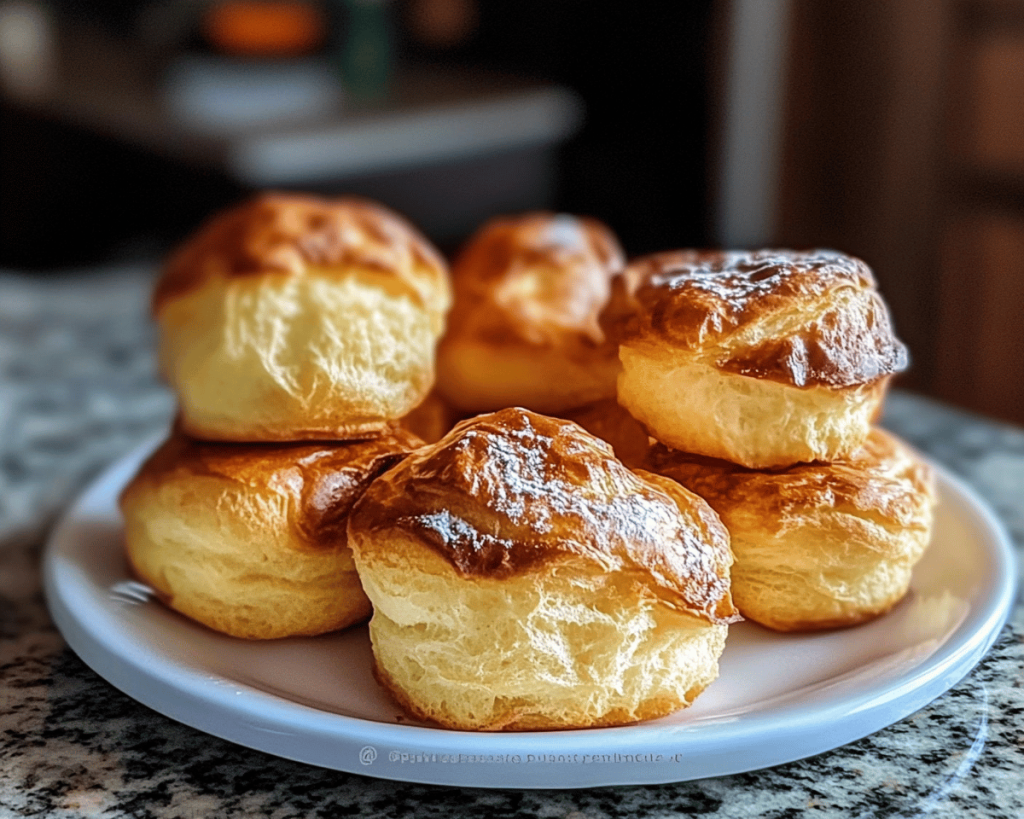
10. When they’re golden-brown and towering over the pan, remove them from the oven. Take a moment—the sight alone can make your heart swell with pride.
11. Serve them immediately, on their own or with a side of whipped butter or jam. Watching family and friends delight in these fluffy wonders is the icing on the cake—or rather, the butter on the popover.
Lessons from My Kitchen
Over the years of making popovers, I have learned some valuable lessons that extend beyond simply baking. Here are the key takeaways:
**Patience and Temperature:** The necessity of a hot oven and a warm batter is crucial. It took me a while to realize that the temperature at which you bake could make or break the dream-like rise. Embrace the challenge; getting it right is the key to mastery.
**Don’t Overmix:** While it’s tempting to stir until everything is perfectly smooth, leaving lumps helps create that lovely, airy texture. Remember, cooking, like life, thrives in a bit of imperfection.
**Experiment Freely:** Popovers are wonderfully adaptable. My favorite variation is adding pumpkin purée and spices for a seasonal twist. In fall, it becomes a treat reminiscent of Thanksgiving, while cheddar and chive variations are always a winner at gatherings.
**Timing is everything:** Popovers are best served immediately. Though I’ve often had to wrestle with the temptation to make them ahead, there’s just something about a warm popover that is quintessentially comforting. If you must make them earlier, my advice is to reheat them briefly in a hot oven, making them enjoyably crispy again.
**Community:** Finally, never underestimate the power of sharing food. I have seen friendships bloom and relationships deepen simply by sharing a tray of freshly baked popovers.
These lessons—silly and profound—remind me that cooking can be both a science and an art. Each batch tells a story, rich with personality and heart. I invite you to experiment, share, and enjoy the experience as much as the deliciousness!
In conclusion, popovers are so much more than just a recipe for me. They’re a lovely bridge back to my grandmother and the laughter that echoed in her kitchen. They are reminders of the importance of taking time, whether alone or with others, to enjoy life’s simple pleasures. As you embark on this endeavor, I hope you find joy and connection in your kitchen. Here’s to finding your own moments of magic through the humble popover!