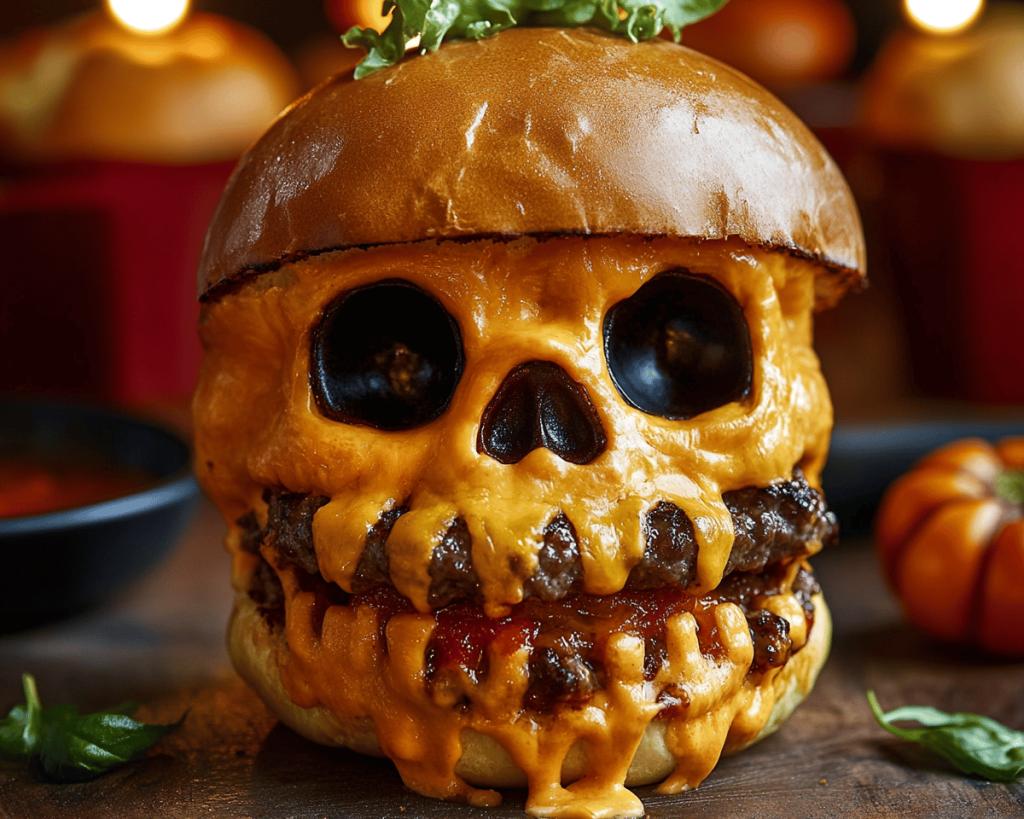
# Halloween Dinner Idea: Cheesy & Juicy Cheeseburger Skulls
As the leaves fall and darkness creeps in earlier each day, there’s nothing quite like the excitement of preparing a festive Halloween dinner. Imagine the thrill in your kitchen as the air fills with the smell of sizzling beef, melting cheese, and spices, all while you create a fun and spooky masterpiece for your family! This Halloween, why not surprise your loved ones with a dish that’s as delicious as it is delightfully eerie? Let me introduce you to my Cheesy & Juicy Cheeseburger Skulls!
These playful cheeseburger skulls are perfect for your Halloween table, combining the warmth of a classic cheeseburger with the novelty of a festive shape that will leave everyone grinning (or shrieking with delight). They’re juicy on the inside with that comforting cheeseburger flavor, encased in a golden, flaky blanket, and ready to be served with a side of spooky ketchup. Trust me—your kids will take one bite and be hooked, and even the grown-ups will appreciate the creativity!
Let’s dive into what makes this recipe special and how you can easily bring a taste of Halloween to your dinner table.
What are Cheesy & Juicy Cheeseburger Skulls?
Cheesy & Juicy Cheeseburger Skulls are an imaginative take on the classic cheeseburger, transformed into a spooky delight that’s perfect for Halloween festivities. Picture this: **plump ground beef** seasoned with savory spices, combined with oozy **cheddar cheese**, then shaped into delightful skulls with the help of a mold or simply by hand. The exterior is created from a flaky **puff pastry**, making each bite buttery and crisp.
This dish captures the essence of comfort food while adding a whimsical twist that resonates with the Halloween spirit. The flavor boasts that familiar cheeseburger goodness that everyone loves, but the presentation is undeniably festive—it’s sure to spark joy and maybe even a little fright during your Halloween celebrations! Whether you’re hosting a gathering or simply cooking for your family, this festive dish brings a perfect blend of taste and atmosphere.
Why You’ll Love This Halloween Dinner Idea
Here are several reasons why these Cheesy & Juicy Cheeseburger Skulls will become your new Halloween favorite:
– **Spooky Fun**: These skulls can make anyone chuckle and are perfect for getting your kids involved in the kitchen! They can help shape the skulls and even create their food art.
– **Flavor Pack**: The combination of spices, tender beef, and melty cheese ensures a flavor explosion in every bite. It’s burger night like you’ve never experienced!
– **Easy to Make**: With simple ingredients and straightforward steps, even novice cooks can whip up these adorable delights without a hitch.
– **Family-Friendly**: These cheeseburger skulls are guaranteed to please even the pickiest eaters. Who could resist a whimsical burger that’s served in a fun shape?
– **Perfect for Meal Prep**: Make a batch in advance for Halloween parties, game nights, or family movie marathons. They reheat beautifully!
– **Versatile Stuffing Options**: You can easily customize the filling with additional ingredients like sautéed onions, mushrooms, or peppers to suit your family’s taste.
– **Deliciously Interactive**: Serve them with a side of spooky ketchup for dipping — it’s the perfect touch that will entertain and delight both kids and adults!
Ingredients You’ll Need
To create your own cheesy and juicy cheeseburger skulls, gather the following ingredients:
– **1 lb ground beef**: Choose lean meat for a juicy finish. Ground turkey or chicken can be substituted for a lighter version.
– **1 cup shredded cheddar cheese**: This will provide that ooey-gooey texture; feel free to mix herbs or use pepper jack for a spicy kick.
– **1 packet taco seasoning**: Easy flavor booster! You can use homemade taco seasoning if you prefer to control the spices.
– **1 sheet of puff pastry** (thawed): The flaky goodness of puff pastry is key here. Make sure it’s well-chilled for easy handling.
– **1 egg (beaten)**: This will serve as an egg wash for a beautiful golden finish.
– **Salt and pepper**: To taste—don’t skimp here, as they bring out all the flavors!
Optional ingredients for variety:
– **Sautéed onions, garlic, or peppers**: For added flavor.
– **Pickles or jalapeños**: Great for adding that extra crunch and flavor layer!
How to Make Cheesy & Juicy Cheeseburger Skulls
Now, let’s conjure some culinary magic with these delightful cheeseburger skulls! Follow these steps to create your Halloween masterpiece:
1. **Preheat Your Oven**: Set your oven to 400°F (200°C). This guarantees a crispy finish on the skulls, allowing the puff pastry to puff up beautifully.
2. **Cook the Beef**: In a large skillet, over medium heat, add the ground beef. Season with the taco seasoning, salt, and pepper—this is where the magic starts to happen! Cook until the beef is browned all over, about 6-8 minutes. You want to break it up with a spatula as it cooks, so no big chunks appear.
3. **Add the Cheese**: Once the beef is cooked through and crumbled, reduce the heat to low and stir in the shredded cheddar cheese. Let it melt, mixing it into the beef until it’s all gooey and delicious. Remove from heat and allow to cool slightly — you want to handle this filling without burning your hands!
4. **Prepare the Puff Pastry**: While your beef mixture cools, roll out the puff pastry on a floured surface, ensuring to keep it around ¼ inch thick. Using a skull mold if you have one, cut out shapes, or simply shape them by hand, making sure to divide them into equal halves for top and bottom skulls.
5. **Fill the Skulls**: On the bottom half of your skull shapes, place a generous spoonful of the cheeseburger mixture. Don’t overfill, or they won’t seal properly. If you’d like, top with a little more cheese before capping with another pastry skull.
6. **Crimp the Edges**: To seal each skull, press the edges of the pastry together gently with a fork or your fingers. If you’re feeling festive, use the fork to create designs or faces on each skull!
7. **Apply Egg Wash**: Using a pastry brush, gently coat the top of each skull with the beaten egg, which will give them that golden, crispy finish in the oven.
8. **Bake**: Place the skulls on a parchment-lined baking sheet and bake for 15-20 minutes until they puff up and turn a lovely golden brown. You’ll know they’re ready when your kitchen fills with the irresistible aroma of baked bread and seasoned beef!
9. **Serve**: Allow the cheeseburger skulls to cool slightly before serving. Pair with spooky ketchup (just a bit of food coloring to regular ketchup can do the trick!) and give your creation a final sprinkle of cheese or some parsley for garnish!
Expert Tips, Tricks & Variations
Enhance your experience with these helpful tips and tricks to make the most out of your cheeseburger skulls:
1. **Make Ahead**: Prepare your filling a day in advance and store it in the refrigerator. You can roll out the dough and fill them before baking as needed for ultimate convenience.
2. **Experiment with Flavors**: Don’t hesitate to add spices like smoked paprika or chili powder to mix things up. Try different cheeses like gouda or mozzarella based on your preference!
3. **Personalized Designs**: Use different shapes (like bones or pumpkins) alongside the skulls for a themed platter that will impress your guests.
4. **Dipping Sauces**: Serve with an array of sauces, like ranch dressing or spicy aioli, beside the spooky ketchup to tantalize your guests’ taste buds even further!
5. **Adjusting Sizes**: If you want bite-sized versions, simply roll out smaller portions of dough and fill accordingly, creating mini skulls perfect for snacking.
What to Serve With Cheesy & Juicy Cheeseburger Skulls
Pair your skulls with dishes that complement them perfectly:
1. **Crispy Sweet Potato Fries**: Their natural sweetness and crispiness counterbalance the savory richness of the cheeseburger skulls and make for a delightful combination.
2. **Green Salad**: Serve a light side salad with mixed greens and a zingy dressing to provide freshness, breaking up the richness of the burgers.
3. **Coleslaw**: A zesty coleslaw adds a crunchy texture and brings a lovely tang that harmonizes beautifully with the cheeseburgers.
4. **Spooky Mocktails**: Whip up some fun and creative Halloween drinks like “witches’ brew” smoothies or a spooky sparkling punch for added festive flair!
5. **Roasted Vegetables**: Seasoned roasted vegetables bring in additional nutrients and colors to your Halloween table, contrasting the skulls wonderfully.
Storage, Freezing & Meal Prep
These Cheesy & Juicy Cheeseburger Skulls store like a dream, making them perfect for meal prep or leftovers!
– **Storing Leftovers**: If you have any skulls leftover (which is rare!), store them in an airtight container in the fridge for up to 3 days.
– **Freezing**: Before baking, you can freeze the assembled skulls for up to 2 months. Just make sure to wrap them tightly in plastic wrap, then transfer to a freezer-safe container.
– **Reheating**: To reheat frozen skulls, let them thaw overnight in the fridge and then bake at 350°F (175°C) for about 15-20 minutes. If baking from frozen, add an additional 10 minutes to the baking time.
– **Meal Prep Tips**: Prepare the meat filling ahead of time and keep it in the fridge for up to 3 days, making it a great option for quick weeknight dinners. Simply assemble before baking!
Frequently Asked Questions
**1. Can I use ground turkey or chicken instead of beef?**
Absolutely! Ground turkey or chicken works wonderfully; just be aware that the flavor might be milder. Adding a bit more seasoning can enhance it.
**2. How can I make these vegetarian?**
Simply substitute the ground beef with your favorite plant-based proteins! Options like Black Bean or Lentil mixes work remarkably well with the cheese filling.
**3. What if my pastry is too warm to work with?**
If your puff pastry gets too warm, it can become sticky and difficult to handle. Just pop it back in the fridge for 10-15 minutes to firm it up again before shaping.
**4. How can I tell when the skulls are done baking?**
You’ll know they’re ready when they’re puffed up and golden brown. The delightful aroma will also fill your kitchen, which is hard to miss!
**5. Can I bake these skulls in advance?**
Yes! You can bake them ahead of time, then reheat in the oven to maintain their crispiness. Just keep them stored in an airtight container in the refrigerator!
Conclusion
Now it’s your turn — grab those ingredients and bring Halloween magic into your kitchen tonight! With these Cheesy & Juicy Cheeseburger Skulls, your dinner table will be filled with laughter and delight, perfect for celebrating this spooky season. Whether it’s a cozy family night or a gathering with friends, these delightful bites will steal the show. So, don’t be shy—tag me when you try this recipe! Happy cooking!