# Homemade Biscoff Cookie Butter Brownies | Rich & Chewy
**Meta Title:** Indulge in Rich & Chewy Biscoff Cookie Butter Brownies
**Meta Description:** Discover homemade Biscoff cookie butter brownies that are rich, chewy, and irresistible! Perfect for a treat any day of the week.
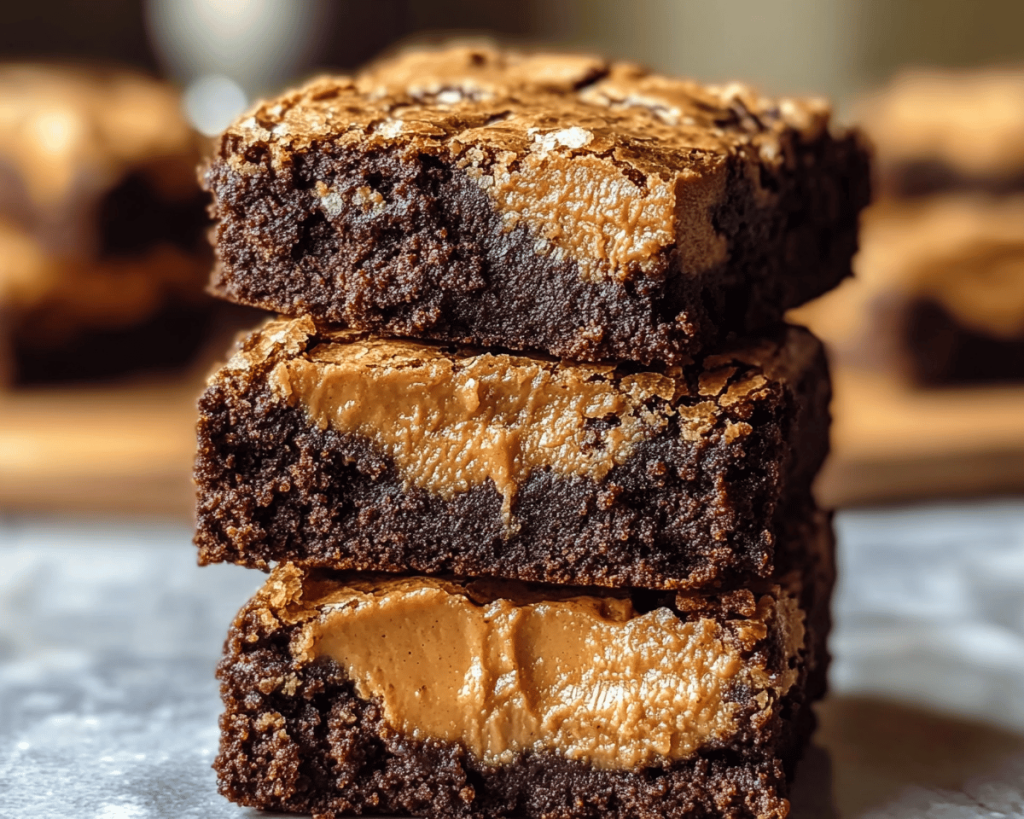
You know that feeling when a heavenly dessert combines gooey chocolate and that warm, spiced aroma of Biscoff cookies? Imagine biting into a fudgy brownie, oozing with rich cookie butter. It’s a moment of pure bliss—and it’s exactly what these *Homemade Biscoff Cookie Butter Brownies* deliver.
These brownies are more than just a simple treat; they’re a testament to your baking prowess and a delightful indulgence to share with friends and family. If you’ve ever craved something sweet yet surprisingly sophisticated, this recipe is for you. With layers of rich chocolate and velvety cookie butter, you’ll learn how to turn a classic chocolate brownie into something out of this world.
## What is Biscoff Cookie Butter?
Biscoff Cookie Butter is a spread made from *Biscoff cookies*, which are spiced cookies that originated in Belgium. Their unique texture and flavor come from a blend of brown sugar, cinnamon, and other spices, creating a lovely balance of sweetness and warmth.
The spread itself is like a dreamy combination of peanut butter and cookie crumbs—smooth, creamy, and utterly delicious. As you swirl it into your brownies, you’ll discover its rich, caramel-like flavor enhances the chocolate base, making these brownies a decadent experience.
Not only is it a treat on its own, but the addition of this magical spread contributes to a brownie that’s uniquely chewy and rich, setting your taste buds into overdrive. It’s no wonder cookies and cookie butters are a favorite among dessert lovers everywhere!
## Why You’ll Love These Biscoff Cookie Butter Brownies
What makes these *Biscoff Cookie Butter Brownies* truly stand out is their impeccable balance of flavors and textures. You get the dense, fudgy goodness of traditional brownies complemented by the sweet, spiced sophistication of Biscoff. These brownies are a hug on a plate—perfect for a cozy night in or to dazzle guests during a gathering.
They’re also surprisingly easy to prepare, taking just around 30 minutes from start to finish. With common pantry staples and minimal prep work, you’ll find they fit right into the busy lifestyle while still offering a touch of elegance and indulgence. Plus, these brownies are excellent for meal prep! They keep well for several days, making them an excellent option for a sweet treat throughout the week. Simply pop them in an airtight container, and you have a ready-to-eat dessert waiting for you.
## Ingredients You’ll Need
Here’s what you’ll need to gather for these indulgent brownies:
1. **1 cup unsalted butter**: This will melt into the base of your brownies, contributing creaminess and richness.
2. **8 oz semi-sweet chocolate**: Choose good quality chocolate for the best flavor. You can substitute dark chocolate if you prefer a more intense cocoa flavor.
3. **1¼ cups granulated sugar**: This adds sweetness and helps create that chewy brownie texture.
4. **3 large eggs**: They add structure and moisture to the brownies.
5. **1 cup all-purpose flour**: This provides the necessary structure while keeping the center fudgy.
6. **½ teaspoon baking powder**: This acts as a leavening agent ensuring your brownies don’t turn out too dense (even though we want them chewy!).
7. **½ teaspoon salt**: A pinch of salt elevates the sweetness and enhances all the flavors.
8. **¾ cup Biscoff cookie butter**: This is the star ingredient! It provides that amazing flavor and creamy texture to the brownies.
9. **½ cup crushed Biscoff cookies (optional)**: For extra crunch and a delicious topping.
*Tip: For the best quality, consider using a fresh jar of Biscoff cookie butter from the store. Homemade versions are tasty too—just ensure they are smooth and spreadable.*
## How to Make Biscoff Cookie Butter Brownies
Ready to dive into baking? Let’s make these scrumptious *Biscoff Cookie Butter Brownies*! Follow these steps:
### Step 1: Prepare Your Oven and Baking Dish
Start by preheating your oven to 350°F (175°C). Grease an 8×8-inch baking dish with cooking spray or line it with parchment paper, allowing a slight overhang for easy removal later on. This simple step will ensure your brownies come out cleanly without sticking to the pan.
### Step 2: Melt the Butter and Chocolate
In a medium saucepan, melt the *unsalted butter* and *semi-sweet chocolate* over low heat. Stir continuously until both are fully melted and combined into a smooth mixture. The aroma of melted chocolate will waft through your kitchen, awakening your senses. Remove from heat and let it cool slightly.
### Step 3: Whisk in Sugar and Eggs
In a mixing bowl, combine the warm butter and chocolate mixture with the *granulated sugar*. Whisk until well combined. The warmth of the chocolate will help dissolve the sugar, creating a glossy base. Next, add in the *eggs*, one at a time, whisking after each addition until fully incorporated. The mixture should turn a beautiful, silky brown.
### Step 4: Mix in the Dry Ingredients
Gently fold in the *flour*, *baking powder*, and *salt* using a spatula until just combined. Be careful not to overmix—it’s perfectly fine if some flour streaks remain. This will help ensure those delightful chewy textures that everyone loves in brownies!
### Step 5: Swirl in the Cookie Butter
Now comes the magic! Pour about half of your brownie batter into the prepared baking dish. Then, spoon dollops of *Biscoff cookie butter* over the batter. Use a knife to swirl it gently, creating beautiful ribbons of cookie butter. Pour the remaining brownie batter over this and swirl with more cookie butter for a show-stopping marbled effect.
### Step 6: Bake Until Perfect
Place your baking dish in the preheated oven and bake for 25-30 minutes. You’ll know they are done when the edges pull away slightly from the pan and a toothpick inserted comes out with a few moist crumbs (but not wet batter!).
The smell wafting through your kitchen will be intoxicating—a blend of chocolatey goodness and warm spice. Allow the brownies to cool in the pan before transferring them to a wire rack for complete cooling.
### Step 7: Slice and Serve
Once cooled completely, lift the brownies out of the pan using the parchment paper edges. Slice into squares or rectangles and serve at room temperature. Beware, these brownies are truly hard to resist. You can dust them with powdered sugar for a lovely presentation or add a drizzle of melted chocolate on top.
## Tips, Tricks & Variations
– **Storing:** Keep your brownies in an airtight container at room temperature for up to 5 days. They also freeze well for up to 3 months! Just ensure they’re tightly wrapped.
– **Reheating:** For an ooey-gooey experience, reheat the brownies in the microwave for 10-15 seconds. This will bring back their soft, fudgy quality.
– **Substitutions:** If you want to reduce sugar, you can try using coconut sugar or a sugar alternative that measures like sugar.
– **Vegan Version:** Substitute the eggs with flax eggs (1 tbsp of ground flaxseed mixed with 2.5 tbsp of water equals 1 egg) and use vegan butter or coconut oil.
– **Gluten-Free Option:** Swapping all-purpose flour with a 1-to-1 gluten-free baking mix can work wonders. Just ensure you’re using a quality product.
## What to Serve With Biscoff Cookie Butter Brownies
These brownies are divine on their own, but pairing them with a few accompaniments can enhance your dessert experience.
– **Vanilla Ice Cream:** The contrast of the warm brownie with cold ice cream creates a delightful encounter. Add a drizzle of caramel sauce to match that cozy flavor profile.
– **Coffee or Espresso:** The bold flavors of coffee enhance the chocolate and cookie butter. This makes for a perfect afternoon treat or a cozy dessert after dinner.
– **Nutty Crunch:** Consider serving with a sprinkle of crushed nuts (walnuts or almonds) on top for extra crunch. This adds texture and will elevate each bite.
## Nutrition & Health Benefits
While these brownies are a treat, they can still be enjoyed in moderation. A standard serving of brownie contains approximately 240-280 calories, depending on serving size and added toppings. Rich in carbohydrates and fats from the butter and chocolate, they can provide an energy boost. The small amounts of *Biscoff* can offer snacking satisfaction with its spiced flavor, making it a delightful choice when you’re craving something sweet. For more on health benefits related to moderate dessert consumption, you can read about it here: [Healthline](https://www.healthline.com/nutrition/how-to-choose-healthier-desserts).
## Frequently Asked Questions
### 1. Can I use crunchy Biscoff cookie butter?
Absolutely! Crunchy cookie butter will give your brownies an extra dimension and delightful bits of crunch within the rich texture.
### 2. How should I store these brownies?
Store your brownies in an airtight container at room temperature for up to 5 days. If you want to keep them longer, wrap each one in plastic and freeze them for up to 3 months.
### 3. Can I add nuts to these brownies?
Yes! Chopped walnuts or pecans would work beautifully in this recipe. Just fold them in gently with the flour mixture before baking.
### 4. How do I know when my brownies are done?
Brownies are done when a toothpick inserted in the center comes out with a few moist crumbs. The edges should also slightly pull away from the pan.
### 5. Can I double the recipe?
You can definitely double the recipe! If you do, use a larger baking dish (such as a 9×13-inch) and increase the baking time slightly.
## Conclusion
These *Homemade Biscoff Cookie Butter Brownies* are not just any dessert—they’re a delightful adventure for your taste buds. Rich, chewy, and unmistakably decadent, they serve as a beautiful reminder that indulging in dessert is something to savor.
So, why not treat yourself to this delicious recipe tonight? Bake a batch, share them with loved ones, or keep them all for yourself (no judgment here!). If you try this recipe, I’d love to hear how it turned out—leave a comment below or tag me on Instagram!
Happy baking!