Prep time: 20 minutes
Cook time: 30 minutes
Total time: 50 minutes
Servings: 12
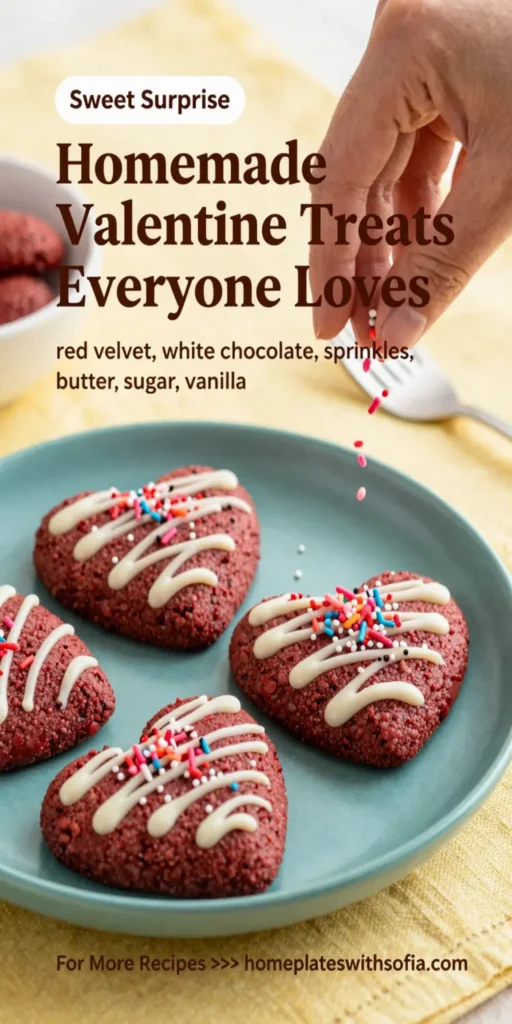
Indulge in the sweetness of Homemade Valentine treats that everyone loves! These delightful creations are perfect for celebrating love, whether for your partner, friends, or schoolmates. With a touch of creativity and a pinch of passion, you can whip up these tasty treats that are sure to melt hearts. These recipes combine aesthetically pleasing designs with delicious flavors, making them irresistible to all ages. Whether you’re a busy parent trying to impress your kids or a kitchen beginner excited to try something new, you’ll appreciate the simplicity and joy of making these treats from scratch.
What Is Homemade Valentine treats everyone loves?
Homemade Valentine treats encompass a variety of sweet goodies made with love, ideal for the celebration of Valentine’s Day. These treats include cookies, chocolates, and candies, all crafted from wholesome ingredients, allowing you to show your affection through food. Making these treats at home gives you the freedom to customize flavors and shapes, making the experience even more delightful. Plus, it’s a great way to involve children in the kitchen, teaching them the joy of cooking while they create something special for their loved ones.
Why You’ll Love This
You’ll absolutely adore these Homemade Valentine treats! First and foremost, they are made with love, echoing the warmth and joy of the holiday. You have the freedom to tailor each treat to your taste—whether you prefer rich chocolate, fruity flavors, or colorful sprinkles. Additionally, these treats offer a wonderful opportunity for bonding with family or friends, turning the process into a memorable experience. Finally, they make for stunning gifts, beautifully packaged and ready to impress anyone who receives them. There’s something special about homemade goodies that store-bought treats simply can’t replicate.
Ingredients You’ll Need
- 2 cups all-purpose flour: This is the main ingredient for the base of your treats, giving them structure and texture.
- 1 cup unsalted butter, softened: Contributes a rich flavor and makes your cookies delightfully tender.
- 1 cup granulated sugar: Provides sweetness to balance the flavors.
- 1 cup brown sugar: Adds a hint of molasses flavor, creating a deeper taste profile.
- 2 large eggs: Acts as a binding agent and helps your treats rise.
- 1 tsp vanilla extract: Enhances the overall flavor and aroma of your treats.
- 1 tsp baking soda: A leavening agent that helps your cookies become fluffy.
- 1/2 tsp salt: Balances the sweetness and enhances other flavors.
- 1 1/2 cups chocolate chips: For that irresistible chocolatey goodness.
- Sprinkles: Adds vibrant color and a festive touch.
How to Make
- Start by preheating your oven to 350°F (175°C). It’s crucial for ensuring even baking. As the oven heats, gather all your ingredients and prepare your baking sheets by lining them with parchment paper.
- In a large mixing bowl, cream together the softened butter, granulated sugar, and brown sugar. Beat them until the mixture is light and fluffy, which usually takes about 3-4 minutes. You’ll notice a lightening of color and an inviting aroma.
- Add the eggs one at a time, mixing well after each addition. Incorporating eggs gradually helps to maintain a smooth texture. Stir in the vanilla extract for added flavor.
- In a separate bowl, whisk together the flour, baking soda, and salt. Gradually incorporate this dry mixture into the wet mixture, stirring until combined. Be careful not to overmix; you want to maintain a tender texture.
- Gently fold in the chocolate chips, ensuring they’re evenly distributed throughout the dough. This step should bring a smile to your face as you see the chocolate peeking through.
- Using a cookie scoop or spoon, drop rounded tablespoons of dough onto the prepared baking sheet, leaving ample space between each for spreading. Sprinkle some extra chocolate chips or colorful sprinkles on top for a festive look.
- Bake in your preheated oven for about 10-12 minutes, or until the edges are golden brown. Keep an eye on them; the cookies will continue to cook slightly once removed from the oven.
- Once baked, let the cookies cool on the baking sheet for about 5 minutes before transferring them to a wire rack to cool completely. This cooling time helps to set the texture.
Variations & Substitutions
Chocolate Mint Variations: For a refreshing twist, add peppermint extract to the mixture. You can also top your cookies with crushed peppermint candies before baking for an extra crunchy and flavorful addition.
Nutty Delight Variations: Swap out a cup of chocolate chips for chopped nuts such as walnuts or pecans. The nuts add a delightful crunch and an additional layer of flavor that pairs wonderfully with chocolate.
Gluten-Free Options: Substitute all-purpose flour with gluten-free flour blends, ensuring your treats remain accessible to everyone. Make sure to check that your chocolate chips are gluten-free as well.
Decorative Touch: Use royal icing to decorate your cookies after baking. You can write sweet messages or create fun designs, making each treat personal and unique.
Common Mistakes to Avoid
Avoid using cold butter directly from the fridge; it won’t cream well with the sugars. Ensure your butter is at room temperature for the best results. Another common mistake is overmixing the dough. Once you add the flour, mix just until combined to keep your treats tender, not tough.
Be cautious about cookie spacing; underestimating spreading can mean a cookie blob instead of individual treats. Lastly, check the baking times as ovens vary significantly. It’s better to underbake slightly for a chewy cookie than to leave them in too long, resulting in a dry texture.
Storage, Freezing & Reheating Tips
To store your Homemade Valentine treats, ensure they are completely cooled before placing them in an airtight container. This is vital to maintaining freshness and preventing sogginess. Store them at room temperature for up to a week, or keep in the fridge for prolonged freshness.
For longer storage, consider freezing the cookie dough before baking. Scoop the dough onto a baking sheet and freeze until solid, then transfer to a zip-top bag. This allows you to bake fresh treats on demand. When you’re ready to bake, simply add a minute or two to the baking time from frozen.
If you have leftover cookies, you can enjoy them by warming them slightly in the microwave for about 10 seconds. This will revitalize their softness and remind you of that fresh out-of-the-oven goodness!
Frequently Asked Questions
Can I use different types of chocolate? Absolutely! You can switch out semi-sweet chocolate chips for dark chocolate, milk chocolate, or white chocolate chips. Each will impart a different flavor profile, so feel free to experiment according to your taste preferences.
How can I make my cookies thicker? If you prefer thick cookies, chilling the dough for about 30 minutes can help. Chilling the dough allows the fat to solidify, leading to thicker cookies that won’t spread too much during baking.
Can I add flavors or extracts to the dough? Yes! Adding flavors such as almond or coconut extract can elevate your cookie experience. Just use them sparingly—generally, a teaspoon is plenty to enhance the overall taste without overpowering the other flavors.
What other mix-ins can I use? Besides nuts and chocolate, consider using dried fruits like cranberries or cherries. You can also fold in oatmeal or coconut shreds for a unique texture and flavor.
Can these treats be made ahead of time? Certainly! You can bake them a few days in advance. Store them in an airtight container, separating layers with parchment paper to keep them from sticking together. They remain fresh and delicious, ideal for making ahead of celebrations.
Conclusion: Homemade Valentine treats are not just delicious; they are heartfelt gifts that express love and appreciation. With this simple recipe, you can create delightful sweet bites tailored to anyone’s palate. So gather your loved ones and enjoy creating these special treats together! Whether you’re celebrating Valentine’s Day or just want to spread some love, these treats are sure to bring smiles.