Let’s Get Real
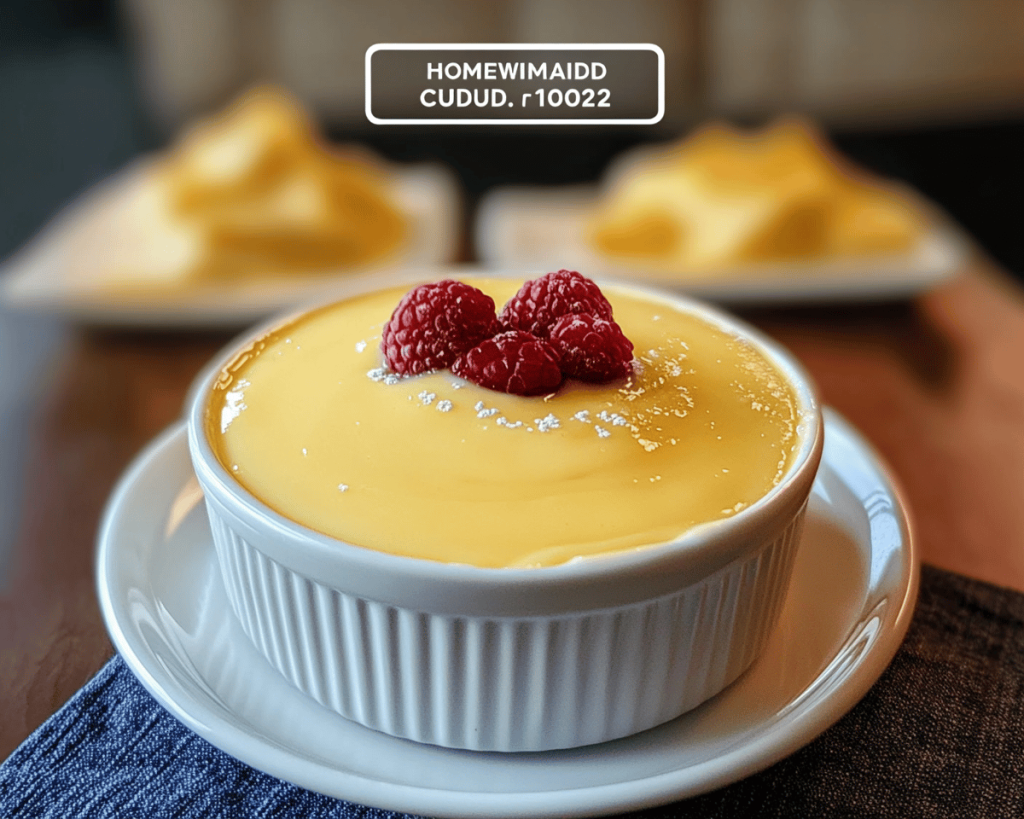
Alright, folks, sit down because I’m about to drop some sweet knowledge on you—Homemade Vanilla Custard. But first, let’s chat about the weather. Is this an acceptable topic? Ugh. I swear, Mother Nature is having a meltdown. One day it’s a sunny 75 degrees, and I’m like, “Let’s make some ice cream,” and then BAM! The next day it’s raining cats and dogs while I’m trapped inside contemplating my life choices. Seriously, who needs umbrellas anyhow?
Speaking of life choices, let’s talk about custard. Remember the custard cups you had at your grandma’s house? You know, the ones lovingly piled next to slightly stale cookies? As a kid, I have to admit I wasn’t a fan. I mean, gelatin was where it was at! But as an adult, I’ve realized custard can be downright magical when made right. I made it a couple of times, failed a few times (thank you, wooden spoon from the 1990s), and now, I’ve nailed it. Now whenever I make it, I practically throw confetti; it’s so good. Plus, the smell? Heaven! So, grab a whisk and your biggest mixing bowl because it’s time to get our custard on.
Ingredients, Unfiltered
What’s Really in Homemade Vanilla Custard
Now, let’s break down what we’re throwing into this magic bowl.
Whole Milk: I’m talking about the “20% fat, yes, please!” kind. Don’t even think about skimping down to low-fat nonsense; you’ll regret it when your custard is more reminiscent of the Sahara desert than sweet, velvety heaven.
Heavy Cream: Also known as liquid gold. Seriously, this is what’s going to make us all feel fancy. Forget about counting calories here; heavy cream is basically like unicorn hugs in a carton.
Granulated Sugar: It’s our sweet friend who ties everything together and makes us smile. Please don’t try and swap this with some stevia nonsense unless you want your custard to taste like a dentist’s waiting room. Just trust me on this one.
Egg Yolks: Don’t throw the whites away! They can be a great future addition to a meringue or a great source of protein when you’re feeling snacky. But honestly, the yolks are where the custard gets that nice rich flavor and texture.
Vanilla Extract: You can stick with good old vanilla extract, but I’m not going to lie; pure vanilla bean paste will take you to flavor town. Use it if you’re feeling fancy.
Salt: A pinch goes a long way in balancing that sweetness. Plus, salt is like that friend who keeps you grounded (but also slightly chaotic)—you know, the one who makes sure you don’t get too serious at parties.
Let’s Talk Health (or Not)
Is This Even Healthy? Let’s Discuss
So, here’s the deal, friends. Is this custard healthy? Well, I could sit here and pretend that all that heavy cream and sugar is magically good for you, but let’s be real. It’s custard. Here’s a fun fact: custard is not a salad. But guess what? I sleep just fine at night knowing I indulge in a custard-eating adventure from time to time.
Sure, you could throw in some kale and call it a health food, but how about we just embrace the creamy goodness for what it is? If you want healthy, go nibble on some carrots. If you want soul-soothing deliciousness, snag a spoon and dig into this vanilla custard, my friends. Moderation? Sure, I can do that… tomorrow.
Your Grocery List
Here’s What You’ll Need
– 2 cups whole milk
– 1 cup heavy cream
– ¾ cup granulated sugar
– 6 large egg yolks
– 2 teaspoons vanilla extract (or, if you’re feeling sassy, use 1 tablespoon vanilla bean paste)
– A pinch of salt
This will serve about four generous portions (or one if you are feeling a little nutty, and it’s been a long day).
The Actual Cooking Part
Okay, Let’s Make This
Here we go! Let’s get you started on making this creamy, dreamy custard. First things first: take a deep breath and gather your ingredients. I swear you’re going to want to keep everything within arm’s reach because we’re about to get custardy.
1. **Heat the Milk and Cream:** In a medium saucepan, combine your whole milk and heavy cream. Throw that mixture over medium heat and keep stirring until it just starts to bubble around the edges. We don’t need a full boil here, less is more! You want it hot but not angry. Trust me, burnt milk would ruin the mood.
2. **Whisk Egg Yolks and Sugar:** While your milk and cream are mingling like they just met at a summer BBQ, grab a bowl. In goes the 6 egg yolks and ¾ cup of sugar. Grab your whisk (the one that just sits at the back of the drawer), and beat those yolks and sugar together until they become pale and slightly frothy. If you feel like a wizard at this point, that’s your cue to keep whisking.
3. **Combine the Two Mixtures:** Now, this is where the magic happens. While whisking continuously, carefully ladle a bit of the hot milk and cream mixture into the egg yolk mix. This is called tempering. If you just dump it all in, the eggs will scramble, and then we have a whole other mess on our hands. Nobody wants custard scrambled eggs. Slowly add in the rest of the hot liquid until it’s all mixed in.
4. **Return to the Stovetop:** Pour that beautiful creamy mixture back into the saucepan and get ready for a bit of patiently stirring again over low heat. We’re looking for the custard to thicken, which should take around 5-10 minutes. You know it’s ready when it coats the back of a spoon. You’ll want to stir constantly. Yes, I know this isn’t a leisurely glass of wine-and-watch-TV moment, but just think about how glorious the end result will be.
5. **Strain & Cool:** Once it thickens (and you’re basically a goddess of the kitchen at this point), remove it from the heat. Strain the custard through a fine-mesh sieve into another bowl to catch any weird egg bits that might’ve formed. Nobody wants that surprise.
6. **Vanilla & Chill:** Stir in your vanilla extract (or paste—living your best life over there!). Allow it to cool to room temperature for about 30 minutes, and then cover it with plastic wrap. This is crucial, so the wrap touches the surface of the custard to prevent a gross skin from forming. Trust me, we don’t want that. Then, place it in the fridge for at least a couple of hours, or until completely chilled.
And Voilà! You’ve just made homemade vanilla custard, and you didn’t even have to call for back-up.
Side Notes & Sassy Hacks
Bonus Tips You Didn’t Ask For
– **Flavor Play:** Want to fancy things up? Totally swap vanilla for other extracts like almond or coconut. Just make sure you dial it down a notch; you don’t want it to taste like a soap opera.
– **Storage:** This custard is best eaten within a few days, but it can technically last up to a week in the fridge. Honestly, mine rarely sticks around that long unless I’m feeling generous.
– **Serving Suggestions:** I love it plain, but if you want to go full-on indulgent, drizzle on some chocolate sauce or serve with fresh berries on top. The contrast will have you dancing in the kitchen—trust me.
– **Meringue Lovers Unite:** As I previously mentioned, don’t throw away those egg whites! They’re perfect for making meringues, pavlovas, or even as a giant omelet if you want the world’s fanciest breakfast.
– **Spatula Friends:** If your custard doesn’t turn out the first time (and lord knows I’ve had my fair share of epic kitchen failures), re-evaluate your technique. Was your heat too high? Were you stirring like the world depended on it?
Final Words of (Culinary) Wisdom
Now that you’re a master custard-maker, take a moment to appreciate your hard work. Seriously—fancy yourself a mixologist of the culinary arts. If you try this recipe, take a snap and tag me because I wanna see your glorious custard creations. Or just send me a mental high-five because we are all in this together, my fellow foodies.
This custard will become your new best friend, and it’ll keep you company while you sip your wine and stare longingly out the window, watching the rain. Remember, life is short; make the custard, and let it be the sweet little victory in your daily grind. Cheers to delicious chaos!


