**Meta Title:** Irresistible Authentic Italian Cannoli Recipe
**Meta Description:** Discover the secrets to making authentic Italian cannoli at home. Crunchy shells filled with creamy ricotta and delightful flavor combinations await!
—
You know that feeling when you step into an Italian pastry shop? The air is thick with sweet aromas, and the sight of rows of vibrant pastries catches your eye. One delicacy that stands out, capturing hearts as much as appetites, is the classic cannoli—an irresistible treat that transports you straight to Sicily with every bite. Today, I’m excited to share my authentic Italian cannoli recipe, one that balances just the right amount of crunch and sweetness, with a creamy ricotta filling that will have you reaching for seconds (or thirds!).
In this recipe, you’ll learn everything from making the perfect cannoli shells to whipping up that luscious filling. So, roll up your sleeves and let’s dive into a piece of culinary tradition that’s perfect for any gathering or simply to savor on your own.
What is Cannoli?
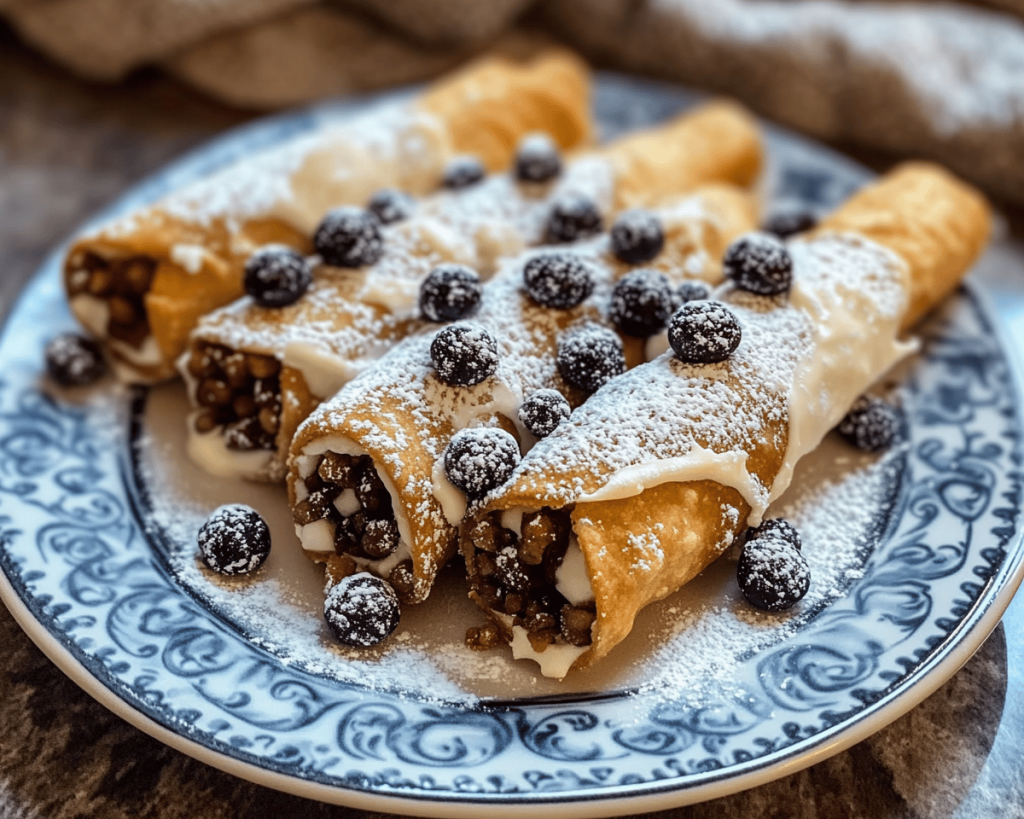
Cannoli are a traditional Sicilian pastry that have delighted taste buds for centuries. Originating in the Sicilian city of Palermo, these heavenly treats consist of a fried pastry shell filled with a sweet, creamy filling made primarily of **ricotta cheese**. The contrast between the crispy exterior and the velvety interior creates a delightful textural experience that is simply unforgettable.
Cannolo, the singular form, translates to “little tube,” elegantly reflecting its shape. The origins of cannoli are steeped in festivities and celebrations, particularly during the **Carnival season**, where they symbolize the joy of indulgence before the Lenten fast. Each bite offers a symphony of flavors, with hints of vanilla, citrus, and sometimes even a touch of chocolate, connecting each cannolo to its rich history.
Why You’ll Love This Authentic Italian Cannoli Recipe
This authentic Italian cannoli recipe stands out for several reasons. First and foremost, it’s simple yet incredibly rewarding. The process of making cannoli can feel a bit intimidating, but with my step-by-step guide, you’ll find that it’s entirely achievable—even for novice bakers.
You’ll adore the **freshness** of the ingredients. I insist on using high-quality **ricotta cheese** — it’s the heart of this recipe! When properly drained and mixed, it creates a filling that’s creamy, delightful, and decorated with flavors that wake up your taste buds. Additionally, the shells are made from scratch, allowing for a light and crispy bite that perfectly balances the sweet filling.
Moreover, making your own cannoli is an excellent way to engage with loved ones. Gather the family for a delightful evening in the kitchen, allowing everyone to shape the shells and enjoy a taste of Italy right at home. These treats also make fantastic gifts or dessert for your next *famiglia* meal, providing a stunning spectacle on any table.
Ingredients You’ll Need
To create the most **irresistible authentic Italian cannoli**, you’ll need the following ingredients:
### For the Cannoli Shells:
– **2 cups all-purpose flour**: This forms the base of your shells. Look for flour labeled “all-purpose” to ensure the right texture.
– **2 tablespoons granulated sugar**: This adds a hint of sweetness to balance the flavors.
– **1/2 teaspoon salt**: A pinch of salt enhances the sweetness of the dough.
– **1/2 teaspoon ground cinnamon**: For that warm, aromatic flavor.
– **2 tablespoons unsalted butter, softened**: Adding richness and tenderness to the pastry.
– **1 large egg**: To bind the ingredients together.
– **1/4 cup white wine or vinegar**: Traditional recipes often call for wine; the acidity helps create crispy shells.
– **Oil for frying (vegetable or canola)**: Choose a neutral oil for frying to let your shells shine without competing flavors.
### For the Filling:
– **1.5 cups ricotta cheese**: The star of the filling; find the freshest, thickest variety you can.
– **3/4 cup powdered sugar**: This ensures a sweet and creamy filling without graininess.
– **1 teaspoon vanilla extract**: For a fragrant touch that enhances the ricotta’s natural flavor.
– **1 teaspoon orange zest**: Offers brightness and a hint of citrus.
– **1/4 cup mini chocolate chips (optional)**: A delightful addition for chocolate lovers.
### For Garnishing (optional):
– **Chopped pistachios or almonds**: To sprinkle on top for a nice crunch and a pop of color.
– **Extra powdered sugar**: For dusting, ensuring a café-worthy presentation.
How to Make Authentic Italian Cannoli
Ready to embark on this delicious journey? Follow these steps to craft your own authentic cannoli at home:
### Step 1: Prepare the Cannoli Dough
1. In a large mixing bowl, whisk together **flour**, **sugar**, **salt**, and **cinnamon**. This builds a lovely base full of flavor.
2. Next, cut in the **butter** using your fingertips or a pastry cutter until the mixture resembles coarse crumbs. This step is key; the butter gives your shells that unique richness.
3. Now, add the **egg** and **white wine/vinegar**. Mix until the dough begins to come together. Avoid overmixing to keep the shells tender and flaky.
4. Knead the dough on a lightly floured surface for about 5 minutes until it’s smooth and elastic. Wrap in plastic wrap and let it rest for at least 30 minutes. This resting period allows the gluten to relax, making your shells more manageable for rolling.
### Step 2: Roll Out the Dough
5. After resting, divide the dough into two sections. Roll one section on a lightly floured surface until it’s about 1/8 inch thick. Use a pasta machine if you have one for a more uniform thickness.
6. Cut the dough into 3-inch circles using a round cookie cutter. Gather and re-roll any scraps until all the dough is used.
### Step 3: Fry the Cannoli Shells
7. Heat oil in a deep-fryer or a deep skillet to 350°F (175°C). To test if your oil is ready, drop a small piece of dough in; it should bubble and rise to the surface.
8. Carefully wrap each dough circle around a **cannoli form** (or a sturdy wooden dowel), sealing the edges with a bit of water. This will hold the shape during frying.
9. Fry the wrapped dough in batches, ensuring not to crowd the pan, for about 2-3 minutes or until they develop a **golden-brown** color.
10. Using tongs, carefully remove the shells and drain them on paper towels. Let them cool before gently sliding them off the forms.
### Step 4: Prepare the Filling
11. In a mixing bowl, combine the **ricotta cheese**, **powdered sugar**, **vanilla extract**, and **orange zest**. Use a spatula to stir until smooth and creamy. Make sure there are no lumps for a luxurious taste.
12. For a playful twist, fold in the mini chocolate chips if desired.
### Step 5: Assemble the Cannoli
13. Just before serving, fill a piping bag (or a plastic bag with the corner snipped off) with the ricotta filling. Pipe it into each cooled shell, filling both ends generously.
14. Dust the filled cannoli with **powdered sugar**, then sprinkle with chopped nuts for added texture.
### Step 6: Serve and Enjoy!
15. Serve the cannoli immediately to retain the crispness of the shells. If you need to prepare them in advance, fill them just before serving.
Tips, Tricks & Variations
– **Proper Filling Temperature**: For the best results, ensure your ricotta is well-drained and at room temperature for a creamy filling. *If too watery, it can make your shells soggy*.
– **Fry in Small Batches**: When frying, work in small batches to keep the oil temperature steady. This ensures your shells fry evenly and don’t absorb excess oil.
– **Customize Your Fillings**: Cannoli are fantastic for customization. Try mixing in **mascarpone cheese** for extra creaminess, or add a splash of **almond extract** for a different flavor profile.
– **Make it Vegan**: Use a plant-based ricotta alternative and substitute the egg in the dough with a flaxseed solution. You can achieve similar results while catering to vegan diets.
– **Storage Tips**: For leftover cannoli, store the shells and filling separately. Fill them just before serving to keep the texture crisp. Shells can last up to a week, while the filling is best enjoyed within 2-3 days.
What to Serve With Cannoli
Cannoli pairs beautifully with an array of beverages. A **robust espresso** or a **sweet dessert wine**, like Vin Santo, can enhance your enjoyment. Additionally, consider serving them alongside a platter of fresh fruits, such as berries or citrus, to balance the sweetness of the dessert.
For sides, feel free to create a rich chocolate sauce or **orange glaze** for dipping, adding a touch of elegance and extra flavor to each bite.
Nutrition & Health Benefits
Cannoli aren’t typically considered health food, but they can offer some nutritional benefits when made with fresh, quality ingredients. The ricotta provides a good source of protein and calcium. One cannolo generally contains about 100-150 calories, depending on the size and quantity of filling.
Enjoying cannoli in moderation can fit into a balanced diet, especially when shared with friends and family during special occasions. For more nutrition tips and guidance, consult reputable sources like [Healthline](https://www.healthline.com) and the [USDA](https://www.usda.gov).
Frequently Asked Questions
1. **Can I make the cannoli shells ahead of time?**
Yes! You can prepare the shells a few days in advance. Store them in an airtight container to keep them crisp, and fill them right before serving to maintain freshness.
2. **What is the best way to store leftover cannoli?**
For the best texture, store the shells and filling separately. Keep the shells in an airtight container at room temperature, and refrigerate the filling. Assemble just before serving.
3. **Can I freeze cannoli shells?**
Absolutely! Cannoli shells can be frozen for up to 2 months. Just make sure they are completely cooled, and store them in a freezer-safe bag or container.
4. **Can I substitute ricotta with something else?**
If you’re looking for alternatives, try mascarpone cheese for a richer, creamier filling. You could also use well-drained cottage cheese, but this will change the flavor and texture slightly.
5. **What if I don’t have cannoli forms?**
No worries! You can create your own by wrapping aluminum foil around a cylindrical piece, close to the size of a traditional cannoli form. Just ensure to grease them lightly before wrapping to ease removal after frying.
—
Indulging in authentic Italian cannoli is a warm invitation to savor tradition, flavor, and love wrapped in sweet, crispy perfection. I hope this recipe inspires you to step into your kitchen, embrace your inner pastry chef, and treat yourself and your loved ones to these sensational desserts.
If you make them (and I really hope you do), please share your results! Tag me on Instagram or leave a comment below with your experience. Let’s keep the joy of cooking alive, one cannolo at a time. Buon appetito!