Let’s Get Real
I don’t know about you, but I have a serious love-hate relationship with weather. When it’s raining, I’m sulking on the couch, swaddled in a blanket like a burrito, pondering life choices. And when it’s sunny? Well, then I’m holed up in the kitchen, trying not to burn the cake while pretending I didn’t just eat an entire pint of ice cream for breakfast. But today? Today is a special day. The sun is shining, and even though it’s a bit too warm for my taste, nothing could get between me and my latest kitchen obsession: Juicy Pineapple Heaven Cake. Seriously, this cake is like sunshine on a plate!
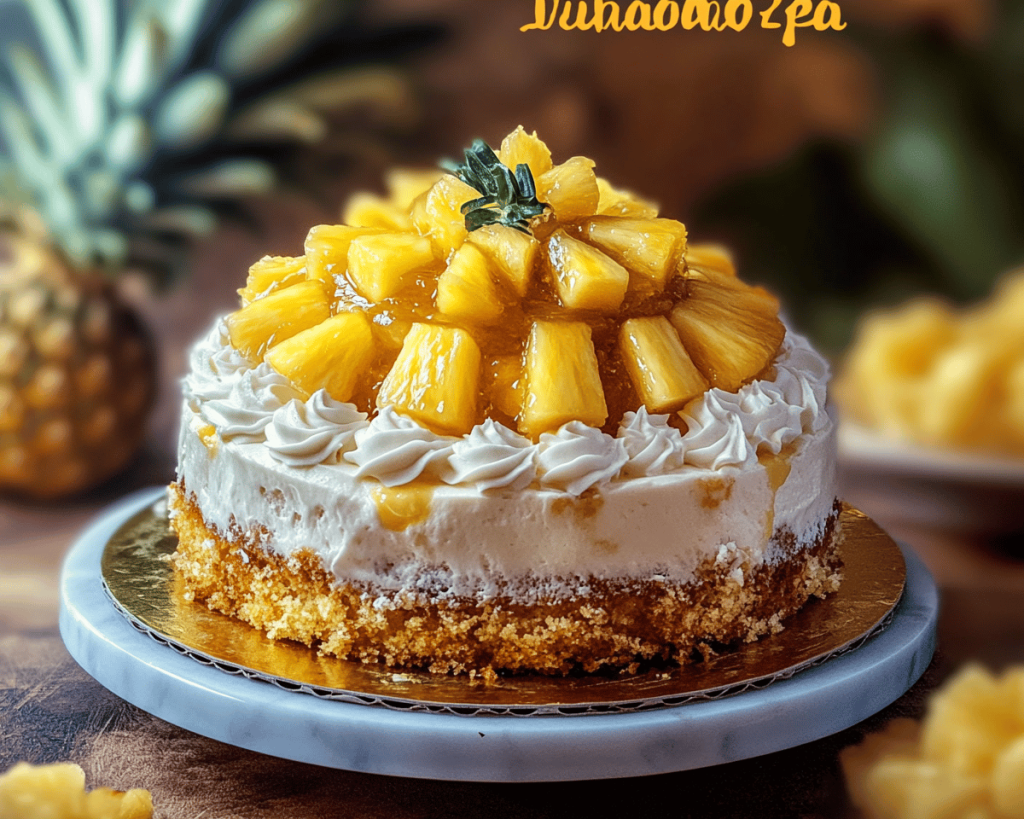
So, here I am, sticking my tongue out at the winter blues and diving headfirst into tropical paradise. I’m talking about a cake that reminds you of lounging on a beach chair with nothing but a piña colada (or, you know, a mocktail if that’s more your vibe). This Juicy Pineapple Heaven Cake is so good, I might just start calling it a dessert of the gods. We’re talking sweet, juicy pineapple, fluffy cake layers, and cream cheese frosting that’ll make you question every other dessert you’ve ever had. So, brace yourselves, because we’re about to create a tropical masterpiece right in your kitchen!
Ingredients, Unfiltered
What’s Really in Juicy Pineapple Heaven Cake
Alright, let’s chat about the ingredients. We need to break it down because, trust me, it’s not just about throwing stuff in a bowl and hoping for the best (though, I wish it were that easy).
Pineapple: The star of the show! Fresh pineapple chunks, perfectly ripened, give that sweet, tangy, tropical flavor that makes you dream of the beach. If you want to save time, you can use canned pineapple, but be warned: you’ll lose a bit of that fresh taste. Go big or go home, right?
Cake Flour: No, seriously, don’t substitute this with all-purpose flour. Cake flour is your friend for a fluffy texture. It’s low in protein, meaning less gluten formation, which results in a tender cake. Let’s just say, this cake is NOT the time to be experimenting with your pantry’s leftovers.
Sugar: Because of course! It’s a cake; we need sugar. I’m all about granulated sugar here, but feel free to get fancy with your choices. Just know that too much customization may lead you down a slippery (and overly sweet) road.
Eggs: Three of the best little binding agents. Make sure they’re large because that’s what the recipe calls for. If you don’t have them, I can’t help you. But I’ll send you mental hugs for trying anyway!
Butter: Real butter, please! We’re making a cake, not some sad alternative. The buttery richness contributes to the moistness and flavor — no margarine madness here.
Vanilla Extract: Mother Nature’s miracle. I like to use pure vanilla extract. Not the synthetic stuff! You’re treating your cake like royalty, so give it the real deal.
Heavy Cream: We need this for the frosting. Yes, I know it sounds decadent, and yes, it totally is, but do we even care? Not one bit. When you taste it, you’ll thank me.
Powdered Sugar: For the frosting too, of course! This is where the magic happens — turning sweet cream into whipped fluffiness. It’s like cloud nine in your mouth.
Cream Cheese: Because life is better with cream cheese. The tanginess balances out the sweetness, giving your frosting character. Trust me, you want this in your life.
Let’s Talk Health (or Not)
Is This Even Healthy? Let’s Discuss
Alright, let’s be real. We’re making a cake that has cream cheese frosting and pineapple, so healthy is probably the last word that comes to mind here. But here’s the thing: we aren’t turning to cake because we’re craving salad.
Sure, there’s butter, heavy cream, and sugar — oh my! But if you’re like me, you’ll recognize that sometimes, life is about balance. Do you skip the dessert because you had a salad for lunch? No! You go for the cake and celebrate that glorious moment of indulgence. It’s all about moderation, my friends. This cake isn’t an everyday dessert unless, of course, you live in some mythical utopia where cake is breakfast. In that case, serve me that invitation, please!
Your Grocery List
Here’s What You’ll Need
– 2 cups cake flour
– 1.5 cups granulated sugar
– 3 large eggs
– 1/2 cup unsalted butter, softened
– 1 cup crushed pineapple, drained
– 1 tsp vanilla extract
– 1/2 cup heavy cream (for the frosting)
– 8 oz cream cheese, room temperature
– 2 cups powdered sugar
– Optional: Fresh pineapple slices for garnishing
This recipe should yield a glorious two-layer cake, serving about 10 to 12 people (or 2, if you’re like me and can never resist a second slice).
The Actual Cooking Part
Okay, Let’s Make This
Alright, gather your ingredients and prepare for the most delicious adventure of your life!
1. **Preheat your oven** to 350°F (about 175°C). Do it now! The oven needs to be ready for the heavenly goodness we’re about to create.
2. **Get your cake flour and sift it into a bowl.** Often, I’m feeling lazy and skip the sifting step. But for this cake, stick to the plan. Sifting the flour lightens it up and makes for a fluffier cake. Plus, it gives you magical baking powers. Seriously.
3. **In another bowl, cream the butter and sugar.** You want it light and fluffy; this usually takes about 3 minutes. If you think your arms might fall off from mixing, don’t panic. In life, we have to earn our trophies (or cakes).
4. **Add in the eggs, one at a time.** Make sure they’re well combined before you toss in the next one — you’ll be surprised at how these little suckers make a difference in texture.
5. **Stir in the vanilla extract** because your cake deserves that sweet touch of warmth. Don’t skimp on this. You won’t regret it!
6. **Next, add the crushed pineapple.** I like to mix it by hand carefully because we want to keep the pineapple chunks intact! It’s called JUICY Pineapple Heaven Cake for a reason. A blender here would make the poor pineapple sad.
7. **Now gradually mix in the sifted flour.** Remember: low speed is key. I’ve made the mistake of going full throttle before only to have flour clouds invade my kitchen. Not the vibe you want.
8. **Pour the batter into your greased cake pans.** I always use parchment paper. If you want to release those layers flawlessly, do yourself a favor and line the bottom of those pans. Plus, it’s less cleaning later. Bleh.
9. **Pop the pans in the preheated oven** for about 30-35 minutes, or until a toothpick inserted in the center comes out clean. This is the moment where you can start dancing around the kitchen. Yes, it’s okay if it looks messy — it’s supposed to!
10. **Let them cool for about 10 minutes before transferring** to wire racks. Patience is a virtue, my friends. If you try flipping them before they’re cool, you’ll end up with lopsided cakes and very little glory. Trust me; I’ve sacrificed layers for this.
11. **Let’s whip the frosting while the cakes cool!** In a bowl, beat the cream cheese until smooth. Add in the heavy cream and powdered sugar gradually. Honestly, I add a pinch of salt here too; it balances the sweetness and gives that “wow” factor.
12. **Once your cake layers are cool, it’s stacking time!** Place one layer on a beautiful cake stand (or your favorite plate if you’re feeling rebellious), slather on a generous amount of frosting, and then place the second layer on top. Top it off with more frosting and some fresh pineapple slices if you’re feeling fancy.
Side Notes & Sassy Hacks
Bonus Tips You Didn’t Ask For
– If you want a tropical twist, try adding shredded coconut to your batter. I won’t tell if you don’t!
– Want a gluten-free version? You can use a 1:1 gluten-free flour substitute. Just make sure it’s one you trust.
– Got leftovers? Freeze individual slices. It makes for a surprised treat on a rainy day when you’re staring at the wall, contemplating life decisions (or dessert options).
– If the frosting gets too thick, don’t panic. Just a splash of milk can save the day.
– You can also use lemon zest in the batter. It’s like a sunshine explosion that complements the pineapple beautiful!
Final Words of (Culinary) Wisdom
So there you have it! Juicy Pineapple Heaven Cake is now in your arsenal of amazing dessert recipes, just waiting to wow your taste buds and those of everyone around you. Don’t forget to capture those Instagram-worthy moments of the cake cut and the inevitable smile explosion after that first bite. If you try it, tag me. Or just send me a mental high-five. Remember, every time you make this cake, you’re not just creating a dessert; you’re crafting bliss one slice at a time! Enjoy!