Prep time: 20 minutes
Cook time: 90 minutes
Total time: 1 hour 50 minutes
Servings: 8 servings
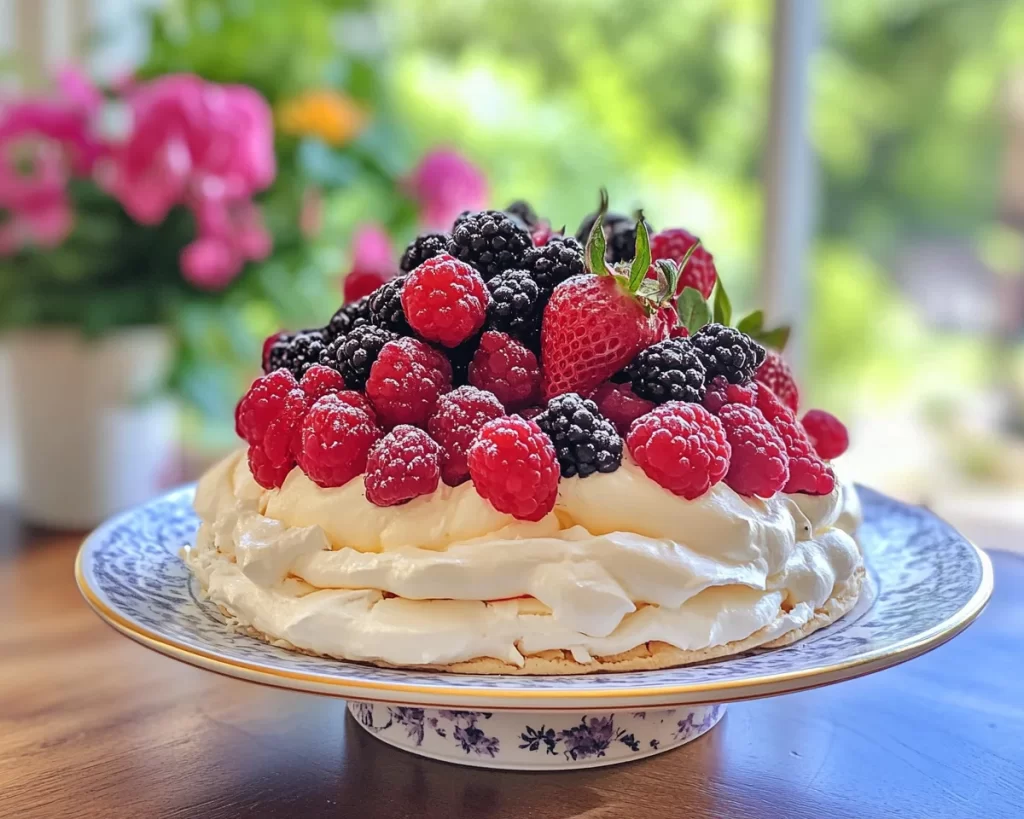
Imagine a light and airy dessert that melts in your mouth, topped with vibrant, juicy berries and a dollop of creamy goodness. That’s exactly what you’ll find in this delightful Mother’s Day Berry Pavlova. If you’re searching for a dessert that impresses without requiring a culinary degree, you’re in the right place. This pavlova is not only stunning but also bursting with flavors that remind us of springtime on every layer. Allow this recipe to be your go-to for celebrations, especially when showing love to mothers or special women in your life.
This recipe stands out because of its simplicity and elegance. You’ll learn how to create a magnificent meringue base, which serves as the canvas for an array of berries and whipped cream. The pavlova’s crisp exterior contrasts beautifully with its soft, marshmallow-like interior, creating a delightful texture that your taste buds will thank you for. Here, you’ll discover pro tips, variations, and substitutions that will help you customize this pavlova to perfection.
What Is Mother’s Day Berry Pavlova?
Mother’s Day Berry Pavlova is a celebrated dessert originating from Australia and New Zealand. It’s named after the Russian ballerina Anna Pavlova. The foundation of the dish is a meringue made primarily of egg whites and sugar, which is baked at a low temperature until it achieves a crisp outer shell while remaining soft and pillowy on the inside. This unique texture is what makes pavlova so irresistible.
Typically adorned with fresh fruits, the standout feature of the Mother’s Day Berry Pavlova is its use of seasonal berries, such as strawberries, blueberries, and raspberries. The sweetness of the pavlova complements the tartness of the berries, creating a flavor symphony where each bite offers a balance of sweetness and tang. Topped with whipped cream, the dish elevates your dessert experience, making it an unforgettable centerpiece for any celebration.
What sets this dessert apart is not only its incredible flavor combination but also its festive appearance. The pavlova is often garnished with a variety of berries and a drizzle of berry sauce, making it a stunning showpiece on any table. Its light nature also makes it perfect for a spring or summer gathering, where you want a dessert that feels special yet doesn’t weigh you down.
Why You’ll Love This
Creating a Mother’s Day Berry Pavlova is a delightful experience, and there are countless reasons to adore it. First and foremost, the **flavors** are simply divine. The combination of the rich, whipped cream with fresh, tart berries creates a dessert that is not only enjoyable but also refreshing. The balance of textures, from the crispy exterior of the pavlova to the softness within, makes it a feast for the senses.
Moreover, this recipe is quite **forgiving**. Unlike traditional cakes that can easily overbake or dry out, pavlova is more resilient to minor errors. The low-and-slow baking method ensures that it can achieve that perfect balance of textures, even if you’re a beginner in the kitchen.
Cost-wise, this dessert is also very reasonable. Most of the ingredients are simple and easily available, especially if you source seasonal fruits. This allows you to **celebrate** special occasions without breaking the bank.
Additionally, pavlova is naturally gluten-free, making it an excellent choice for those with dietary restrictions. You can customize the toppings according to preferences or desired dietary needs, allowing you to create a unique dessert that everyone can enjoy together.
Ingredients You’ll Need
- 4 large egg whites – These form the base of the meringue, creating that signature light texture. Fresh eggs work best for stable peaks.
- 1 cup granulated sugar – Essential for sweetness and structure. For a lighter texture, you can use superfine sugar if available.
- 1 teaspoon vanilla extract – Adds a beautiful flavor profile to the meringue. Substitute with almond extract for a unique twist.
- 1 teaspoon white vinegar – Helps stabilize the egg whites while adding a subtle tang to the overall flavor.
- 1 cup heavy cream – Perfect for whipping into stiff peaks to top the pavlova. You may use coconut cream for a dairy-free option.
- 2 cups mixed berries – A mix of strawberries, blueberries, and raspberries. Feel free to include seasonal fruits you enjoy.
- Optional: powdered sugar – For dusting and serving, it adds a touch of additional sweetness and presentation.
Each ingredient plays a crucial role in achieving that perfect balance of flavor and texture. The egg whites are essential for the meringue base, while the sugar adds sweetness and structure. Vanilla extract enhances the overall flavor, while white vinegar ensures stability, making each bite delightful.
How to Make
1. **Preheat your oven** to 275°F (135°C). Line a baking sheet with parchment paper and draw a 9-inch circle on the paper. This will help guide your meringue shape.
2. **Beat the egg whites** in a clean, dry bowl until they form soft peaks. This usually takes about 2-3 minutes on medium speed. Make sure no egg yolks get into the whites, or they won’t whip up properly.
3. **Gradually add the sugar,** one tablespoon at a time, while continuing to beat the mixture on high speed. Keep beating until the meringue is glossy and stiff peaks have formed. This can take another 4-5 minutes.
4. **Gently fold in the vanilla extract and white vinegar** until just combined. Be careful not to deflate the meringue. The goal is to keep it light and airy.
5. **Spoon the meringue onto the drawn circle** on the baking paper. Create a slight well in the center to hold the whipped cream and berries later. Use a spatula to spread it smoothly.
6. **Bake in the preheated oven** for about 60-90 minutes, or until the outer shell is crisp and the inside is soft. The pavlova should easily lift off the parchment paper and have a light golden hue.
7. **Turn off the oven** and leave the pavlova inside as it cools down. This prevents cracking due to temperature shock. Leave it in the oven for at least 1 hour.
8. **Prepare the topping** while the pavlova cools. Whip the heavy cream in a chilled bowl until soft peaks form. If desired, you can add a bit of powdered sugar for sweetness.
9. **Once the pavlova is completely cool,** gently remove it from the baking paper. Place it on a serving platter.
10. **Spread the whipped cream** over the pavlova, filling the well you created.
11. **Top with mixed berries** and garnish with a light dusting of powdered sugar for presentation.
12. **Serve immediately** and enjoy the delightful blend of flavors and textures.
Making a pavlova might seem daunting, but following these steps will lead you to dessert success. The beauty of this dish is that it allows for a bit of creativity while still sticking to a straightforward method.
Variations & Substitutions
Chocolate Pavlova Variation: Swap out a portion of the cornstarch for cocoa powder to create a chocolate pavlova. This variation appeals to chocolate lovers and adds a rich depth of flavor. Accentuate with chocolate curls on top along with your berries for a beautifully decadent dessert.
Citrus Pavlova Variation: Instead of berries, use segments of citrus fruits like oranges or grapefruits. The citrus adds a refreshing zest that contrasts beautifully with the sweet meringue. Add a drizzle of citrus glaze made with juiced citrus and sugar to enhance the flavor.
Dairy-Free Option: Substitute heavy cream with coconut cream for a dairy-free alternative. Chill the coconut cream overnight, then whip it until fluffy. Top with berries for a light, vegan-friendly dessert. This is great for those with lactose intolerance or dietary restrictions.
Cheesecake Pavlova: Create a cheesecake-inspired filling by mixing cream cheese with whipped cream and a bit of vanilla extract. Spread this mixture on top of your cooled pavlova, followed by a layer of fresh berries or a fruit compote. This variation adds a rich and creamy texture while still maintaining the lightness of the pavlova.
Common Mistakes to Avoid
One of the most typical errors when making pavlova is **failing to whip the egg whites sufficiently**. Without achieving the right stiffness, your meringue will not hold its shape while baking. Always ensure that your mixing bowl and utensils are completely clean, as any fat or grease can ruin your results.
Another mistake is **baking at too high a temperature**. A low and slow bake helps to create a crisp exterior while keeping the inside marshmallow-like. If your oven runs hot, this can lead to a collapsed pavlova, so it might be beneficial to invest in an oven thermometer to ensure accuracy.
Lastly, many bakers make the mistake of **not allowing the pavlova to cool in the oven**. This step is crucial for preventing cracks and ensuring the texture remains soft inside. By leaving it in the oven while it cools, it gradually adjusts to the temperature change, allowing for a beautifully intact dessert.
Storage, Freezing & Reheating Tips
Pavlova is best enjoyed the same day it’s made. However, if you need to store leftovers, it’s essential to do so properly. Place any leftover pavlova in an airtight container at room temperature, ensuring it doesn’t get humid, as this can make the meringue soggy.
If you have leftover toppings, store the whipped cream and berries separately in the fridge for up to 2 days. When you’re ready to serve, simply assemble the pavlova again. Do not freeze an already assembled pavlova, as the meringue will likely lose its texture.
If you’re looking to prepare the pavlova ahead of time, you can bake the meringue base a day or two in advance and store it in a cool, dry place until you’re ready to top it. This is a great time-saving tip for busy hosts.
Frequently Asked Questions
Can I make pavlova in advance?
Yes, the meringue base can be made a day in advance and stored in an airtight container. Just make sure to assemble it with the cream and berries right before serving to maintain its texture and avoid sogginess.
Why is my pavlova cracking?
Cracking is often caused by a drastic temperature change. To prevent this, allow the pavlova to cool slowly in the oven by turning off the heat and leaving the door slightly ajar. Also, ensure that you don’t overbeat the egg whites to avoid creating too much air in the meringue.
Can I use frozen berries instead of fresh?
While fresh berries are preferred for their flavor and texture, you can use frozen berries as a substitute. Just be aware that they may release more moisture, so it’s better to mix them into a compote to avoid sogginess on the pavlova.
What can I do if my pavlova is too sticky?
If you find your pavlova too sticky, it may not have been baked long enough. Ensure it has a crisp exterior before taking it out of the oven. If you’re unsure, using a food thermometer can help; the internal temperature should be around 120°F (49°C).
Is pavlova gluten-free?
Yes, pavlova is naturally gluten-free since it is made primarily with egg whites and sugar. This makes it an excellent option for those with gluten intolerance or celiac disease.
Conclusion:
In summary, Mother’s Day Berry Pavlova is a delightful, visually stunning dessert that everyone will adore. It’s not only easy to make but also adaptable, allowing you to customize it to your taste preferences. By following these instructions, you can create a pavlova that celebrates the essence of spring and the joy of family gatherings. Give it a try at your next event, and don’t hesitate to share your creations with loved ones. Remember, cooking is all about love and care, so this pavlova is sure to be a hit!