Prep time: 30 minutes
Cook time: 20 minutes
Total time: 50 minutes
Servings: 12 cupcakes
The aroma of freshly baked cupcakes wafting through the house can evoke cherished memories and create an atmosphere of warmth and joy. Imagine the delight on your loved ones’ faces when you present a beautiful bouquet of vanilla cupcakes, each one a small celebration. This Mother’s Day Vanilla Cupcake Bouquet not only tastes divine but serves as an eye-catching centerpiece for your festive table. Whether you are a busy parent longing for a simple yet impressive dessert or a beginner in the kitchen looking to dazzle guests, this recipe is perfect for you. You will learn how to make these delightful cupcakes from scratch, upgrade them with various flavor options, and avoid common pitfalls along the way.
What Is Mother’s Day Vanilla Cupcake Bouquet?
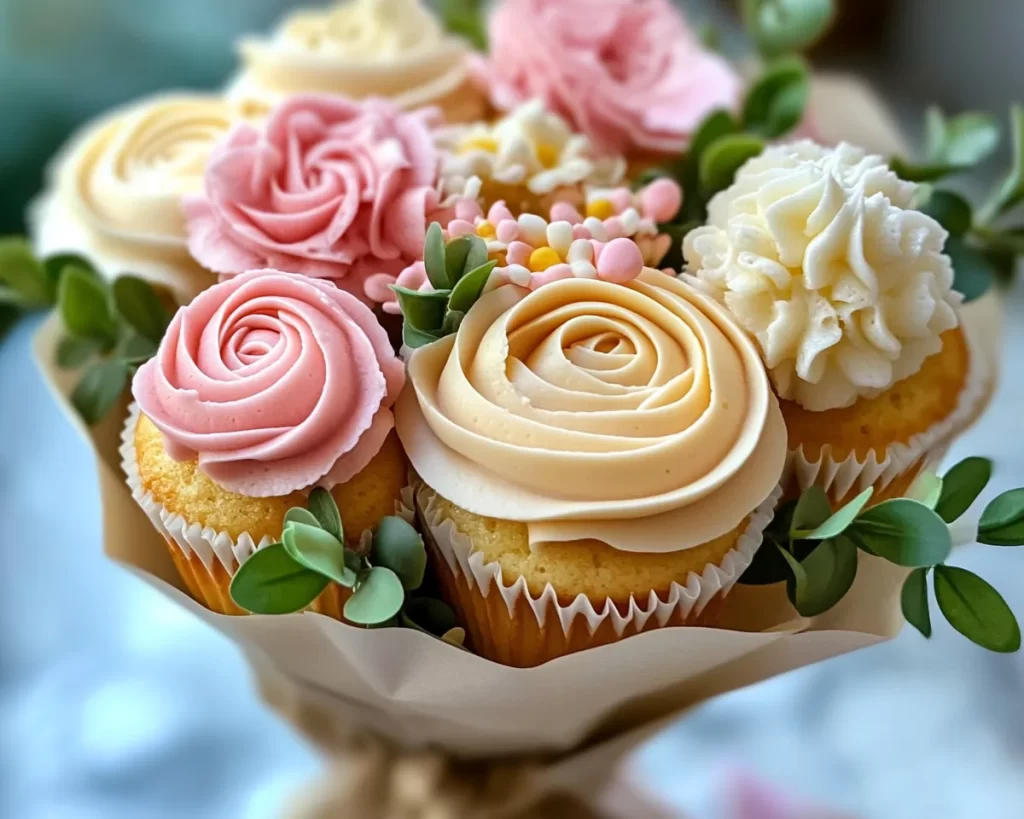
The Mother’s Day Vanilla Cupcake Bouquet is a charming and delightful dessert that merges the worlds of baking and floral design. Originating from the creative cake-decorating movement, this cupcake bouquet presents a whimsical twist on traditional baking. Picture a bouquet of vibrant flowers; now, imagine that transformed into delicious cupcakes, arranged beautifully using cake pops as stems in a pot. Each cupcake is fluffy and light, with a rich vanilla flavor that melts in your mouth. The perfect marriage of texture and taste makes it hard to resist. These cupcakes are often decorated with colorful frosting and edible decorations that resemble flowers, making them visually stunning and an absolute delight for celebrations.
Making these cupcakes isn’t just about the baking; it’s about the experience. You get to channel your inner artist as you decorate each cupcake, ensuring that your creation not only tastes great but also looks spectacular. The versatility of the cupcake bouquet means you can put your own spin on it. You may choose to incorporate different flavors or colors to make it uniquely yours, which is particularly meaningful when you’re celebrating someone special, like your mom, on Mother’s Day.
Why You’ll Love This
One of the best aspects of the Mother’s Day Vanilla Cupcake Bouquet is its stunning visual appeal combined with delicious flavor. The taste is simply out of this world—fluffy, moist cupcakes topped with silky smooth frosting. Because the aesthetics are as important as the flavor, you can let your creativity shine through in the decoration. This recipe is not only easy to make, but it is also cost-effective, allowing you to produce a show-stopping dessert without breaking the bank.
You may have heard that baking can be intimidating, especially for those who are inexperienced, but trust me, this cupcake bouquet is straightforward enough that even beginners can succeed. A common misconception is that achieving a professional look in baking requires years of experience, but this recipe challenges that notion. With step-by-step instructions and detailed tips, you’ll find baking these cupcakes manageable, even for those who find themselves feeling overwhelmed in the kitchen.
Ingredients You’ll Need
- All-purpose flour: This forms the base of your cupcakes, giving them structure and texture. You can use cake flour for a lighter result.
- Sugar: Granulated sugar sweetens your cupcakes, balancing the flavors. Avoid substitutes like stevia, which might alter the texture.
- Baking powder: This leavening agent is essential for making your cupcakes rise and become fluffy.
- Salt: Just a pinch enhances the sweetness and rounds out the flavor.
- Unsalted butter: At room temperature, it helps create a tender crumb and adds richness to the cupcakes. You can substitute with vegetable oil for a dairy-free option.
- Eggs: These provide moisture and act as a binding agent. For a vegan variation, consider using flax eggs.
- Vanilla extract: This is the star ingredient that infuses your cupcakes with beautiful flavor. Natural extract is preferred for the best taste.
- Milk: Adds moisture to the batter. You can also use almond or oat milk for a dairy-free version.
- Powdered sugar: Essential for making the frosting, creating a fluffy and sweet topping for your cupcakes.
- Food coloring: Optional for enhancing your frosting; use gel-based colors for the best results.
These ingredients are easily accessible in most supermarkets, making this recipe a breeze to tackle anytime. Remember, quality matters, so always opt for the freshest ingredients you can find.
How to Make
- Preheat the oven: Start by preheating your oven to 350°F (175°C). This initial step is crucial because placing your cupcake batter into a preheated oven helps them rise beautifully and develop a fluffy texture.
- Prepare the cupcake liners: While your oven is heating, prepare a standard cupcake tin by placing cupcake liners in each well. The liners not only keep the cupcakes moist but also make for easier serving and a beautiful presentation.
- Mix dry ingredients: In a mixing bowl, whisk together the all-purpose flour, baking powder, and salt. Doing this step first ensures even distribution of the leavening agent throughout the flour, preventing uneven rising during baking.
- Cream the butter and sugar: In another bowl, add your room-temperature unsalted butter and granulated sugar. Using an electric mixer, beat them together on medium speed until the mixture turns light and fluffy. This process usually takes about 3-5 minutes. It’s essential for achieving a tender crumb in your cupcakes.
- Add eggs and vanilla: Next, add the eggs, one at a time, mixing well after each addition. This step incorporates air into the batter, contributing to that light texture. Drizzle in the vanilla extract and mix until well combined.
- Combine wet and dry ingredients: Gradually add the dry mixture to the wet ingredients, alternating with milk. Start by adding a third of the flour, followed by half the milk. Repeat this process, ending with the flour. Be careful not to overmix; this can make the cupcakes dense.
- Scoop batter into liners: Using a cookie scoop or a measuring cup, fill each cupcake liner about two-thirds full with batter. This allows room for the cupcakes to rise without overflowing.
- Bake: Place the cupcake tray in the preheated oven and bake for 18-22 minutes. You’ll know they’re done when a toothpick inserted into the center comes out clean or with just a few crumbs. Allow the cupcakes to cool in the pan for a few minutes before transferring them to a wire rack to cool completely.
- Prepare the frosting: While the cupcakes are cooling, you can make the frosting. Start by beating together softened unsalted butter and powdered sugar until it’s light and fluffy. Add a splash of milk and vanilla extract and continue beating until smooth and spreadable. Make sure the consistency is thick but easy to pipe, adjusting with additional milk if necessary.
- Decorate: Once the cupcakes are completely cooled, it’s time to decorate. You can use a piping bag fitted with a star tip to create swirls of frosting on top of each cupcake. Optional: Use a food coloring of your choice to tint your frosting to match your theme.
- Assemble bouquet: To assemble the cupcake bouquet, insert suitable sticks into the bottom of the cupcake liners and place them inside a flower pot filled with floral foam. Arrange them for a visually appealing look, just like a bouquet of flowers. Optional: You can adorn the arrangement with tissue paper or faux flowers for added flair.
Each step ensures a seamless baking experience, creating that perfect Mother’s Day Vanilla Cupcake Bouquet that is both beautiful and delicious.
Variations & Substitutions
Chocolate Cupcake Variation: For those who adore chocolate, simply swap half of the all-purpose flour for cocoa powder. This will give your cupcakes a rich chocolate flavor that pairs wonderfully with vanilla frosting. Just remember to adjust the sugar slightly, as cocoa can bring a bitter note. These chocolate cupcakes can still be decorated similarly to maintain the bouquet’s aesthetic.
Citrus Burst Variation: For a refreshing twist, add the zest of one lemon or orange to the batter. The citrus flavor will brighten the vanilla, resulting in a lift that sets your cupcakes apart. This option works well for those who enjoy a more vibrant palette and is particularly appealing during warm months.
Dairy-Free Variation: Making your cupcake bouquet dairy-free is as simple as substituting unsweetened applesauce for butter and using almond milk or oat milk instead of regular milk. You can also opt for a dairy-free chocolate frosting if you want to change things up. This version allows everyone to indulge without dietary restrictions.
Gluten-Free Variation: To create a gluten-free version of this delightful cupcake bouquet, substituting regular flour with a one-to-one gluten-free baking blend is an excellent option. Ensure you’re also using gluten-free baking powder and double-check all other ingredients to avoid any hidden gluten.
Flavor Infusions: Consider enriching your vanilla cupcakes with flavor infusions such as almond or coconut extract instead of vanilla. This slight twist can create a new flavor profile that adds intrigue to your cupcake bouquet.
Common Mistakes to Avoid
One of the most frequent mishaps occurs when cupcakes are overmixed. Overmixing the batter can lead to tough, dense cupcakes instead of the desired light and fluffy texture. Always mix only until the ingredients are just combined; a few lumps are perfectly fine! Another error involves improper measuring of the flour. Using too much flour can result in dry cupcakes. The best practice is to spoon flour into the measuring cup and level it off without packing it down.
Additionally, cooling time is critical. Many bakers rush the process and attempt to frost warm cupcakes. This can melt your frosting and ruin the aesthetic appeal as well as the texture. Allow your cupcakes to cool completely before adding the frosting to achieve the best results.
Lastly, not adjusting your oven shelf can lead to uneven baking. If your oven has uneven heat, it can create hotspots that prevent even rising. Always place your cupcakes in the center of the oven to avoid this common issue; it might help to rotate the tray halfway through baking.
Storage, Freezing & Reheating Tips
When it comes to storing your delicious Mother’s Day Vanilla Cupcake Bouquet, proper care is essential to maintain freshness. First, ensure that cupcakes are completely cooled before storing them. Place any leftover cupcakes in an airtight container at room temperature if you plan to consume them within a day or two; they’ll retain their moisture without refrigeration.
If you would like to keep them for an extended period, consider freezing them. To do this, cool the cupcakes completely, then wrap each one individually in plastic wrap before placing them in a resealable plastic bag. They can be frozen for up to three months. When you’re ready to enjoy them, simply remove the desired number of cupcakes and allow them to thaw at room temperature. If you’ve frozen them without frosting, you can prepare fresh frosting to go on top right before serving.
For displaying the cupcake bouquet, keep it in a cool area away from direct sunlight. If using real flowers or decorative fillers, replace them frequently to keep the arrangement looking fresh.
Frequently Asked Questions
Can I use a boxed cake mix instead of homemade batter? Yes, you certainly can use a boxed cake mix for convenience. Just follow the instructions on the box for the best results. However, homemade batter offers richer flavors and a more personalized touch.
What frosting works best for this bouquet? While buttercream frosting is generally the most popular choice due to its stability and ease of decoration, cream cheese frosting can add a tangy twist that pairs exceptionally well with vanilla cupcakes. Choose the frosting based on your flavor preference.
How do I know when my cupcakes are done? A toothpick inserted into the center of the cupcakes should come out clean or with just a few moist crumbs. Keep an eye on the time, but your nose is also a good indicator—the beautiful smell of baking cupcakes is hard to miss!
Can I make these cupcakes ahead of time? Absolutely! You can prepare the batter and keep it in the refrigerator for a day before baking. Alternatively, bake them ahead of time, store them as mentioned above, and frost them closer to the event for optimal freshness.
What alternatives can I use for food coloring? If you prefer natural alternatives, beet juice or spirulina powder can be used to dye frosting. However, keep in mind that the colors may not be as vibrant as those achieved with conventional food coloring.
Conclusion:
This Mother’s Day Vanilla Cupcake Bouquet is more than just a recipe; it’s a celebration of love, creativity, and deliciousness. With its beautiful presentation and delightful flavor, it brings joy not only to the recipient but also to the baker. Don’t hesitate to try this recipe—you can customize it to fit your preferences and make it truly your own. Get into the kitchen, enjoy the process, and don’t forget to share the end result with your loved ones! Happy baking!