Let’s Get Real
Oh, peanut butter and chocolate, how do I even begin to explain the love I have for you? Seriously, if I could marry a flavor combination, it’d be PB + chocolate, no questions asked. Life would be a constant sweet affair filled with heavenly bites and maybe a little bit of chaos—mostly involving sticky fingers and chocolate smudges on my shirts. But, then again, who needs a pristine wardrobe when you can feast upon the glorious creation that is Peanut Butter Chocolate Chip Balls?
Now, if you’re here, chances are you already know that peanut butter and chocolate are a match made in foodie heaven. But let me be real: I didn’t start out loving these little balls of joy as a kid. Nope. I was that kid who turned her nose up at anything that remotely resembled something made from nuts. The idea of eating something that was both “healthy” and “sweet” seemed like a cruel joke. And now, here I am, pouring peanut butter into my recipes like it’s water. Something has changed!
Peanut Butter Chocolate Chip Balls have swept me off my feet, and there’s no looking back. I mean, how could you resist a no-bake treat that delivers joy with every bite? These babies are perfect for snack time, lunchboxes, or just a little pick-me-up when the world feels like it’s crashing down around you. Believe me when I say this: once you make these, they will become your go-to treat, and you will never be able to look at peanut butter again without craving one (or several) of these tiny indulgences.
Ingredients, Unfiltered
What’s Really in Peanut Butter Chocolate Chip Balls
Okay, let’s dissect these ingredients like a science experiment gone fabulous. Grab your lab coats (or aprons), and let’s take a closer look at what we’ll be working with.
Peanut Butter: The rock star of this show! I prefer creamy, but if you’re a crunchy fan, go wild! Just be prepared to have little nutty surprises in every bite. My go-to brand is JIF, but I won’t judge if you’re all about that natural nut butter life. Just remember, if it separates into a jar of oily goodness, you might have to work a bit harder to make these balls stick together.
Honey or Maple Syrup: Let’s bring the sweetness into this party, shall we? I’m all about honey for that rich flavor, but if you’re feeling a bit more earthy, maple syrup hits the spot too. Just don’t overdo it; this isn’t a pancake breakfast, after all! A little sweetness goes a long way.
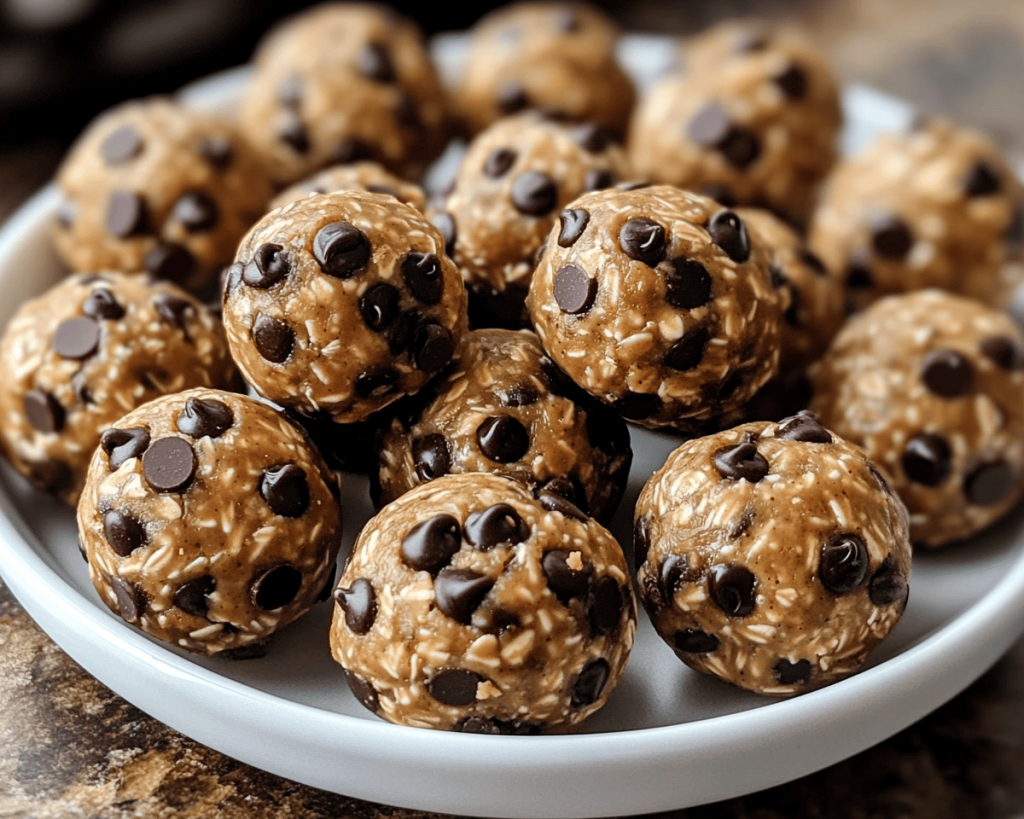
Old-fashioned Oats: The unsung hero of healthy snacking! I love oats—they give these little balls a chewy base that makes you feel like you’re eating something wholesome (while also indulging). And let’s be real: if you’re trying to convince anyone that these are healthy, oats are your best friend.
Chocolate Chips: Is there such a thing as too many chocolate chips? No, there isn’t, so load ‘em up! I usually opt for semi-sweet, but milk chocolate chips are more than welcome to the party. And, if you’re feeling adventurous, go the dark chocolate route to add some sophistication to your life.
Vanilla Extract: A dash of this fragrant magic makes everything better. I like to use pure vanilla—as it should be—because imitation doesn’t really cut it. We’re here to impress our taste buds, not fool them!
Pinch of Salt: A little salt, my friends, goes a long way. It enhances the sweetness of the peanut butter and chocolate, creating that irresistible contrast. Trust me, you’ll want to add it.
Let’s Talk Health (or Not)
Is This Even Healthy? Let’s Discuss
Let’s address the elephant (or peanut butter jar) in the room: are these actually healthy? I mean, we have oats, peanut butter, and honey, giving us a shiny halo of health, right? Well, first of all, let’s be honest here. If you think you can chow down an entire batch in one sitting and still consider it a health food, you may want to reevaluate your relationship with dessert.
But here’s the kicker—these little gems are made with wholesome ingredients. We’re talking about beneficial fats from the peanut butter, some fiber from the oats, and just a smidge of natural sweetness. So while your body is getting a bit of love, just remember that moderation is key, people! Yes, there’s sugar, but at least it’s from sources that won’t send your blood sugar to the moon and back.
In my book, balanced living means cooking with ingredients that make you feel good while also treating yourself. So, sure, these Peanut Butter Chocolate Chip Balls aren’t a kale salad, but hey, they’re a heck of a lot tastier!
Your Grocery List
Here’s What You’ll Need
Alright, dear readers, here’s the game plan for your grocery run. Make sure to grab:
– 1 cup creamy peanut butter
– 1/3 cup honey or maple syrup
– 1 cup rolled oats (old-fashioned, not quick oats)
– 1 cup semi-sweet chocolate chips (or any chocolate chips of your choice)
– 1 tsp high-quality vanilla extract
– A pinch of salt
We’re aiming for about 20-25 balls here, depending on how generous you’re feeling while rolling them.
The Actual Cooking Part
Okay, Let’s Make This
Get ready, because this is where the magic happens. And by magic, I mean a blending of flavors in the simplest format possible—no oven needed!
1. **Mix the Ingredients:** Start by grabbing a large bowl. I’m talking about that bowl that could hold all your despair after a long day—yes, that one! Combine your peanut butter, honey (or maple syrup), vanilla extract, and a pinch of salt. I like to use a spatula to mix everything together gently as if you’re coaxing a shy friend out from a corner at a party.
2. **Add the Oats:** Next, throw in the oats and mix again. At this point, it’s going to get a little tough as that peanut butter sticks to the oats like it’s their best bud. Don’t freak out if it looks messy — it’s supposed to! Life is messy, and so is my kitchen.
3. **Choco-licious Times:** Now comes my favorite part—add the chocolate chips. Fold them gently into the mixture. Make sure you sneak a few for yourself because…you know, quality control.
4. **Chill Out:** Once your mixture is well combined, cover the bowl and place it in the fridge for about 30 minutes. This step is crucial to firming up your dough (if it can be called that), making it easier to roll into balls without it falling apart like my attention span during a boring lecture.
5. **Roll ‘Em Up:** After chilling, scoop out a tablespoon-sized portion and roll it into a ball. Don’t worry about making them perfect; we’re not trying to be Martha Stewart here (and if you somehow are, more power to you). Plop them onto a parchment-lined baking sheet and repeat until your mixture is gone. Life’s too short to not have chocolate in every mouthful.
6. **Final Chill:** Once they’re all rolled up, pop the baking sheet back in the fridge for another 30 minutes. This helps them set up nicely.
And voila! You did it! You’ve just created an irresistible batch of Peanut Butter Chocolate Chip Balls.
Side Notes & Sassy Hacks
Bonus Tips You Didn’t Ask For
– **Substitutions Galore:** Allergic to peanut butter? No sweat! Almond butter or cashew butter works just as well. Just avoid trying to use sunflower seed butter unless you want the flavors of a sad lunchbox swap.
– **Protein Power:** If you wanted to get a little fancy and healthy, toss in a scoop of your favorite protein powder. Just keep in mind that this could change the texture, so don’t go crazy.
– **Make it Crunchy:** Want a little crunch? Add in crushed nuts or seeds – think chia or flaxseed for that extra health boost! It’s versatile this way; feel free to get creative!
– **Storage is Key:** Store these little balls in an airtight container in the fridge. They can last up to a week (though I highly doubt they will last that long unless you live under a rock). You could also freeze them for about a month if you want to keep your baking urges at bay.
Final Words of (Culinary) Wisdom
There you have it, folks! Peanut Butter Chocolate Chip Balls made easy and fun. Life might throw some challenges at you—like melted chocolate on your fingers or debating whether to eat one or fifty—but don’t let that stop you from creating these delicious snacks. They’re easy, tasty, and just what you need for a pick-me-up.
If you try them (and I know you will), snap a photo and tag me on social media. Or if you’re an introvert like me, just send me a mental high-five—we food bloggers appreciate that just as much. Now, get rolling and go make some magic happen in your kitchen!