Prep time: 20 minutes
Cook time: 30 minutes
Total time: 50 minutes
Servings: 12
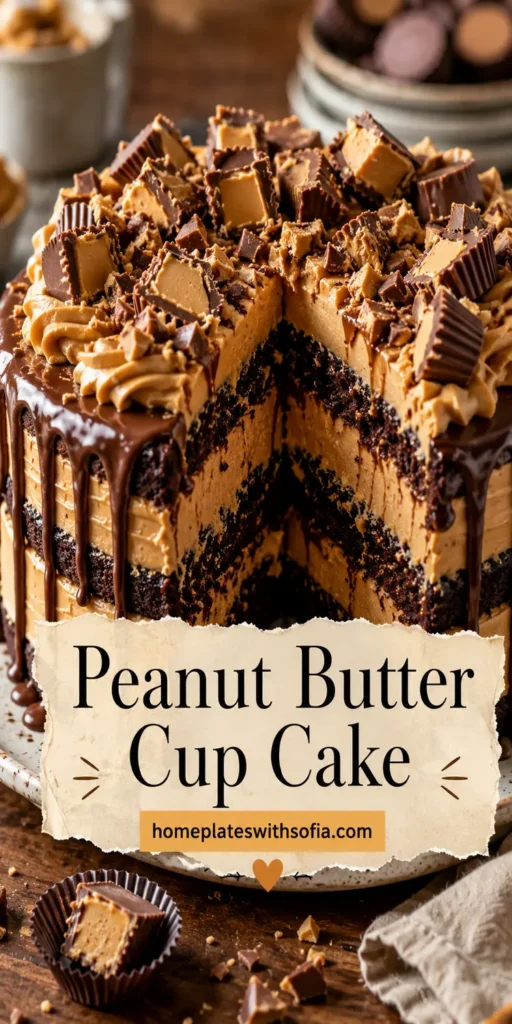
Peanut Butter Cup Cake is an indulgent, delicious dessert that combines the rich flavors of chocolate and peanut butter. This cake is the perfect indulgence for a weekend treat or a gathering with friends and family. The combination of moist, chocolatey cake and creamy peanut butter frosting topped with peanut butter cups creates a delightful experience for anyone lucky enough to dig into it. Whether you’re a baking novice or an experienced home cook, this recipe is manageable and rewarding, making it a fantastic choice for dessert lovers of all ages.
What Is Peanut Butter Cup Cake for Weekend Dessert?
Peanut Butter Cup Cake is a decadent dessert that marries the classic flavors of chocolate and peanut butter. The cake itself boasts a rich chocolate flavor that’s enhanced by the addition of creamy peanut butter. Layered with a velvety peanut butter frosting and topped with crushed peanut butter cups, this cake offers a perfect blend of textures and flavors. It brings a delightful sweetness and nuttiness that makes it a favorite for parties, celebrations, or simply a weekend dessert to share with loved ones.
Why You’ll Love This
There are countless reasons to adore Peanut Butter Cup Cake. First and foremost, it offers a unique flavor profile that appeals to both chocolate lovers and peanut butter enthusiasts. The moist cake paired with rich frosting is sure to satisfy any sweet tooth. Additionally, this cake is incredibly versatile—perfect for birthdays, potlucks, or even a cozy Sunday family dinner. The ease of preparation allows both new bakers and seasoned chefs to create a remarkable dessert without feeling overwhelmed. Plus, the presentation is stunning, making it a show-stopper!
Ingredients You’ll Need
- 1 ¾ cups all-purpose flour: This gives the cake structure, making it light yet moist.
- 1 ½ cups granulated sugar: Sweetens the cake, enhancing the chocolate and peanut butter flavors.
- ¾ cup unsweetened cocoa powder: Provides the rich chocolate flavor that forms the base of the cake.
- 1 ½ teaspoons baking powder: Helps the cake rise to achieve a fluffy texture.
- 1 teaspoon baking soda: Works with the baking powder to ensure a soft, airy cake.
- ½ teaspoon salt: Balances sweetness while also enhancing the flavors.
- 2 large eggs: Binds the ingredients together and gives the cake richness.
- 1 cup whole milk: Adds moisture and contributes to the cake’s tender crumb.
- ½ cup vegetable oil: Keeps the cake moist while also helping it to rise.
- 2 teaspoons vanilla extract: Adds warmth and enhances the overall flavor.
- 1 cup creamy peanut butter: The star of the frosting that gives it a rich and creamy texture.
- 1 ½ cups powdered sugar: Sweetens the frosting, balancing the strong peanut butter flavor.
- ¼ cup milk: Adjusts the consistency of the frosting to a spreadable texture.
- Peanut butter cups (for topping): Adds extra sweetness and texture, making the cake visually appealing.

How to Make
- Preheat the oven: Set your oven to 350°F (175°C). This ensures an even baking temperature. Prepare two 9-inch round cake pans by greasing them thoroughly with butter or cooking spray and lining them with parchment paper for easy removal.
- Mix dry ingredients: In a large mixing bowl, combine the all-purpose flour, granulated sugar, cocoa powder, baking powder, baking soda, and salt. Whisk the ingredients together until they are well combined to eliminate any clumps.
- Combine wet ingredients: In another bowl, whisk together the eggs, milk, vegetable oil, and vanilla extract until the mixture is smooth and thoroughly combined. This step introduces air into the mixture, resulting in a lighter cake.
- Combine wet and dry mixtures: Gradually add the wet ingredients to the dry ingredients, mixing gently. Avoid over-mixing; stop as soon as there are no visible flour streaks. The batter should be thick and rich with a glossy sheen.
- Pour batter into pans: Divide the cake batter evenly between the prepared pans. Use a spatula to smooth the tops for even baking. Gently tap the pans on the counter to remove any air bubbles.
- Bake the cakes: Place the pans in the preheated oven and bake for 30-35 minutes. To check for doneness, insert a toothpick into the center of the cakes; it should come out clean or with a few moist crumbs.
- Cool the cakes: Once baked, remove the cakes from the oven and allow them to cool in the pans for about 10 minutes. Then, gently remove the cakes from the pans and transfer them to a wire rack to cool completely.
- Prepare frosting: While the cakes are cooling, whip together the creamy peanut butter, powdered sugar, and ¼ cup milk in a mixing bowl. Beat until the frosting is smooth and spreadable. Adjust the consistency if necessary by adding more milk or powdered sugar.
- Frost the cakes: Once the cakes are fully cooled, place one layer on a serving plate. Spread a generous layer of peanut butter frosting on top, then gently place the second layer on top. Use the remaining frosting to cover the top and sides of the entire cake for a beautiful finish.
- Decorate: Crush the peanut butter cups and sprinkle generously over the top of the cake, creating an appealing presentation. Let the cake set for a while before slicing to help the frosting firm up slightly.
Variations & Substitutions
Chocolate Peanut Butter Swirl: For an creation of contrasting flavors, divide the batter into two bowls, adding a bit more cocoa powder and vanilla extract to one. Swirl them together in the baking pans before cooking. This creates a striped effect that’s as visually stunning as it is delicious.
Alternative Frosting: If you want a lighter frosting, consider a whipped cream-based frosting. Simply whip heavy cream to stiff peaks and fold in some peanut butter for a lighter, fluffier alternative that contrasts beautifully with the dense cake.
Gluten-Free Version: Use gluten-free flour blends instead of all-purpose flour to make a gluten-free version of this cake. Make sure the other ingredients are gluten-free-safe, especially baking powder.
Nut-Free Option: For those with nut allergies, swap the peanut butter with sun butter or a soy nut butter to keep the richness but in a nut-free way. This will still give you the creamy texture and flavor without any risk.
Vegan Adaptation: For a vegan-friendly recipe, substitute eggs with flax eggs or unsweetened applesauce, and use plant-based milk. Additionally, ensure the frosting is made with non-dairy peanut butter alternatives and powdered sugar without additives.
Common Mistakes to Avoid
One common mistake is not properly measuring the ingredients, especially the flour and cocoa powder. Make sure to spoon these dry ingredients into measuring cups and level them off with a knife rather than scooping them directly with the cup. Scooping can pack the flour, leading to a denser cake.
Another issue is overmixing the batter. Cakes need to be mixed just until the dry ingredients are incorporated to avoid developing the gluten too much, which could result in a tough texture.
Frosting Too Runny: If your frosting is too runny, it may not have been whipped enough or could be too warm. Refrigerate the frosting for a short period to thicken it up. Always ensure your cake is completely cooled before applying frosting for the best results.
Storage, Freezing & Reheating Tips
To store your Peanut Butter Cup Cake, cover it in an airtight container to keep it fresh for up to 3 days at room temperature. If you need to store it longer, place it in the refrigerator for up to a week.
Freezing: You can also freeze this cake for up to 3 months! Preferably freeze the layers separately, ensuring they are well-wrapped in plastic wrap followed by aluminum foil. Frost once thawed to keep the frosting from becoming too soggy.
To reheat individual slices, place them on a microwave-safe plate and heat in short intervals of 15-20 seconds until just warmed. This helps bring back the cake’s moisture and makes the frosting slightly melty.
Frequently Asked Questions
Can I make this cake ahead of time?
Absolutely! This cake is perfect for making ahead. You can bake the layers a day or two in advance. Just make sure to store the cooled layers in an airtight container at room temperature. Frost just before serving to keep the cake looking fresh.
Why did my cake sink in the middle?
A sinking cake usually occurs due to under-baking or opening the oven door too early. Always check for doneness with a toothpick and avoid frequently checking until the baking time has elapsed to ensure even heat distribution.
Can I use crunchy peanut butter instead of creamy?
Definitely! Using crunchy peanut butter can add an extra layer of texture and nutty flavor to your cake. Just ensure it’s well-mixed before adding to the frosting to maintain a smooth consistency.
What should I serve with this cake?
Pair the cake with a scoop of vanilla ice cream or a dollop of whipped cream for an extra touch of indulgence. Fresh fruit like bananas or berries also adds a refreshing contrast to the rich cake.
Can I adapt this recipe for cupcakes?
Yes! This cake batter works well for cupcakes. Fill cupcake liners about ⅔ full and bake at the same temperature for about 18-20 minutes or until a toothpick comes out clean.
Conclusion: Peanut Butter Cup Cake is a delightful and indulgent dessert that checks all the boxes for a satisfying treat. Combining rich chocolate with creamy peanut butter not only pleases the palate but also makes for a stunning presentation. With variations and easy storage options, this cake is the perfect sweet solution for busy weekends and special occasions alike. Enjoy exploring the nuances of this recipe and make your next dessert a memorable feast!