Prep time: 15 minutes
Cook time: 25 minutes
Total time: 40 minutes
Servings: 12 servings
Pumpkin Pie Bombs are the perfect blend of cozy pumpkin flavors and crispy pastry, making them a delightful treat for any occasion. Whether you’re entertaining guests or craving something sweet during autumn, these little bombs are quick to make and even quicker to disappear from your table. Ideal for busy parents and kitchen beginners, they combine simplicity with satisfaction, ensuring everyone can enjoy a slice of fall, regardless of culinary skill!
What Is Pumpkin Pie Bombs?
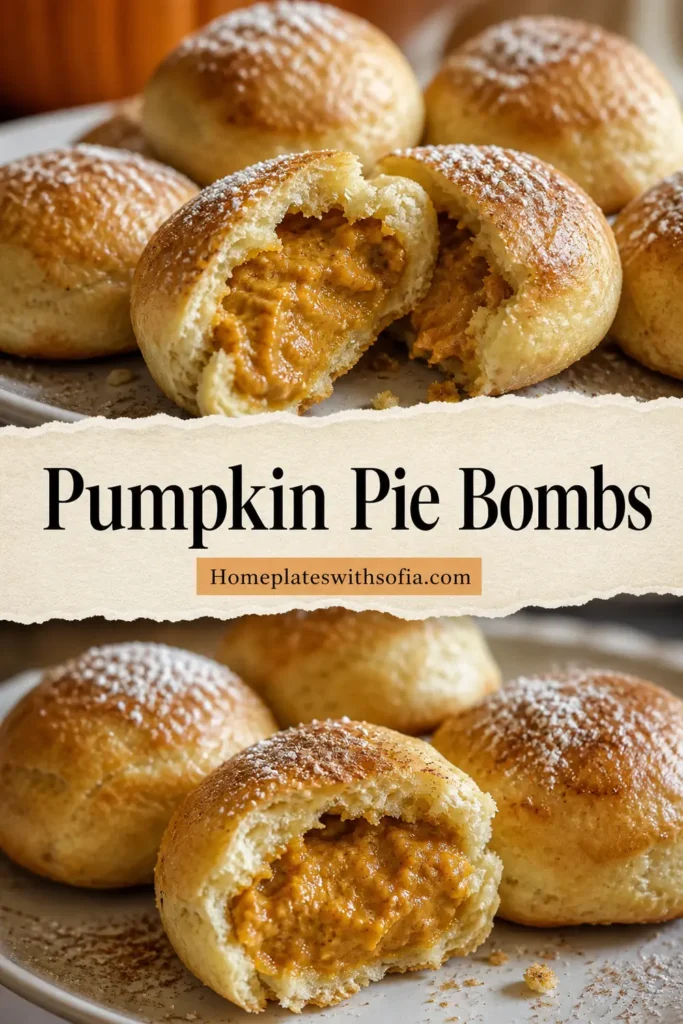
Pumpkin Pie Bombs are essentially individual servings of pumpkin pie wrapped in a flaky pastry. These delightful morsels take the classic flavors of pumpkin pie—think cinnamon, nutmeg, and creamy pumpkin filling—and envelop them in a golden brown pastry shell. They are designed to be easy to eat, making them a great dessert for parties, potlucks, or even a cozy night in. Unlike traditional pumpkin pie, which requires slicing and serving, these bombs simplify the process, allowing everyone to grab one and enjoy it without the messiness of plates and forks.
Why You’ll Love This
There are countless reasons to love Pumpkin Pie Bombs, and here are a few to consider:
- **Flavorful**: Packed with all the delightful spices and richness of traditional pumpkin pie.
- **Easy to Make**: They require minimal preparation and are straightforward, perfect for novice bakers.
- **Portable**: Being handheld, they are easy to serve at gatherings.
- **Versatile**: These can be made as desserts, snacks, or even as a unique addition to a brunch menu.
- **Crowd-Pleaser**: With their appealing shape and tasty filling, they are sure to impress friends and family alike.
Ingredients You’ll Need
To create these delightful bombs, gather the following ingredients:
- 1 package of refrigerated pie crusts: These provide a flaky base that is easy to work with. Homemade crusts can also be used if you prefer!
- 1 can (15 oz) of pumpkin puree: This is the star ingredient, giving the bombs their distinctive flavor.
- 3/4 cup of brown sugar: For sweetness and a touch of caramel-like flavor.
- 1 teaspoon of cinnamon: This adds warmth and spice to the mixture.
- 1/2 teaspoon of nutmeg: A key spice that complements the pumpkin beautifully.
- 1/4 teaspoon of salt: Balances the sweetness and enhances the flavors.
- 2 large eggs: Eggs act as a binding agent and give richness to the filling.
- 1 tablespoon of all-purpose flour: Helps to thicken the filling and maintain its texture.
- Optional: Whipped cream for serving: Adds a lovely, creamy touch when served alongside the bombs.
How to Make
Creating these scrumptious Pumpkin Pie Bombs is a straightforward process. Follow these step-by-step instructions:
- Preheat the oven: Start by preheating your oven to 375°F (190°C). This ensures the bombs bake evenly and achieve that golden perfection.
- Prepare the filling: In a mixing bowl, combine the pumpkin puree, brown sugar, cinnamon, nutmeg, salt, eggs, and flour. Whisk everything together until it’s smooth and fully combined. The mixture should be creamy with a bright orange color, giving great promise of deliciousness to come.
- Roll out the pie crust: Unroll your refrigerated pie crusts on a floured surface. Cut out circles about 4-5 inches in diameter using a cookie cutter or a cup, ensuring you have enough circles to make all your bombs.
- Fill the crusts: Place a tablespoon of the pumpkin filling in the center of each dough circle. Be careful not to overfill; you want just enough to allow for sealing.
- Seal the bombs: Fold the dough over the filling to create a half-moon shape. Press the edges together firmly to seal, then use a fork to crimp the edges for a decorative touch and extra security.
- Brush and bake: Transfer the sealed bombs onto a baking sheet lined with parchment paper. Brush the tops with a bit of melted butter for a lovely golden finish. Bake in the preheated oven for about 20-25 minutes, or until the tops are golden brown and beautifully puffed.
- Cool and serve: Let the bombs cool for a few minutes on the baking sheet before transferring them to a wire rack. Serve warm, possibly topped with whipped cream.
Variations & Substitutions
Cream Cheese Swirl: For a decadent twist, add a cream cheese swirl to your filling. Mix together 4 oz of softened cream cheese with 1/4 cup of sugar and a splash of vanilla extract. Drop spoonfuls of this mixture onto the pumpkin filling before sealing.
Mini Chocolate Chips: If you enjoy a bit of chocolate, fold in 1/2 cup of mini chocolate chips into the pumpkin filling. This adds a delightful chocolate burst to each bite and complements the pumpkin flavors.
Gluten-Free Crust: To cater to gluten-free needs, use gluten-free pie crusts. These are available in most supermarkets and offer an excellent alternative without sacrificing flavor.
Spice Variations: Consider adding other spices such as ginger or cloves for a bolder flavor profile. Adjust according to your preferences to make your bombs uniquely yours!
Common Mistakes to Avoid
When making Pumpkin Pie Bombs, be mindful of a few common pitfalls:
Overfilling the bombs: One of the most common mistakes is putting too much filling inside. This can cause the bombs to burst while baking. Aim for just a tablespoon of filling to ensure they seal properly.
Not sealing well: Insufficiently sealing the edges can lead to your filling leaking out during baking. Make sure to crimp the edges well, and if you’re uncertain, you can use a bit of water to help the dough stick together better.
Baking at the wrong temperature: Always ensure your oven is fully preheated to the correct temperature. Baking at too low a temperature can result in a soggy crust, while too high can burn the outside without cooking the filling.
Storage, Freezing & Reheating Tips
Once your Pumpkin Pie Bombs are baked, you may want to store leftovers (if there are any!). Here’s how to do it properly:
Storage: Keep any leftover bombs in an airtight container at room temperature for up to two days. If they start to lose their crispness, a quick reheat in the oven can help restore some texture.
Freezing: To freeze Pumpkin Pie Bombs, cool them completely, then flash freeze them on a baking sheet for about an hour before transferring them to a freezer bag. They will keep for up to three months in the freezer.
Reheating: Reheat frozen bombs in a preheated oven at 350°F (175°C) for about 15-20 minutes. This will ensure a crisp shell and heated filling. Avoid using the microwave, as this can lead to a soggy texture.
Frequently Asked Questions
Can I use fresh pumpkin instead of canned? Absolutely! If you prefer to use fresh pumpkin, be sure to cook it until tender before pureeing. Make sure you use the right variety for pies, such as sugar pumpkins, as they have the best flavor and texture for this recipe.
How long do these bombs last? Pumpkin Pie Bombs are best enjoyed fresh, but they can be stored as mentioned above. Expect them to remain fresh for about two days at room temperature or up to three months in the freezer.
Are there any nut-free options? Yes! This recipe is naturally nut-free, so feel free to serve it to guests with nut allergies. Always double-check that any pre-packaged ingredients, like pie crusts, don’t contain any nuts.
Can I make these ahead of time? Certainly! You can prepare the filling a day in advance and assemble the bombs the next day. If you want to go further, you can freeze assembled bombs (but unbaked) before baking them right before serving.
What can I serve with them? Pumpkin Pie Bombs are delicious on their own but also pair beautifully with whipped cream or vanilla ice cream. A drizzle of caramel or chocolate sauce can also elevate the dessert experience.
Conclusion: Pumpkin Pie Bombs are a fantastic way to enjoy the flavors of traditional pumpkin pie in a fun and portable format. With their easy preparation and delightful taste, they are sure to become a favorite in your household. Whip up a batch this fall and watch them disappear!