**Meta Title:** Spooktacular Red Velvet Cake Pops Recipe for Halloween
**Meta Description:** Create hauntingly delicious red velvet cake pops this Halloween. A fun treat for parties, they’re perfect for all ages and easy to make!
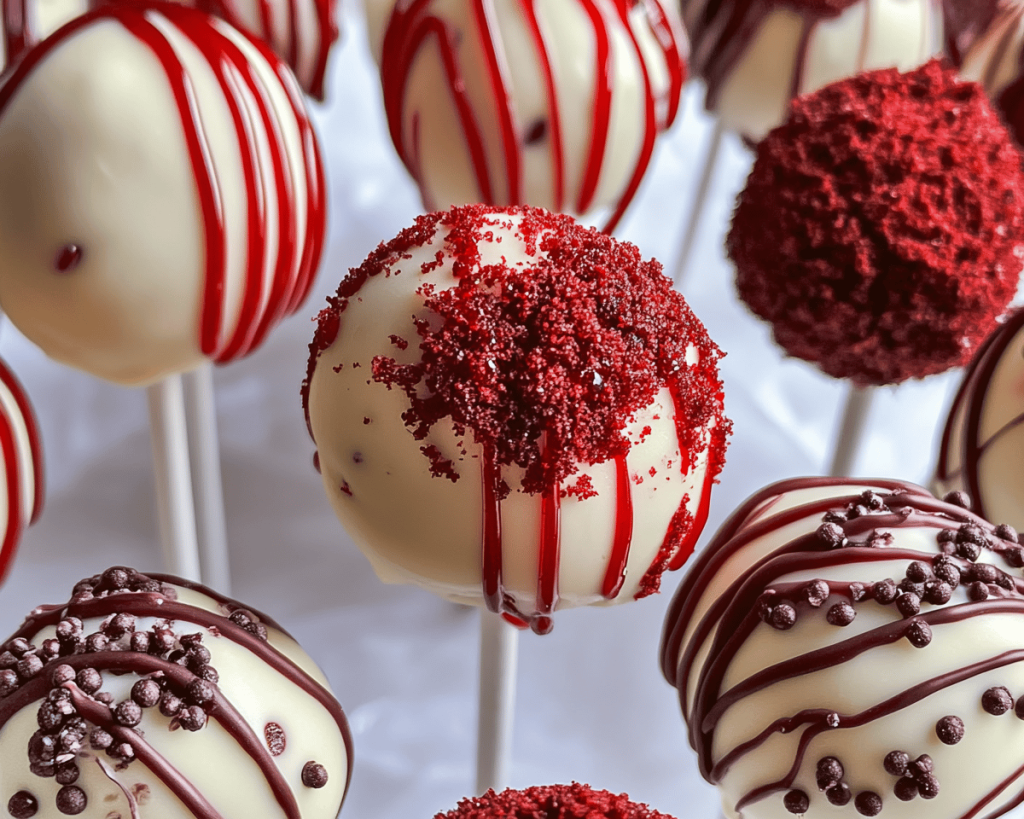
You know that feeling when your mind starts spiraling into the bewitching season of Halloween? The brisk air, the festive decorations, and most importantly, the sweet treats that bring smiles to faces young and old. If you’re ready to up your dessert game for Halloween parties, then I have the perfect recipe that combines a dash of spookiness with a dollop of deliciousness: **Red Velvet Cake Pops**! These cute, poppable bites of joy are not just visually striking with their vivid red color and creamy white coating, but they’re also incredibly indulgent, making them a hit at any gathering.
In this article, I will guide you through making stunning red velvet cake pops — from understanding what they are, why you’ll love them, to every little detail on how to create these scrumptious treats. You’ll also learn some tricks to customize them to your delight. Whether it’s for a Halloween bash or simply to enjoy, these cake pops are sure to leave a lasting impression.
What is Red Velvet Cake Pops?
Red velvet cake pops are delightful bite-sized confections that combine the rich, velvety texture of *red velvet cake* with creamy frosting, all coated in a layer of chocolate. The origins of red velvet cake date back to the 1920s and have been embraced for its striking red color and subtle hint of cocoa flavor, enhanced by the cream cheese or vanilla frosting that typically pairs with it. This cake evolved into pops when bakers began rolling the crumbled cake and frosting into balls, attaching them to sticks, and dipping them in melted chocolate or candy coating.
The taste is truly remarkable — expect a moist, rich, and slightly tangy sensation that dissolves in your mouth while the luscious, sweet coating adds a satisfying crunch. Red velvet cake pops are visually captivating, making them an ideal centerpiece for your Halloween spread, embodying both festivity and elegance in one whimsical package.
Why You’ll Love This Red Velvet Cake Pop Recipe
This red velvet cake pop recipe is bound to become a family favorite for several reasons. First and foremost, they are incredibly simple to make, requiring just a few key ingredients you likely already have in your pantry. Additionally, they are perfect for any kind of event — from Halloween parties to birthday celebrations and even as a charming after-school snack for the kids.
Not only do these cake pops taste divine, but they also allow for a bit of fun decor! You can easily adapt the decoration to fit any spooky theme — think ghostly white chocolate, vibrant orange sprinkles, or even spooky edible eyes. Plus, they’re super portable, making them easy to share or pack for school lunches. Finally, who doesn’t love the satisfaction of creating a dessert that both delights the eyes and the palate?
Ingredients You’ll Need
Making these red velvet cake pops is a breeze once you gather the right ingredients. Here’s what you need:
– **Red Velvet Cake Mix (or homemade)**: The base of your cake pops, giving that vibrant red hue and moist texture. If you’re feeling adventurous, a homemade version can include cocoa powder, flour, sugar, eggs, buttermilk, and vanilla.
– **Eggs**: Essential for binding. Use large eggs for best results.
– **Vegetable Oil**: This adds moisture to the cake, ensuring a tender crumb. You can substitute with melted coconut oil for a different flavor profile.
– **Water**: To enrich the cake mix and keep it from drying out. Simple tap water works fine.
– **Cream Cheese Frosting**: This provides the luscious filling inside the pops. You can purchase pre-made frosting or whip up your own with cream cheese, butter, powdered sugar, and vanilla extract.
– **Candy Melts or White Chocolate**: This will be the outer coating. Opt for red, white, or even black for Halloween flair.
– **Lollipop Sticks**: To help you dip and eat these pops easily.
– **Sprinkles (Optional)**: Use Halloween-themed sprinkles to make your cake pops extra festive.
How to Make Red Velvet Cake Pops
Now that you have everything ready, let’s get started on making these delicious red velvet cake pops. Here’s a step-by-step guide to ensure success:
1. **Bake the Red Velvet Cake**: Preheat your oven to 350°F (175°C). In a large bowl, mix the red velvet cake mix with eggs, vegetable oil, and water according to the package instructions. If you’re making it from scratch, fold together your wet and dry ingredients until just combined. Pour the batter into a greased cake pan and bake for about 25-30 minutes, or until a toothpick comes out clean. The aroma of chocolate and vanilla will fill your kitchen—trust me, it’s heavenly!
2. **Cool the Cake**: Allow the cake to cool in the pan for about 10 minutes before transferring it to a wire rack. Let it cool completely, which makes it easier to crumble.
3. **Crumble the Cake**: Once cooled, crumbling the cake into a large bowl is next. Break it apart with your fingers or use a fork until it resembles fine crumbs. This step is nostalgic for me; I could do it all day!
4. **Mix in the Frosting**: Next, add about 1 cup of cream cheese frosting to the crumbled cake and mix until well combined. The mixture should be moist but not sticky. Use your hands to ensure that all the crumbs are coated in frosting. The moment you mix in the frosting, you’ll appreciate the comforting sweetness and tang it brings!
5. **Shape into Balls**: Scoop out about a tablespoon of the mixture and roll it into a ball. Place each ball on a parchment-lined baking sheet. Once you’ve shaped all the mixture, refrigerate the balls for about 30 minutes. This will help them firm up and make them easier to work with.
6. **Prepare the Chocolate Coating**: While the cake pops chill, melt your candy melts or white chocolate in a microwave-safe bowl in 30-second intervals, stirring between each interval until smooth. Once melted, the chocolate should have a glossy finish.
7. **Insert the Sticks**: Take the chilled cake balls out of the refrigerator. Dip the tip of each lollipop stick into the melted chocolate and gently insert it into the center of each cake ball. This ‘seals’ the stick in and ensures it won’t fall off later.
8. **Dip the Cake Pops**: Now it’s time for the fun part! Holding the stick, dip each cake ball into the melted chocolate, ensuring it’s coated evenly. Allow any excess chocolate to drip off. If desired, you can roll the wet cake pop in sprinkles or crushed cookies for added flair.
9. **Chill Again**: Once coated, place the cake pops back onto the parchment-lined sheet and let them sit until the chocolate sets, about 15-20 minutes.
10. **Serve and Enjoy**: Once the chocolate is firm, these cake pops are ready to be devoured. Arrange them on a festive platter or place them in a jar for display. Watch as your friends and family marvel at your magical creation—these little bites of joy are bound to be a hit!
Tips, Tricks & Variations
To maximize your cake pop experience, consider these **expert tips**:
– **Storage**: Store the cake pops at room temperature if you plan to eat them within two days. For longer storage, refrigerate them in an airtight container for up to a week.
– **Reheating Chocolate**: If your chocolate becomes too thick, simply return to the microwave in 10-second intervals to reheat and loosen it up.
– **Spice Swaps**: Consider adding a teaspoon of vanilla or almond extract into the cake batter for a hint of extra flavor.
– **Vegan Version**: Swap the eggs for ground flaxseed mixed with water, use a vegan red velvet cake mix, and coconut cream for the frosting if you want a plant-based option.
– **Creative Toppings**: Think outside the box! Use crushed pecans, colorful edible glitter, or even caramel drizzle to elevate your cake pops.
What to Serve With Red Velvet Cake Pops
Pair your red velvet cake pops with delightful accompaniments. They go beautifully with:
– A cup of rich *hot cocoa* or *coffee*, where the intensity of the drink will balance the sweetness of the cake pop.
– A scoop of *vanilla bean ice cream*, which adds creaminess and freshness to each mouthful.
– An array of fruits such as *strawberries* or *raspberries* to brighten up your dessert spread, not only in flavor but in color.
– A festive platter of *Halloween-themed snacks*, mixing sweet and savory for variety and excitement.
Nutrition & Health Benefits
While red velvet cake pops are certainly a treat, there are still some nutritional pleasures to consider. A single cake pop generally contains around 150 calories, depending on ingredients and portion sizes. They can be higher in sugar due to the frosting and coating but offer satisfaction in moderation.
Integrating a little sweetness into your life is essential, especially during festive times. However, it’s good to keep in mind the balance; enjoy these treats while being mindful of your overall diet. For more on balancing desserts, check out *Healthline’s article on sugar intake* .
Frequently Asked Questions
**1. Can I make cake pops ahead of time?**
Absolutely! You can prepare the cake pops and dip them in chocolate a day before your event. Just remember to store them properly in an airtight container to keep them fresh.
**2. What if I don’t have cake pop sticks?**
No problem! You can simply use forks or craft sticks as an alternative. You could even create a “cake ball” station where people can grab them with toothpicks.
**3. How do I prevent the chocolate from cracking?**
Make sure the cake pops are completely chilled before dipping. Also, tapping the stick gently against the bowl after dipping helps remove excess chocolate and can prevent cracks.
**4. Can I freeze red velvet cake pops?**
Yes! You can freeze uncoated cake balls for up to three months. Just pop them in the fridge to thaw before dipping them in chocolate!
**5. What’s the best way to package them for gifts?**
Consider wrapping each cake pop in cellophane bags secured with ribbon for a cute presentation. This makes them perfect for sharing with friends or sending to school with your kids.
In conclusion, let’s embrace the hauntingly delightful world of Halloween treats with these moist and flavorful red velvet cake pops. You’ll find that as you dip, decorate, and serve these lovely desserts, they not only bring joy to your gatherings but also spark lovely memories wrapped in the spirit of Halloween.
So why not whip up a batch tonight? You’ll be amazed at how these charming bites can turn an ordinary afternoon into a festive one! If you loved making them, don’t forget to leave a comment or tag me on Instagram with your creations—I can’t wait to see your spooky treats!