Prep time: 20 minutes
Cook time: 30 minutes
Total time: 50 minutes
Servings: 16 bars
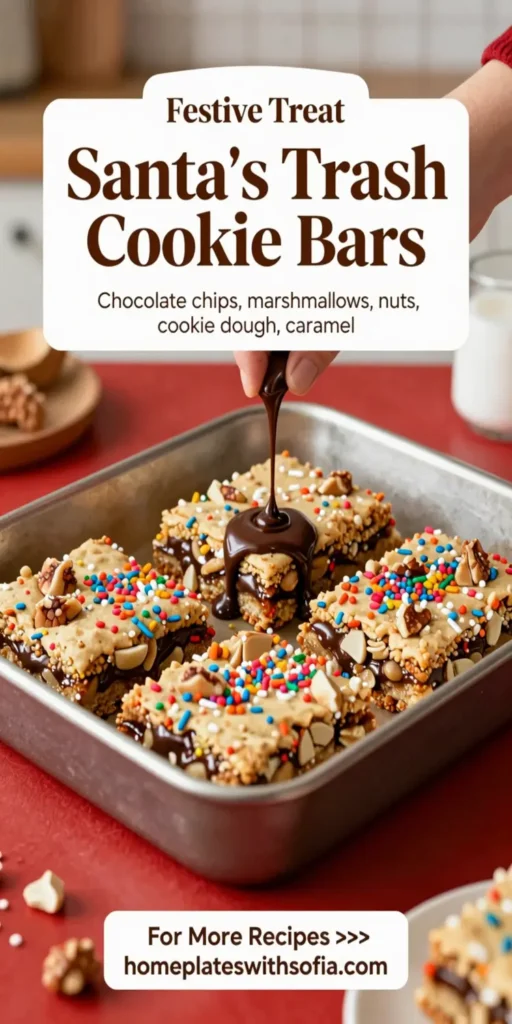
Santa’s Trash Cookie Bars are an irresistible treat that combines a delicious medley of flavors and textures, making them an ideal addition to your dessert repertoire. Whether you’re preparing for a holiday gathering or just treating yourself and your family to something sweet, these cookie bars encapsulate that festive feeling in every bite. They not only look amazing but also burst with flavor, thanks to the combination of chocolate, nuts, and various sweet add-ins. These bars are easy to make, letting you focus more on enjoying the treats and less on the process.
What Is Santa’s Trash Cookie Bars?
Santa’s Trash Cookie Bars are essentially a delightful cookie bar that channels the spirit of holiday treats into a rich and satisfying dessert. This delectable dish is commonly made with a base of cookie dough and includes a mix of sweet and salty ingredients, making them a unique twist on classic cookie bars. The term “trash” refers to the variety of mix-ins that can be used, including chocolate chips, pretzels, and various nuts, encompassing both sweet and salty flavors. They embody the fun of baking during the holiday season where there are no rules; you throw in whatever you wish to create a unique dessert everyone will love.
Why You’ll Love This
There are countless reasons to fall in love with Santa’s Trash Cookie Bars. For one, they offer a wonderful mix of textures and flavors that please the palate. You get chewiness from the cookie base, crunch from various mix-ins, and a delightful sweetness that lingers. They’re also incredibly versatile; you can customize them based on what you have at home or what your family enjoys. This flexibility allows you to experiment, making each batch uniquely yours. Additionally, they’re super easy to prepare, making them a perfect choice for busy parents or beginner bakers alike. The whole family will gather around to enjoy these delectable bars, creating wonderful memories in the kitchen!
Ingredients You’ll Need
- 2 cups all-purpose flour: This is the foundation of your cookie bars, providing the structure.
- 1 teaspoon baking soda: For leavening, it helps the bars rise and gives them a soft texture.
- ½ teaspoon salt: Enhances the flavors of other ingredients and balances sweetness.
- 1 cup unsalted butter: Adds richness and moisture; make sure it’s softened for easy mixing.
- 1 cup brown sugar: Brings deep flavor and moisture, contributing to the chewiness of the bars.
- ½ cup granulated sugar: For sweetness and helps create a crispy top layer.
- 2 large eggs: They bind the ingredients and help provide structure.
- 2 teaspoons vanilla extract: Adds warmth and flavor, enhancing the overall taste.
- 1 cup chocolate chips: The classic addition that makes these bars decadently delicious.
- 1 cup mixed nuts (chopped): For added crunch and a nutty flavor.
- 1 cup pretzels (chopped): Provides a salty crunch that contrasts beautifully with the sweetness.
- ¾ cup M&Ms or other candies: A colorful addition that adds both sweetness and a playful element.
How to Make
- Start by preheating your oven to 350°F (175°C). Line a 9×13-inch baking pan with parchment paper, leaving some overhang to make removing the bars easier later. Greasing the pan lightly is an option, too.
- In a bowl, whisk together the flour, baking soda, and salt. This step ensures even distribution of the leavening agent and salt throughout the flour.
- In a large mixing bowl, cream together the softened unsalted butter, brown sugar, and granulated sugar until light and fluffy. This process usually takes about 2-3 minutes; the goal is to incorporate air for a lighter texture. Use an electric mixer on medium speed for best results.
- Add the eggs one at a time, mixing well after each addition. Next, pour in the vanilla extract and mix until everything is combined. You’ll notice the batter becoming a smooth base for your bars.
- Gradually incorporate the dry ingredients into the wet mixture until just combined. Be careful not to overmix, as this could lead to dense bars.
- Now it’s time to fold in the fun! Add the chocolate chips, chopped nuts, pretzels, and M&Ms. Use a spatula to gently combine, ensuring the mix-ins are evenly distributed throughout the dough.
- Pour the mixture into the prepared baking pan, smoothing the top with the spatula for even baking. This step is crucial for ensuring that they bake uniformly.
- Bake for 25 to 30 minutes, or until the edges are lightly golden and a toothpick inserted in the center comes out with a few crumbs. The bars will continue to cook a little as they cool, so don’t overbake!
- Once baked, remove the pan from the oven and let it cool completely in the pan before lifting out the bars using the parchment overhang. Cut into squares or rectangles, and enjoy!
Variations & Substitutions
Nut-Free Version: If you’re allergic to nuts or simply prefer a nut-free option, you can replace the chopped nuts with additional chocolate chips or add more pretzels for crunch. This variation will keep the flavor profile while accommodating different dietary needs, making it perfect for school snacks and parties.
Gluten-Free Version: For those needing a gluten-free dessert, you can substitute the all-purpose flour with a 1:1 gluten-free flour blend. This ensures a similar texture while making the bars accessible to everyone. Just check that your other ingredients, like chocolate chips, are certified gluten-free as well.
Adjustable Sweetness: If you prefer less sweetness, reduce the sugar by ¼ cup and add an extra ¼ cup of oats to absorb some moisture without compromising texture. This will help keep the bars chewy and delicious without making them overly sweet.
Vegan Version: To make these bars vegan-friendly, substitute the eggs with flax eggs (1 tablespoon of ground flaxseed mixed with 2.5 tablespoons of water per egg and allowed to sit for a few minutes until thickened) and use plant-based butter instead of regular butter. Ensure all other ingredients are vegan-friendly, particularly chocolate chips.
Common Mistakes to Avoid
One common mistake is overmixing the batter, which can lead to tough cookie bars. When combining wet and dry ingredients, mix until just combined; it’s okay if there are a few streaks of flour left. Overmixing can result in a chewy texture rather than a soft, pleasant bite.
Another issue often faced is using cold butter. Make sure your butter is softened at room temperature; this is crucial for achieving the right texture in your bars. If your butter is too cold, it can lead to mixing difficulties and an uneven dough.
Finally, be cautious with oven temperature. Always preheat your oven to ensure an even baking process. Baking at a temperature that’s too low can result in bars that lack that lovely golden edge and are overly soft in the center. Using an oven thermometer can help ensure your oven is accurate.
Storage, Freezing & Reheating Tips
For proper storage, keep the cookie bars in an airtight container at room temperature. They will stay fresh for about 3 to 5 days, but you may want to refrigerate them during hot weather to avoid melting the chocolate.
If you’d like to prolong their life, consider freezing the bars. Wrap them individually in plastic wrap, then place them in a freezer-safe bag or container. These bars can be frozen for up to 3 months. When you’re ready to enjoy them, simply thaw them in the refrigerator overnight or at room temperature for a few hours.
For reheating, microwave them for about 10-15 seconds if you prefer that fresh-baked warmth. Be careful not to overheat, as this can cause the chocolate to melt too much and make the bars too gooey.
Frequently Asked Questions
Can I use different types of chocolate?
Absolutely! You can use dark chocolate, white chocolate, or even add a mix of different types to your bars for a more complex flavor profile. Feel free to customize according to your preferences!
What can I substitute for eggs if I don’t have any?
Flax eggs are an excellent substitute if you’re out of regular eggs. For each egg needed, mix 1 tablespoon of ground flaxseed with 2.5 tablespoons of water and allow it to sit until it becomes gelatinous. Applesauce or mashed bananas can also work, though they will add a bit of flavor.
How can I ensure my bars are chewy and not dry?
To keep your cookie bars chewy, make sure not to overbake them. Remove them from the oven when the edges are set but the center looks slightly underbaked. They will continue cooking as they cool.
What is the best way to cut these bars?
Using a sharp knife is key; you can also heat the knife under warm water, then wipe it dry to make clean cuts. This will help you achieve neat squares without crumbling the edges.
Can I add other mix-ins?
Of course! Feel free to experiment with different types of nuts, dried fruits, or even cookie dough pieces. The beauty of Santa’s Trash Cookie Bars is their versatility, so let your creativity shine!
Conclusion:
Santa’s Trash Cookie Bars are not just a treat; they encapsulate the joy of baking and sharing with loved ones. With their mix of flavors, textures, and endless possibilities for customization, these bars are sure to become a favorite in your household. Perfect for gatherings or just a cozy night at home, they provide a sweet end to any meal. Bake a batch, share them with friends and family, and enjoy the warmth and joy they bring to your table!