Prep time: 30 minutes
Cook time: 25 minutes
Total time: 55 minutes
Servings: 12 servings
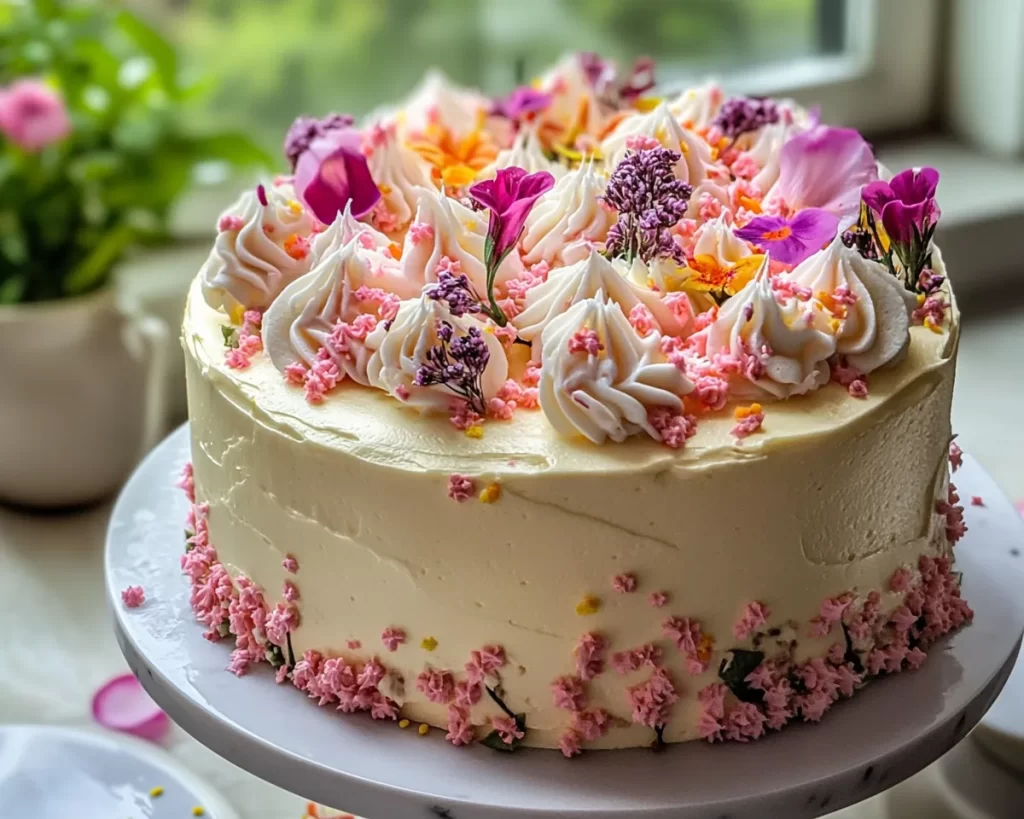
When it comes to celebrations, nothing combines joy and sweetness quite like a cake. Enter the Spring Birthday Cake: Pastel Spring Birthday Cake, a delightful showstopper that captures the essence of the season. Imagine a fluffy, moist cake layered with vibrant pastel colors, adorned with a luscious frosting that reminds you of blooming flowers. This cake is the perfect centerpiece for birthday parties or any springtime gathering, instantly brightening the mood and enticing taste buds.
In this article, not only will you learn how to create this stunning dessert from scratch, but you’ll also discover tips on making it a success, variations to suit your family’s preferences, and the nuances that elevate your cake from good to extraordinary. You’ll be ready to impress everyone around you with your baking prowess!
What Is Spring Birthday Cake: Pastel Spring Birthday Cake?
The Spring Birthday Cake, specifically crafted in pastel shades, often embodies the joy and rebirth that spring brings. This gorgeous cake typically features light and fluffy layers using a basic cake batter infused with subtle flavors like vanilla or almond. It is then layered with vibrant colored frosting, often achieved with natural colorants or food dyes, making it visually striking.
Traditional recipes for this cake date back decades, adapted over time to suit modern palates, with an emphasis on pastel colors that evoke a sense of warmth and delight. When crafted correctly, the layers yield an incredibly fluffy texture that melts in your mouth, while the frosting is rich yet airy, promoting a harmonious taste that pleases both kids and adults alike. The combination of delicate flavors, along with the soft pastel hues, enhances the celebratory ambiance of any event.
The cake’s versatility is also noteworthy; it can be adapted to meet various dietary needs, and it can be customized for different occasions. From classic birthday celebrations to festive spring gatherings, this cake remains a timeless favorite, promising to elicit smiles and happy memories for years to come.
Why You’ll Love This
There are numerous reasons why the Spring Birthday Cake stands out. Firstly, the taste is simply delectable. With its moist layers and smooth frosting, each bite offers a perfect balance of sweetness without being overwhelming. This cake embodies a lightness that is particularly appealing during the warmer months when heavier desserts might not be as enticing.
From an ease-of-preparation perspective, this cake strikes the perfect balance. The basic techniques required to make this cake are accessible to beginners and offer the opportunity for more experienced bakers to refine their skills. It offers room for creativity, as you can easily adapt flavors or frosting techniques according to your preferences.
While baking can often seem like a costly affair, with the right ingredients, this cake is quite budget-friendly. Basic pantry staples are typically all you need, making it a cost-effective yet luxurious option for any celebration. Additionally, this cake can be tailored to be gluten-free or dairy-free, making it suitable for those with dietary restrictions.
Many often think that creating a visually stunning cake requires professional skills. However, that could not be further from the truth. The pastel icing and layered structure of this cake are simple enough for any home cook to achieve, allowing you to wow your friends and family without requiring a bakery-level skill set.
Ingredients You’ll Need
- 2 ½ cups all-purpose flour: Provides structure to the cake. You can substitute with gluten-free flour for a gluten-free version.
- 2 ½ tsp baking powder: Helps the cake rise and become fluffy. Double-check its freshness for best results.
- 1 cup unsalted butter (softened): Adds moisture and richness. Ensure it’s at room temperature for easy mixing.
- 2 cups granulated sugar: Sweetens the cake. You can reduce the amount for a less sweet version.
- 4 large eggs: Binds the ingredients together and contributes to the texture. Use eggs at room temperature for best incorporation.
- 1 cup milk: Keeps the cake moist and adds a subtle flavor. Whole milk works best, but alternatives like almond or oat milk can be used.
- 2 tsp vanilla extract: Provides flavor. For a unique twist, consider using almond or lemon extract.
- Pastel food coloring: To achieve vibrant colors for each layer. Natural colorants like beet juice, matcha, or turmeric can also be experimented with.
- 4 cups powdered sugar: Used in the frosting, providing sweetness and an airy texture. Adjust the quantity based on desired sweetness.
- 2 tbsp milk (for frosting): This will help achieve the right consistency for spreading. You can adjust the amount based on your preference.
- Rainbow sprinkles: For decoration. These add a fun and festive touch. Consider using sprinkles that align with any specific themes.
Each ingredient plays a vital role in ensuring the cake not only tastes exceptional but also retains the aesthetics that make it so appealing. Knowing the purpose of each component allows you to feel more confident in the baking process, creating a deeper connection to your culinary creation.
How to Make
1. Begin by preheating your oven to 350°F (175°C). This step is crucial for ensuring your cake bakes evenly. If your oven has hot spots, you might want to rotate the pans halfway through the baking process.
2. Next, prepare three 9-inch round cake pans by greasing them with butter and lightly flouring them. This prevents sticking and helps the cakes release smoothly after baking. You can also use parchment paper at the bottom for added assurance.
3. In a mixing bowl, combine 2 ½ cups of all-purpose flour and 2 ½ teaspoons of baking powder. Mixing these dry ingredients first ensures they are evenly distributed, which is essential for the cake’s rise.
4. In a separate bowl, cream together 1 cup of softened unsalted butter and 2 cups of granulated sugar until the mixture becomes light and fluffy. This usually takes about 4-5 minutes with an electric mixer. The air incorporated during creaming contributes to the cake’s texture.
5. Add the 4 large eggs one at a time to the butter-sugar mixture, mixing well after each addition. Incorporating eggs gradually allows for better emulsification and results in a smoother batter, crucial for a fluffy cake.
6. Mix in 1 cup of milk and 2 teaspoons of vanilla extract until well combined. The liquid ingredients add moisture and flavor, which are key to achieving the perfect texture.
7. Gradually add the dry flour mixture into the wet ingredients, mixing just until combined. Overmixing can lead to a dense cake, so a few lumps are perfectly fine.
8. Divide the batter evenly into three separate bowls. Here’s where the fun begins! Add a few drops of pastel food coloring to each bowl, creating your desired shades. Stir gently until the color is uniformly distributed.
9. Pour each colored batter into the prepared pans, spreading evenly with a spatula. You can experiment with different layering techniques by swirling colors together for a marbled effect if desired.
10. Bake for 25-30 minutes, or until a toothpick inserted in the center comes out clean. Be sure to check around the 25-minute mark, as oven times can vary.
11. Remove the cakes from the oven and allow them to cool in the pans for about 10 minutes. Then, carefully transfer them to a wire rack to cool completely. Cooling them on a rack allows air to circulate, preventing sogginess.
12. While the cakes cool, prepare the frosting by beating 4 cups of powdered sugar with 2 tablespoons of milk until the desired consistency is reached. The frosting should be spreadable but not too runny, which can be adjusted by adding more powdered sugar or milk.
13. Once the cakes are completely cool, place the first layer on a serving plate. Apply a generous layer of frosting on top, spreading it evenly using a spatula.
14. Carefully place the second layer on top and repeat the frosting process. Finally, add the third layer, spreading frosting generously over the top and sides of the cake.
15. To finish, decorate with rainbow sprinkles for that extra festive touch. You could even top it with fresh flowers for a stunning spring look.
16. Let the cake set for at least 30 minutes before slicing. This allows the layers to bond together, making for cleaner slices and a more stable cake.
Variations & Substitutions
Chocolate Spring Birthday Cake: If you’re a chocolate lover, why not incorporate cocoa powder into your cake? Replace ½ cup of all-purpose flour with cocoa powder for a rich chocolate base. Chocolate frosting would pair beautifully with this variation, adding a luxurious touch that will appeal to all chocolate enthusiasts.
Fruit-Infused Layers: For those looking to add a refreshing twist, consider incorporating fruit purees, such as raspberry or lemon, into the cake batter. This will add a subtle fruit flavor and moisture to the cake, making it perfect for warm weather festivities. Substitute some of the milk with pureed fruit to keep the cake moist while achieving those vibrant flavors.
Dairy-Free Version: If you’re accommodating dairy allergies, there are easy substitutes available. Use coconut oil instead of butter, and almond, soy, or oat milk in place of regular milk. Additionally, you can opt for dairy-free margarine for the frosting. This ensures the festive cake can be enjoyed by everyone, regardless of dietary restrictions.
Gluten-Free Spring Birthday Cake: For a gluten-free alternative, replace the all-purpose flour with a gluten-free flour blend. Look for a blend with xanthan gum, which helps replicate the texture of traditional flour. Ensure that all other ingredients, including baking powder and powdered sugar, are also gluten-free.
Layered Cupcakes: If you want to create individual servings, consider turning this recipe into cupcakes! Simply bake the batter in cupcake liners for about 15-18 minutes. Frost and decorate each cupcake to maintain the charming pastel theme while offering a single-serving dessert that’s easy to grab and enjoy.
Common Mistakes to Avoid
One common mistake those new to baking often make is overmixing the batter. This can result in a dense, tough cake as it develops the gluten in the flour. Always mix until just combined for a light, airy texture that delights with every bite.
Another error is not properly measuring flour. It’s crucial to spoon the flour into your measuring cup instead of scooping directly from the bag, which can lead to an excess amount of flour and ruin the cake’s texture.
Ensure all ingredients, particularly eggs and butter, are at room temperature unless stated otherwise. Using cold ingredients can create an uneven texture and prevent your cake from rising as it should.
Lastly, resist the temptation to open the oven door too early. Doing so can create a dip in the batter due to sudden temperature changes, impacting the final rise of the cake.
Storage, Freezing & Reheating Tips
Properly storing your Spring Birthday Cake is vital for maintaining its freshness and flavor. If you have leftover cake, you can store it in an airtight container at room temperature for up to three days. Ensure the cake is well covered, as exposure to air can lead to dryness.
For longer storage, consider freezing the cake. To do so, wrap each layer in plastic wrap and place it inside a zip-top freezer bag. The cake can be frozen for up to three months. When you’re ready to enjoy it, simply remove it from the freezer, unwrap, and let it thaw in the refrigerator overnight.
Reheating isn’t often necessary, but if you prefer warm cake, place your slice in the microwave for about 10-15 seconds. Be cautious not to overheat, as this can dry out the cake.
Always practice safe food handling; never leave the cake out for more than two hours if it’s frosting contains dairy. If the cake gets topped with fresh fruit, consider consuming it within a day for optimal freshness.
Frequently Asked Questions
Can I use a different frosting flavor? Absolutely! While buttercream is a classic choice, feel free to experiment with cream cheese frosting for a tangy twist, whipped cream for lightness, or even a ganache for a luxurious finish.
How do I know when the cake is done baking? A toothpick inserted into the center should come out clean or with just a few crumbs attached. If the toothpick has wet batter clinging to it, the cake needs more time in the oven.
What can I do if my cake is dry? If you find your cake turns out dry, ensure you’re measuring your flour correctly next time. You can also brush simple syrup over the layers to add moisture without compromising flavor.
Can I make this cake ahead of time? Yes! You can bake the layers ahead of time and store them as described above. Frost and decorate on the day of the celebration for the best results.
How can I make this cake more festive? To enhance the festive vibe, consider using edible flowers, themed sprinkles, or fresh fruit as decorations. Piping techniques can also make your frosting look professional without being overly complicated.
Conclusion:
The Spring Birthday Cake: Pastel Spring Birthday Cake is both a feast for the eyes and a delight for the taste buds. Its light, fluffy texture combined with pastel colors creates a vibrant centerpiece for any celebration. This cake is not only easy to make and budget-friendly, but it also offers a wonderful opportunity for customization to suit any dietary need or personal preference.
I encourage you to try making this cake yourself. Whether you stick to the classic version or branch out with exciting variations, I’m sure it will brighten up your celebrations as it has for many others. Share your creations or invite friends and family to join in the fun of baking. Happy baking!