Prep time: 30 minutes
Cook time: 45 minutes
Total time: 1 hour 15 minutes
Servings: 12
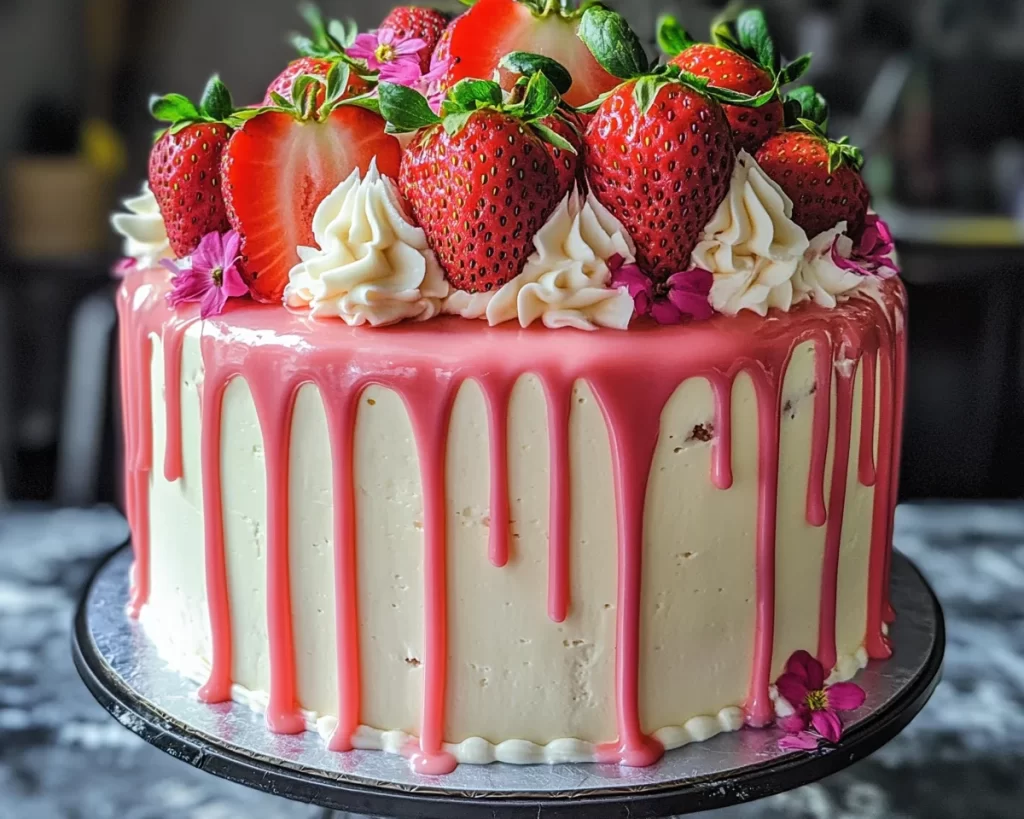
There’s something utterly delightful about cakes that exude the essence of spring, and the Strawberry Vanilla Drip Cake is a perfect representation. Imagine the gentle warmth of the spring sun as you slice into a moist, fluffy cake adorned with a creamy vanilla frosting, drizzled with luscious strawberry sauce, and garnished with fresh strawberries. This cake stands as an emblem of celebrations, particularly birthdays, where joy and love are shared. Making this cake is not just a baking endeavor but a heartfelt experience that brings family and friends together, evoking memories of laughter, joy, and sweet indulgence.
This recipe is special not only for its beautiful presentation but also for its incredible flavors. The combination of fresh strawberries and rich vanilla creates a symphony of taste that dances on your palate, making every slice irresistible. Through this article, not only will you learn how to create this stunning cake, but you’ll also discover tips for achieving the ideal texture, variations, and tricks to ensure your celebration is a hit. As you embark on this culinary journey, prepare for the delightful aroma that will fill your kitchen, enticing everyone around.
What Is Spring Birthday Cake: Strawberry Vanilla Drip Cake?
The Spring Birthday Cake: Strawberry Vanilla Drip Cake is a culinary masterpiece that celebrates the vibrant flavors of warmer months. Originating from classic cakemaking traditions, this cake combines the lightness of vanilla sponge with the tart sweetness of fresh strawberries. It’s not just any cake; it is a layered cake, creating a perfect balance of flavor and texture—each bite is a harmonious mix of moist cake and creamy frosting. The visual appeal of a drip cake adds an element of fun, turning this delicious treat into a centerpiece for your celebration.
From its fluffy structure to the refreshing burst of strawberries, this cake is versatile enough to suit any special occasion. Whether you’re celebrating a birthday, an anniversary, or simply the joy of spring, its decadent flavors are sure to impress guests. The drip effect, achieved through a simple strawberry sauce, not only enhances its aesthetic but also serves to amplify the flavor. With the right techniques, you can recreate this dessert with ease, allowing you to indulge while enjoying the process of baking.
Why You’ll Love This
There are countless reasons why you’ll fall in love with this Strawberry Vanilla Drip Cake. Firstly, the taste is out of this world; the combination of the sweet vanilla cake and tart strawberry sauce creates a balanced flavor profile that keeps you coming back for more. The recipe is easy to follow, making it approachable even for beginners; anyone can turn their kitchen into a bakery with the right instructions and tips. Plus, this cake is budget-friendly—strawberries are often available at reasonable prices during springtime, allowing you to create a show-stopping dessert without breaking the bank.
Some may shy away from baking layer cakes, thinking them too complicated, but this recipe tackles common misconceptions. Each step is designed to guide you through the process seamlessly, ensuring that you won’t face any daunting challenges. For example, if you’re worried about even layers, I’ve included tips for perfecting your baking technique. The versatility of the ingredients allows for adaptations according to dietary needs, making it a cake that nearly everyone can enjoy, thus enhancing its appeal for gatherings or family dinners.
Ingredients You’ll Need
- 2 cups all-purpose flour – This will form the base of your cake. It’s essential for achieving that fluffy texture. You may substitute it with gluten-free flour if needed.
- 1 ½ cups granulated sugar – This sweetens the cake and gives it moisture. You can experiment with half brown sugar for a different flavor.
- ½ cup unsalted butter – Make sure it’s at room temperature for easy creaming with sugar.
- 1 cup buttermilk – It helps to keep the cake moist and adds a slight tang. You can use homemade buttermilk by adding vinegar to regular milk.
- 3 large eggs – Eggs provide structure and richness. If you require a vegan option, consider using flax eggs or aquafaba.
- 2 tsp baking powder – This leavening agent is crucial for fluffiness. Ensure it’s fresh for the best results.
- 1 tsp baking soda – Also contributes to the cake’s rise; make sure it’s fresh as well.
- 1 tsp vanilla extract – This adds wonderful aromatic flavors. Opt for pure vanilla for a better taste.
- ½ tsp salt – Balances the sweetness; don’t skip this vital ingredient.
- 1-2 cups fresh strawberries – These will be puréed into sauce for drizzling and can also be used for decoration.
- 2 cups heavy whipping cream – This will be whipped and used for the frosting, adding richness.
- ½ cup powdered sugar – For sweetening the frosting. Adjust according to taste.
Each ingredient plays a pivotal role in ensuring the success of this cake. Their freshness and quality directly influence not just the taste but also the texture. Pay special attention to your strawberries; using fresh, ripe berries elevates the flavor immensely—always opt for organic when possible, as they tend to be more flavorful.
How to Make
- Prep your oven and pans: Preheat your oven to 350°F (175°C). Prepare three 8-inch round cake pans by greasing them with butter and lining the bottoms with parchment paper. This ensures that your cakes release easily after baking, keeping them intact and beautiful for stacking.
- Mix the dry ingredients: In a mixing bowl, whisk together the all-purpose flour, baking powder, baking soda, and salt. This step helps evenly distribute the leavening agents throughout the flour, which is crucial for achieving an even rise in your cake.
- Cream the butter and sugar: In a separate bowl, beat the unsalted butter and granulated sugar together until the mixture is light and fluffy. This process typically takes around 4-5 minutes. Creaming incorporates air into the butter, which is key for a light cake texture.
- Add the eggs and vanilla: Crack in the eggs one at a time, mixing well after each addition. Then stir in the vanilla extract. Ensure that you scrape down the sides of the bowl to incorporate all ingredients thoroughly; this will lead to a well-mixed batter.
- Combine wet and dry ingredients: Alternate adding the dry ingredients with the buttermilk to the butter mixture, starting and ending with the dry ingredients. Mix until just combined; overmixing can lead to a dense cake, so be gentle here.
- Bake the layers: Divide the batter evenly among the three prepared pans. Smooth the tops with a spatula for even baking. Bake in the preheated oven for 25-30 minutes, or until a toothpick inserted into the center comes out clean. Set a timer so you have a back-up plan—the smells of baking will be hard to resist!
- Cool the cakes: Once baked, remove the pans from the oven and let them cool in the pans for about 10 minutes. Then, turn them out onto a wire rack to cool completely. Cooling is essential to prevent a melted frosting disaster!
- Prepare the strawberry sauce: While the cake layers cool, place your fresh strawberries in a blender and purée them until smooth. Cook the purée in a saucepan over low heat, stirring continuously for about 5-10 minutes, until it thickens slightly. Let it cool before drizzling.
- Make the frosting: In a clean mixing bowl, whip the heavy cream until it begins to thicken. Gradually add the powdered sugar and continue whipping to stiff peaks. This decadent frosting holds a beautiful shape and complements the cake wonderfully.
- Assemble the cake: Place the first cake layer on a serving plate and spread a layer of frosting on top. Drizzle some strawberry sauce over the frosting, followed by the second layer. Repeat this process with the second layer. Finally, place the third layer on top and frost the top and sides of the cake.
- Add the drip effect: Using a spoon, drizzle the cooled strawberry sauce around the edges of your frosted cake, allowing it to drip down the sides for that beautiful drip effect. Don’t forget to decorate the top with fresh strawberries for an extra pop!
Baking this Strawberry Vanilla Drip Cake is more than just following a recipe; it’s about embracing the cooking experience. Take your time, enjoy the creative aspect of decorating, and don’t rush the baking process. With the right approach, you can produce a cake that doesn’t just taste great but looks stunning!
Variations & Substitutions
Vegan Strawberry Vanilla Drip Cake: If you’re looking for a vegan alternative, you can replace the eggs with flax eggs (1 tablespoon ground flaxseed + 3 tablespoons water per egg) and the buttermilk with a plant-based milk (like almond or oat) combined with a splash of vinegar. Use vegan butter or coconut oil as your fat source. The result will be just as fluffy and delicious, with a hint of tropical flavor from the coconut oil.
Chocolate Strawberry Drip Cake: For those who have a deep love for chocolate, consider swapping out half of the flour in the original recipe for cocoa powder. This change will give you a rich chocolate cake, providing a great contrast to the fresh strawberry sauce. Top it with chocolate ganache for an extra indulgence.
Gluten-Free Strawberry Vanilla Drip Cake: If gluten is a dietary concern, simply substitute the all-purpose flour with a high-quality gluten-free blend. Ensure that your baking powder is also gluten-free. The texture will be just as delightful, making it suitable for everyone at the party.
Fruit Compote Topping: Instead of using only strawberries, feel free to get creative with mixed berries—raspberries, blueberries, or blackberries can work wonderfully and provide a beautiful blend of colors. Simply adjust the sauce prep by blending various berries for a mixed berry compote that enhances both the flavor and look of your cake.
Almond Flour Variation: For a nuttier flavor, consider using almond flour instead of regular flour. Note that the texture will be different, creating a denser yet moist cake. Almond flour works beautifully in collaboration with strawberries, adding a unique layer of taste.
Each of these variations opens the door to a different flavor profile and texture, showing that there’s no limitation to how you can enjoy your Strawberry Vanilla Drip Cake. Personalizing it to match your preferences or dietary needs not only makes it special but also ensures everyone gets to savor a slice of happiness.
Common Mistakes to Avoid
When baking a layer cake, several common pitfalls can lead to less-than-ideal results. One of the most critical mistakes is overmixing the batter. While mixing is essential to achieve the right consistency, overmixing can develop gluten in the flour, resulting in a dense cake rather than a light and fluffy one. To avoid this, mix until just combined and use a spatula to fold in any remaining flour.
Another common issue arises during the assembly stage. Not allowing the cake layers to cool completely can cause the frosting to melt into a gooey mess, defeating the purpose of those beautifully frosted layers. Make sure your cakes are at room temperature before you begin frosting.
Lastly, when it comes to the strawberry sauce, be cautious not to cook it too long; this can lead to a thick paste rather than a drizzle-friendly consistency. Aim for a pourable sauce that will beautifully adorn your cake. Always taste and adjust the sweetness according to your preference. Remember, patience and attention to detail are key in creating a luscious Strawberry Vanilla Drip Cake that will be the highlight of any spring celebration.
Storage, Freezing & Reheating Tips
To properly store your Strawberry Vanilla Drip Cake, make sure it is fully cooled before wrapping it up. If you have leftovers, it’s best to place them in an airtight container to keep the moisture within. If you want to extend the cake’s freshness, store it in the refrigerator, where it can last for up to a week. Just be aware that refrigeration can alter the texture of the frosting slightly.
If you wish to freeze the cake, it’s best to do so unassembled. Wrap each layer tightly in plastic wrap and then in foil before freezing. This method retains the moisture in the cakes. You can freeze them for up to 3 months. When you’re ready to use them, simply let them thaw in the fridge overnight, then assemble and frost as desired.
Reheating the cake isn’t necessary, but if you enjoy it warm, you can slice a piece and pop it in the microwave for about 10-15 seconds. This will give you that fresh-baked feeling without compromising the cake’s overall integrity. Always consider food safety best practices, especially with cream-based frostings.
Frequently Asked Questions
Can I use frozen strawberries for making the strawberry sauce? Absolutely! Frozen strawberries work well for the sauce; just make sure to thaw them beforehand. You might need to adjust the sweetener depending on the sweetness level of the berries after thawing. Cooking them down into a sauce enhances their flavor, so don’t skip this step.
How can I make the frosting easier to spread? If your frosting is too stiff, you can add a tablespoon of milk or heavy cream to achieve a more spreadable consistency. Just be cautious – adding too much liquid can make it runny. Mix in small increments until you reach the desired texture.
Can this cake be made ahead of time? Yes! The cake layers can be made in advance and stored in the fridge or freezer. Just make sure to wrap them well to keep them fresh. Frosting can also be prepared ahead of time; simply store it in an airtight container in the refrigerator. Just remember to let it come back to room temperature before frosting the cake.
What type of flour is best for this cake? All-purpose flour works best for a light, fluffy cake. If you prefer a heartier texture or are aiming for a gluten-free option, consider using almond flour or a specific gluten-free blend. Make sure to check for necessary ingredient adjustments as these can vary.
How do I prevent my cake layers from doming? One tip is to ensure your oven temperature is properly calibrated before baking. If your cakes tend to dome, you can also level them off after baking by trimming the tops with a serrated knife, creating an even surface for stacking. Another great technique is to use baking strips around the pans to promote even cooking.
Conclusion:
This Strawberry Vanilla Drip Cake is a charming and delicious way to celebrate the arrival of spring. With its moist layers and vibrant flavors, it quickly becomes the centerpiece of any gathering. Each slice carries a delightful blend of textures and tastes that will have your guests raving. Don’t hesitate to explore variations or make this cake your own. Get started on creating this masterpiece, and remember—it’s all about enjoying the process. Share your love for baking and this recipe with friends and family; there’s nothing quite like the joy of a homemade cake!