Prep time: 20 minutes
Cook time: 30 minutes
Total time: 50 minutes
Servings: 12
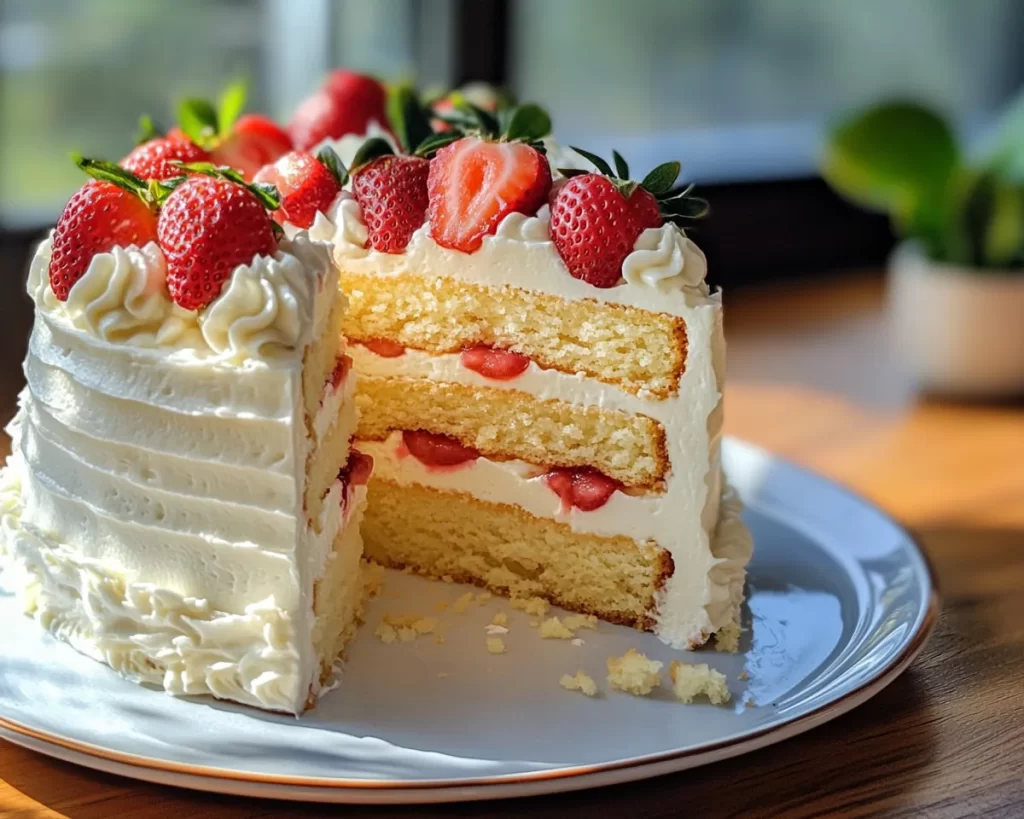
Are you craving a dessert that embodies the warmth of spring and the joy of celebration? If so, this Spring Birthday Cake: Vanilla Cake with Strawberry Filling is the perfect choice. Picture a fluffy, moist vanilla cake, layered with luscious strawberry filling and topped with a delicate whipped cream frosting. Its vibrant flavors and cheerful presentation make it ideally suited for birthdays, picnic gatherings, or any spring celebration. Imagine the smiles as you cut into this beautiful cake, revealing its stunning layers. In this article, you’ll discover how to make this delightful cake from scratch, with tips for customization to suit your tastes.
What Is Spring Birthday Cake: Vanilla Cake with Strawberry Filling?
The Spring Birthday Cake is a delightful combination of simplicity and elegance. Originating as a variation of traditional birthday cakes, it features a fluffy vanilla cake that is both light and rich, making it an excellent base for delicious fillings. The vanilla flavor provides a subtle sweetness, allowing the fresh, fruity strawberry filling to shine through. This cake showcases layers of vanilla, filled with homemade strawberry compote that balances sweetness with a refreshing tartness.
Texture plays a pivotal role in this dessert; you get the slight creaminess of the frosting coupled with the smoothness of the strawberry filling, all enveloped in the airy texture of the cake. It’s an inviting, colorful centerpiece for your celebrations, effortlessly coming together for both novice and experienced bakers alike. Whether you are hosting a birthday party or simply treating yourself to something sweet, this cake will surely elevate your springtime gatherings.
Why You’ll Love This
There are several reasons to fall in love with this Spring Birthday Cake. To begin with, the taste is nothing short of delightful; each bite offers a perfect balance between the sweet vanilla cake and the tart strawberry filling. You can make it ahead of time, allowing you to spend more valuable moments enjoying the company of friends and family rather than being stuck in the kitchen. The cost is relatively low as well, using common ingredients that most people already have on hand.
This cake is also very versatile. Don’t feel restricted to just strawberries; you can easily substitute in other berries or even stone fruits, depending on what is in season or what you prefer. One common misconception is that making layered cakes is a complicated process. While it may seem daunting, the method is straightforward and can be simplified with practice. This cake is forgiving, making it a perfect choice for beginners or busy parents looking to make something special without breaking the bank or their sanity.
Ingredients You’ll Need
- 2 ½ cups all-purpose flour: The staple of the cake, providing structure. You can use cake flour for a lighter texture.
- 2 cups granulated sugar: Essential for sweetness and moisture. Brown sugar can add a caramel note if desired.
- 1 cup unsalted butter: Gives the cake a rich flavor and tender crumb. If you have dietary restrictions, a non-dairy butter works well.
- 4 large eggs: They act as a binding agent, giving structure to the cake. This is essential in achieving stability.
- 1 cup whole milk: Keeps the cake moist and flavorful. Substitute for almond or oat milk for a dairy-free version.
- 1 tablespoon vanilla extract: Adds depth of flavor; you can use vanilla bean paste for an intensified vanilla taste.
- 2 teaspoons baking powder: Helps the cake rise; make sure it’s fresh for maximum effectiveness.
- ½ teaspoon salt: Enhances all the flavors; essential even in sweet dishes.
- 2 cups fresh strawberries: The star filling ingredient, offering a sweet and tangy flavor. Frozen strawberries can also work when fresh aren’t available.
- 1 cup heavy cream: For whipped frosting, creating a light and fluffy topping to the cake.
- ½ cup powdered sugar: Sweetens the whipped cream; adjust the amount to your taste.
Utilizing high-quality ingredients will elevate your cake. Always go for fresh strawberries, as their flavor greatly influences your cake’s outcome. If strawberries are out of season, consider using frozen ones, but make sure they are unsweetened to maintain the cake’s balance.
How to Make
1. **Prepare your ingredients:** Start by gathering all the ingredients at room temperature. This makes mixing easier and ensures the batter comes together smoothly. Preheat your oven to 350°F (175°C) and grease three 9-inch round cake pans. Line the bottoms with parchment paper for easy removal after baking.
2. **Mix the dry ingredients:** In a large bowl, whisk together the all-purpose flour, baking powder, and salt. It’s vital to mix these components well to ensure even distribution, which will lead to consistent rising and texture.
3. **Cream the butter and sugar:** In a mixing bowl, beat the unsalted butter and granulated sugar together on medium speed until light and fluffy, approximately 3-5 minutes. This step incorporates air into the batter, contributing to a light texture.
4. **Incorporate the eggs and vanilla:** Add the eggs one at a time, mixing well after each addition to ensure they are well-integrated. Pour in the vanilla extract and continue mixing to infuse the batter with rich flavor.
5. **Gradually add dry ingredients and milk:** With the mixer on low, alternate between adding the dry ingredients and the milk. Begin and end with the flour mixture. This process prevents the batter from becoming too tough. Mix until just combined—overmixing can result in a dense cake.
6. **Prepare the strawberry filling:** While the cake bakes, slice the fresh strawberries and place them in a saucepan over low heat. Add a little sugar to taste and cook until the strawberries break down into a thick compote. Let the filling cool before using it to layer your cake.
7. **Bake the cakes:** Divide the cake batter evenly among the prepared pans. Bake in your preheated oven for 25-30 minutes or until a toothpick inserted into the center comes out clean. Keep an eye on them in the final minutes, as baking times may vary depending on your oven.
8. **Cool the cakes:** Once baked, remove the cakes from the oven and let them cool in the pans for about 10 minutes. Then, turn them out onto a wire rack to cool completely. This is crucial—ensure that the cakes are cold before frosting; otherwise, your frosting may melt.
9. **Whip the cream for frosting:** In a medium bowl, use a whisk or an electric mixer to whip the heavy cream and powdered sugar until soft peaks form. This should take around 3-5 minutes. This creamy layer complements the fruity filling beautifully.
10. **Assemble the cake:** Once your cakes are cool, place one layer on a serving platter. Spread a layer of strawberry filling over the top, followed by a generous layer of whipped cream. Repeat this process with the second layer. Place the final layer on top and frost the top and sides with the remaining whipped cream.
11. **Chill and serve:** For best results, refrigerate the cake for at least 30 minutes before slicing. This allows the flavors to meld and makes serving easier. When you’re ready, slice and enjoy this delightful Spring Birthday Cake!
Variations & Substitutions
Chocolate Strawberry Cake: If you are a chocolate lover, consider adding cocoa powder to the vanilla cake batter. Replace about 1/2 cup of the all-purpose flour with unsweetened cocoa powder. This adjustment delivers a decadent chocolate flavor that pairs exceptionally well with the strawberry filling. This is perfect for birthdays when you want something a little richer.
Lemon Vanilla Cake: For a citrusy twist, incorporate lemon zest and a splash of lemon juice into the cake batter. The bright lemon flavor contrasts beautifully with the sweetness of the strawberries, creating a refreshing palette. This is, particularly great if you’re serving the cake on a warm day.
Gluten-Free Option: If you have dietary restrictions, you can substitute the all-purpose flour with a 1:1 gluten-free flour blend. Make sure to check that the blend contains xanthan gum, which gives the cake stability. The flavor will remain delicious, and no one will guess that it’s gluten-free!
Dairy-Free Version: For a dairy-free cake, swap out the unsalted butter for a vegan butter alternative and use almond milk or coconut milk in place of whole milk. The cake remains rich and satisfying without any dairy, and you’ll still enjoy all the delectable flavors.
Berry Medley Filling: Why stop at strawberries? Use a mix of your favorite berries, like raspberries or blueberries, for a different filling. The flavor combo adds complexity and a burst of colors, making the cake even more visually appealing and delicious.
Common Mistakes to Avoid
One common mistake is not properly measuring your flour. Too much flour can create a dense cake, while too little can lead to a weak structure. Always spoon the flour into your measuring cup and level it off with a knife for the best results.
Another mistake is baking the cake at too high a temperature, which can cause the outer edges to overcook while the middle remains raw. Make sure to preheat your oven properly and use an oven thermometer to ensure accuracy.
Also, remember to let your cakes cool completely before frosting. If you’re in a hurry and frost while warm, you risk melting your whipped cream topping into a puddle. Allow adequate time for cooling to keep your layers intact.
Storage, Freezing & Reheating Tips
For storage, cover the cake tightly with plastic wrap or foil, or use an airtight container. The cake can be kept in the refrigerator for up to 5 days. If you’d like to make it ahead, you can prepare the cakes and filling in advance, storing them separately until you’re ready to assemble.
When it comes to freezing, this cake freezes beautifully. Wrap each cooled cake layer in plastic wrap and then foil to prevent freezer burn. It can be frozen for up to three months. When ready to use, allow it to thaw in the refrigerator overnight before frosting and serving.
For reheating, if you want to enjoy a slice slightly warm, use the microwave in short bursts, checking carefully to avoid overheating. Additionally, you can freshen up the whipped cream by re-whipping it slightly if it has lost its fluffiness.
Frequently Asked Questions
Can I use frozen strawberries for the filling?
Yes, frozen strawberries can be used for the filling, but be sure to thaw and drain them first. You may need to adjust the sugar, as frozen strawberries often come sweetened. Cook them down similarly to fresh strawberries to achieve the right consistency.
How do I prevent my cake from collapsing?
To prevent your cake from collapsing, ensure all ingredients are at room temperature before mixing. Properly beat the butter and sugar to incorporate air, and be gentle when mixing the flour into the batter. Baking at the correct temperature is also crucial for proper rise.
Is it possible to make the cake in advance?
Absolutely! This cake can be made a day or two in advance. It can be baked, cooled, and wrapped tightly until you’re ready to assemble it. Just keep the whipped cream frosting separate until you are ready to serve for the best texture.
Can I replace the whipped cream with frosting?
Definitely! If you prefer a richer frosting, feel free to use buttercream or cream cheese frosting instead of whipped cream. Just remember that the weight and texture will be different, affecting the overall feel of the cake.
How can I make the cake less sweet?
To reduce sweetness, opt for less sugar in both the cake and the filling. You can also swap out some of the granulated sugar for unsweetened cocoa powder or use ripe bananas for natural sweetness and moisture without added sugar.
Conclusion:
In summary, this Spring Birthday Cake: Vanilla Cake with Strawberry Filling is a celebration of flavors, textures, and colors. Its fluffy vanilla layers paired with vibrant strawberry filling make it a standout dessert that will leave your guests requesting seconds. Whether you stick to the classic version or decide to customize it to suit your preferences, this cake is sure to become a treasured recipe in your collection. So, roll up your sleeves, gather your ingredients, and let the delightful aroma fill your kitchen. You’re not just baking a cake; you’re creating memories that will be cherished for years to come. Enjoy the process, and don’t forget to share your delicious results with others!


