Prep time: 30 minutes
Cook time: 35 minutes
Total time: 1 hour 5 minutes
Servings: 12
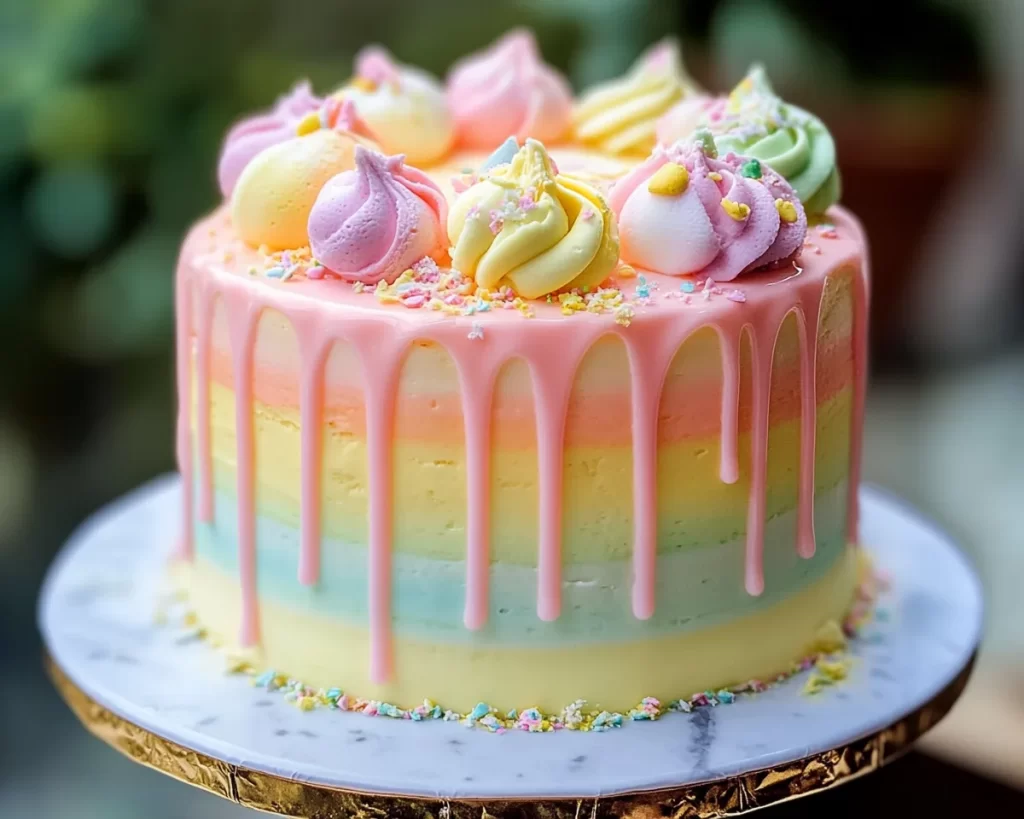
The joy of making a cake can often be amplified by the aesthetic pleasure of its presentation. Nothing turns heads quite like a beautifully crafted drip cake, especially during *springtime*. The *Spring Cake Designs: Pastel Drip Cake* is not just a treat for the taste buds but also a feast for the eyes. It combines the delightful flavors of soft cake layers with a luscious drip made from pastel-colored icing, compelling enough to bring smiles at any gathering. In this article, you’ll discover how to create this stunning masterpiece in your kitchen, complete with tips for customization, variations, and common mistakes to avoid.
This cake is particularly special for its vibrant colors and soft textures that evoke the beauty of spring. Picture a gathering where this pastel wonder is showcased; it’s not just cake; it’s a conversation starter. An easy-to-follow process makes it suitable even for a busy parent or a beginner in the kitchen. By the end of this recipe guide, you’ll have the tools to whip up your own pastel drip cake that not only looks professional but also tastes divine.
What Is Spring Cake Designs: Pastel Drip Cake (Easy Look)?
The *Spring Cake Designs: Pastel Drip Cake* is a unique dessert that marries the rich, tender texture of cake with eye-catching colors and styles. Originating from innovative pastry chefs who seek to combine visual artistry with culinary excellence, this cake offers a delightful experience. The cake typically consists of multiple layers, often made from vanilla or white cake, which is then adorned with a silky drizzle of colored ganache or frosting that drips down its sides.
Apart from its aesthetic charm, the *flavors* come from the interplay of vanilla cake and creamy frosting, often enhanced with different extracts or fruit purees for added zest. The cake is often decorated with toppings like fresh fruits, edible flowers, or colorful sprinkles, making it versatile for any occasion. Whether you’re celebrating a birthday, a spring festival, or simply enjoying a quiet afternoon, this cake promises to elevate the mood and taste.
Why You’ll Love This
You will absolutely adore this pastel drip cake for multiple reasons. To start, its taste is undeniably delightful – *soft, moist cake* layers complement the creamy frosting and gorgeous drip. The overall experience is a symphony of textures; each bite offers a little bit of everything. Additionally, preparing this cake is straightforward enough for beginners, requiring minimal specialized equipment or techniques. It provides an exciting opportunity for creativity as you can personalize it with your favorite flavors and colors.
Another reason you’ll fall in love with this cake is its economical nature. With simple ingredients that are usually available in your pantry, it doesn’t require extravagant expenses. Moreover, it is *adaptable* to suit various dietary needs or preferences. For instance, you can substitute traditional ingredients to make it gluten-free or dairy-free, ensuring that everyone can enjoy it without any dietary restrictions. Many people hesitate to make such cakes, fearing complex techniques. Not to worry! Creating a beautiful pastel drip cake can be accomplished with a little patience and enthusiasm.
Ingredients You’ll Need
- 2 ½ cups all-purpose flour: This is the base of your cake, providing structure and texture.
- 2 ½ tsp baking powder: This helps your cake rise, making it light and fluffy.
- ½ tsp salt: Enhances the overall flavor by balancing sweetness.
- 1 cup unsalted butter (softened): Adds richness and moisture to your cake.
- 2 cups granulated sugar: Provides sweetness and helps in browning.
- 5 large eggs: Adds moisture and stability to the cake structure.
- 1 tbsp vanilla extract: Provides a warm aromatic flavor.
- 1 cup whole milk: Contributes to the cake’s moistness and texture.
- 8 oz white chocolate (for the drip): Gives a rich and creamy texture when melted.
- 1 cup heavy cream: Used to create a pourable ganache for the drip.
- Food coloring (various pastel shades): To achieve the beautiful pastel hues.
- Fresh fruits and edible flowers (for decoration): Adds a visual appeal and extra flavor.
Each ingredient plays a vital role. For instance, if you’re looking for a healthier option, you can substitute all-purpose flour with almond flour for a gluten-free version or use coconut sugar in place of granulated sugar. In terms of flavor enhancements, consider adding lemon zest or almond extract for a unique twist.
How to Make
1. **Preheat Your Oven**
Start by preheating your oven to 350°F (175°C). This step is essential because a properly heated oven ensures even cooking and rising. While your oven heats, prepare your cake pans by greasing them with butter and dusting them with flour—a crucial step to prevent sticking. For this recipe, I recommend using two 9-inch round cake pans for even layering.
2. **Mix the Dry Ingredients**
In a bowl, whisk together the all-purpose flour, baking powder, and salt. This helps to evenly distribute the leavening agent. By whisking, you also aerate the flour, which can lead to a lighter cake. Set this mixture aside as you prepare for the next step.
3. **Cream the Butter and Sugar**
In a large mixing bowl, use an electric mixer to cream the softened unsalted butter and sugar together until the mixture is light and fluffy—this usually takes about 4-5 minutes. This creaming process incorporates air into the mixture, resulting in a cake that has a lovely, soft texture once baked.
4. **Add the Eggs and Vanilla**
Add the eggs one at a time, making sure each one is fully incorporated before adding the next. Then, mix in the vanilla extract. As you mix, you will notice a beautiful, creamy texture forming. This is crucial for a well-emulsified batter.
5. **Combine Dry and Wet Ingredients**
Gradually add the flour mixture to the butter and sugar mixture, alternating with the milk. Start with the flour and end with the flour, mixing until just combined. Be careful not to over-mix, as this can create a dense cake. The batter should be smooth and thick but pourable.
6. **Bake the Cake**
Divide the batter evenly between the prepared pans. Bake for 30-35 minutes or until a toothpick inserted in the center comes out clean. It’s essential to keep an eye on the cakes toward the end of the baking time, as ovens can vary in temperature.
7. **Cool the Layers**
After baking, let the cakes cool in their pans for about 10 minutes. Then, carefully remove them from the pans and transfer them to a wire rack to cool completely. Cooling is crucial to ensure that the frosty topping does not melt when spread on the cake.
8. **Prepare the Drip Ganache**
Chop the white chocolate into small pieces and place it in a heatproof bowl. In a saucepan, heat the heavy cream until just steaming but not boiling, then pour it over the chocolate. Let it sit for a minute, then stir until smooth and shiny. Once the ganache has cooled slightly, you can mix in food coloring to achieve your desired pastel shades.
9. **Assemble the Cake**
Place one cake layer on a serving plate and spread a generous amount of frosting on top. Then, place the second layer on top and frost the sides and top. You don’t need to achieve a perfect finish, as the drip will cover any imperfections.
10. **Apply the Drip**
Use a spoon or a squeeze bottle to carefully drip the ganache over the edges of the cake, allowing it to cascade down the sides. This step is where you can be creative; the drip doesn’t have to be uniform. Once completed, add decorations such as fresh fruits or edible flowers.
Variations & Substitutions
Chocolate Drip Variation: If you’re a chocolate lover, consider a chocolate drip instead of the traditional white chocolate. Simply replace the white chocolate with semi-sweet or dark chocolate for a richer flavor profile. The chocolate ganache will provide that same smooth, decadent finish. This is perfect for those who enjoy a deeper, more comforting cake experience.
Lemon Blueberry Variation: To incorporate a fruity twist, consider adding a blueberry compote between layers. You can make this by simmering fresh blueberries with a bit of sugar and lemon juice until thickened. The fresh flavor will pair beautifully with a lemon-flavored frosting. This variation is ideal for spring gatherings, evoking the essence of the season.
Gluten-Free Option: For those with dietary restrictions, you can easily convert this recipe into a gluten-free version. Just substitute the all-purpose flour with a gluten-free flour blend. Be sure to check that your baking powder is gluten-free, as some brands contain wheat starch. Keep in mind that gluten-free cakes may have a different texture, so don’t be discouraged if it’s not exactly the same.
Vegan Version: You could also create a vegan pastel drip cake. Substitute eggs with flaxseed meal or applesauce, use coconut oil in place of butter, and switch to almond milk or oat milk. For the ganache, simply use dark chocolate and coconut cream. This version not only caters to vegan diets but also yields a moist and delightful cake.
Cake Pops Variation: If you have leftover cake or want to create something fun for kids, transform your pastel drip cake into cake pops! Crumble the cooled cake, mix with frosting to form a dough, roll into balls, and dip them in melted chocolate. This playful twist is great for parties and is sure to be a hit.
Common Mistakes to Avoid
One frequent mistake is **over-mixing the batter**, which can lead to a dense cake rather than a light and fluffy one. Make sure to mix until ingredients just come together. Additionally, an *underbaked cake* can ruin your results; always check for doneness with a toothpick—if it comes out with wet batter, it needs more time.
Another misstep occurs when people skip properly **cooling** the cake before frosting it. If you apply frosting on a warm cake, it will melt and create a mess rather than a smooth finish. Always allow the layers to cool completely on a wire rack. Lastly, when adding the drip, ensure the ganache is not too hot, as this can cause it to run off too quickly.
Storage, Freezing & Reheating Tips
To store your *Spring Cake Designs: Pastel Drip Cake*, keep it in an airtight container in the refrigerator for up to five days. If you want to freeze it, wrap the layers carefully in plastic wrap and then foil to prevent freezer burn. It’s best to freeze the layers before frosting for optimal quality. When ready to enjoy, allow the cake to thaw in the fridge overnight for a gradual process, then frost and serve.
For reheating, if you have leftovers that you want to warm up slightly, it’s best to use a microwave for just a few seconds at a time—this should be done carefully to avoid melting the decorations.
Frequently Asked Questions
Can I make this cake a day in advance? Yes, making the cake in advance is a fantastic idea. You can bake the layers a day ahead, then wrap them tightly and refrigerate. Just add the frosting and drips on the day of serving for the freshest look.
Can I use a different frosting than buttercream? Absolutely! You can use a cream cheese frosting for a tangy twist or even a whipped ganache for an ultra-rich experience. Just remember that the texture might be different, affecting how the drip looks, so use your judgment.
What can I do if the ganache is too thick? If you find your ganache is thicker than you’d like, simply warm it gently over a double boiler or in the microwave for a few seconds. Stir well until it reaches your desired consistency.
Can I use different flavors in my cake layers? Yes, you can experiment with various flavors! Consider chocolate, red velvet, or even a funfetti option for a fun, colorful burst. Just make sure that your chosen flavor complements the overall theme of the cake.
What if I don’t have heavy cream for the ganache? If you are out of heavy cream, a substitute can be made with whole milk and a bit of butter. For every cup of heavy cream, mix about 3/4 cup of whole milk with 1/4 cup of melted butter. This can yield a similar richness, though the texture may vary slightly.
Conclusion:
In wrapping things up, the *Spring Cake Designs: Pastel Drip Cake* is a delightful blend of beauty and taste. It not only brings a festive touch to any occasion but also provides a canvas for your creativity in the kitchen. Whether you choose to stick to the classic recipe or explore various flavors and alternatives, the enjoyment you’ll get from making and eating this cake is worth every effort. I encourage you to customize it to suit your preferences, share it with friends and family, and enjoy the smiles it brings. Happy baking!


