Prep time: 30 minutes
Cook time: 25 minutes
Total time: 55 minutes
Servings: 12 servings
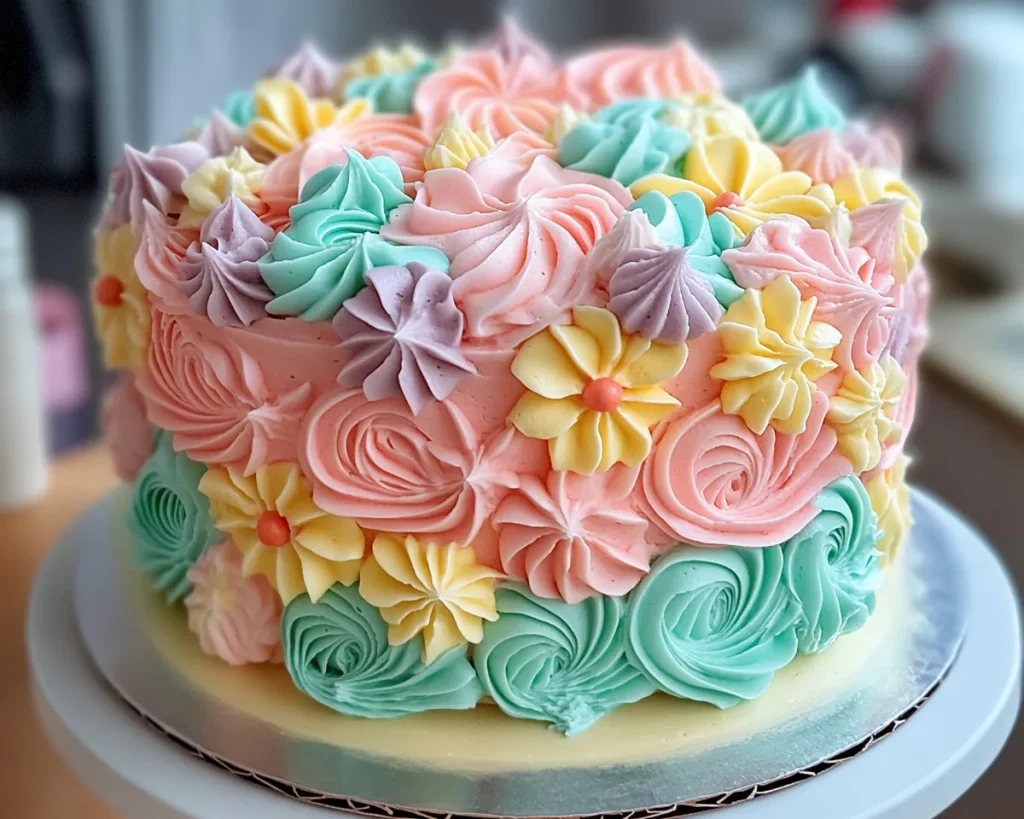
When it comes to baking, few things evoke a sense of joy quite like a beautifully crafted cake, especially one that celebrates the essence of spring. Our recipe for Spring Cake Designs: Pastel Spring Buttercream Swirls beckons with vibrant colors and delightful flavors, turning an ordinary dessert into a breathtaking centerpiece for any gathering. Imagine cutting through layers of moist cake, only to reveal a burst of pastel goodness brought to life by creamy buttercream swirls. This cake isn’t just delightful to the taste buds; it’s also visually stunning, guaranteed to leave your guests in awe.
This recipe is special not only for its aesthetic appeal but also for its versatility and easy-to-follow steps. As you immerse yourself in the process, you’ll discover how the harmonious blend of flavors and textures crafts a cake that embodies the spirit of spring. Whether you are a busy parent trying to impress your family with a homemade dessert or a beginner looking to dive into the baking world, this recipe provides simple yet effective guidance. You’ll learn the secrets to creating mouth-watering buttercream, eye-catching swirls, and how to make a cake that’s both scrumptious and artistic.
What Is Spring Cake Designs: Pastel Spring Buttercream Swirls?
Spring Cake Designs: Pastel Spring Buttercream Swirls is more than just a dessert; it’s a celebration of the season. This cake usually features layers of soft, fluffy cake dressed in a light and airy buttercream frosting adorned with colorful swirls. The origins of such cakes can often be traced back to traditional baking techniques where cakes were decorated not just for taste but as a testament to the skill and creativity of the baker. The use of pastel colors is particularly symbolistic of spring, reminiscent of blooming flowers and blooming gardens, providing a sense of renewal and joy.
The texture of this cake is incredibly inviting. With every slice, you’ll experience the *soft, tender crumb* of the cake complemented by the *silky smoothness* of the buttercream. Each bite offers a *sweet, yet delicate flavor*, making it perfect for spring celebrations like birthdays, garden parties, or even a cozy family gathering. Additionally, you can customize the cake with different flavors like lemon or vanilla, enhancing its culinary appeal and giving it that personal touch.
Moreover, the visual aspect of this cake is outstanding. As you pipe pastel buttercream swirls atop each layer, you create a masterpiece that captures the eyes before it even tantalizes the taste buds. It’s a showstopper that shines on any dessert table, making it not only delicious but also a stunning focal point.
Why You’ll Love This
There are myriad reasons to love the Spring Cake Designs: Pastel Spring Buttercream Swirls. First of all, the flavor combinations are simply unmatched. The *sweetness of the buttercream melds perfectly with the light undertones of the cake*, creating a delightful balance that caters to all age groups. If you’re hosting a gathering, this cake will have your guests asking for seconds and thirds!
Additionally, the ingredients used in this recipe are generally budget-friendly. A *few basic pantry staples*, such as flour, sugar, and butter, come together to create this masterpiece without breaking the bank. You won’t need to stock up on special ingredients that are difficult to find, making it accessible for everyone from experienced bakers to novices. This aspect of cost-effectiveness is particularly important for busy parents or anyone looking to whip up a stunning dessert while staying within a budget.
Many people shy away from baking because they think it’s too complex or time-consuming, but this cake challenges that misconception. The recipe is straightforward, breaking down the baking process into easy-to-follow steps. You’ll also see that you can adapt this recipe to suit dietary needs, such as replacing traditional butter with plant-based alternatives for a vegan version.
Furthermore, the versatility in *decorating techniques* allows you to express your personality or the theme of your gathering. Whether you want bold, bright swirls or soft, muted colors, the choice is yours! This also makes it an excellent opportunity to involve your kids in the kitchen, turning baking into a family bonding experience and inviting them to explore their creativity.
Ingredients You’ll Need
- All-purpose flour: This serves as the backbone of the cake, providing structure. For gluten-free options, consider using a gluten-free baking blend.
- Sugar: Granulated sugar sweetens the cake. You could use coconut sugar for a healthier alternative.
- Baking powder: This is the leavening agent, ensuring your cake rises beautifully. Always check the expiration date, as old baking powder can lead to flat cakes.
- Salt: A small amount enhances flavor. Sea salt can create a more complex taste profile.
- Unsalted butter: The star of both the cake and the buttercream. Make sure it’s at room temperature for easy blending.
- Eggs: They help with binding and provide moisture. For vegans, a flaxseed egg can serve as a substitute.
- Vanilla extract: This adds a warm flavor. For more depth of flavor, try using almond extract in moderation.
- Heavy cream: Essential for the buttercream. This creates a smooth, rich texture. You can use coconut cream for a dairy-free version.
- Food coloring: Gel food colorings work best for achieving vibrant pastels without altering the consistency of your buttercream.
Each ingredient plays a pivotal role in crafting the perfect cake, and understanding their function can significantly enhance your baking skills. Don’t be afraid to play around with flavors and make the recipe your own!
How to Make
- Preheat your oven: Start by preheating your oven to 350°F (175°C). This is crucial for even baking. While that heats up, prepare your baking pans by greasing and flouring them or using parchment paper.
- Mix the dry ingredients: In a large mixing bowl, whisk together the all-purpose flour, baking powder, and salt. These elements need to be well-combined to ensure even leavening throughout the cake batter. Set this aside for later.
- Cream the butter and sugar: In another bowl, beat the unsalted butter and granulated sugar together using a hand mixer or stand mixer on medium speed until the mixture is light and fluffy. This typically takes about 3–5 minutes. The texture changes as air incorporates into the butter, which is key for a fluffy cake.
- Add the eggs and vanilla: After your butter and sugar mixture is well-aerated, add the eggs, one at a time, mixing well after each addition. Then pour in the vanilla extract. Remember, this is where you can substitute with almond extract if desired.
- Combine the mixtures: Gradually add your dry ingredient mixture to the wet ingredients, alternating with milk or heavy cream. Start and end with the dry ingredients to maintain a consistent texture. Mix only until combined, as over-mixing can lead to a tougher cake.
- Pour into pans: Divide the batter evenly between your prepared baking pans. For a more even bake, you can weigh the batter or use an ice cream scooper. Smooth the tops with a spatula for good aesthetics.
- Bake: Place the pans in your preheated oven and bake for 20–25 minutes or until a toothpick inserted in the center comes out clean. As the cake bakes, the aroma will fill your kitchen, making it tempting to sneak a taste.
- Cool the cakes: Once baked, let your cakes cool in the pans for about 10 minutes before transferring them to a wire rack to cool completely. This is crucial, as icing a warm cake can lead to melting buttercream.
- Prepare the buttercream: In a clean mixing bowl, beat the remaining room-temperature butter until creamy. Gradually add your sifted powdered sugar and heavy cream, mixing until you achieve a smooth consistency. Adjust the cream for your desired spreadability.
- Add color: For the pastel swirls, divide your buttercream into small bowls and add a few drops of gel food coloring to each bowl. Mix gently until the colors are blended yet distinct.
- Assemble the cake: Once the cakes are completely cool, place one layer on a cake stand. Spread a generous amount of buttercream on top, then place the second layer on top. Repeat the process until you reach the top layer.
- Decorate: Using a piping bag fitted with a star tip, pipe swirls of different colors across the top and sides of your cake. This artful decoration allows for creativity; feel free to add edible flowers or sprinkles for added charm.
- Slice and serve: Once finished, slice the cake and serve it to your eagerly waiting guests. Enjoy the delightful combination of flavors and the *beautiful presentation*, making all the effort worth it!
Baking this cake is not just about following instructions; it’s an experience that combines patience, creativity, and joy. Take your time, savor each step, and enjoy the aromas that fill your kitchen as you create.
Variations & Substitutions
Lemon Spring Cake: For a refreshing twist, you can substitute part of the vanilla extract with fresh lemon juice and zest. This will infuse the cake with a zesty flavor that perfectly complements the sweetness of the buttercream. The citrus notes bring a spring-like brightness, making it incredibly refreshing. This version is perfect for those who prefer a less sweet cake but still want the delightful pastel swirls on top. Ensure you taste the batter before baking to adjust sweetness if needed.
Chocolate Pastel Swirls: If chocolate is more your style, you can create a rich chocolate cake base by substituting a portion of the flour with cocoa powder. The buttercream can also be flavored with chocolate by adding melted or powdered cocoa. The result is a deliciously indulgent cake with a mix of creamy chocolate buttercream swirls that vibrantly contrast with the light cake. This variation is ideal for chocolate lovers and will still retain the spring aesthetic with pastel colors!
Gluten-Free Version: To make this cake gluten-free, replace all-purpose flour with a gluten-free baking mix. Ensure the baking powder and any other ingredients are labeled gluten-free as well. This adaptation makes the cake accessible for those with gluten sensitivities while maintaining the delightful flavor and texture. Just be aware that the texture might vary slightly from the traditional version, so a practice run before a special occasion is advisable.
Vegan Buttercream: For a completely dairy-free dessert, the buttercream can be made with coconut cream instead of heavy cream and plant-based butter. Mix in powdered sugar until the desired consistency is reached. This variation enables you to create a cake that is suitable for those following a vegan lifestyle while still allowing for the same delicious flavors and beautiful pastel swirls.
Each variation opens the doorway to countless possibilities. Feel free to experiment, as baking is all about making the recipe work for you and your loved ones!
Common Mistakes to Avoid
One of the most common mistakes people make when baking this cake is rushing the ingredients’ preparation. Always ensure your butter is at room temperature before mixing. If it’s too hard or melted, the batter may not achieve the desired light and fluffy texture. Additionally, over-mixing the batter after adding the dry ingredients can lead to a dense, tough cake. Mixing should stop as soon as the ingredients are just combined to preserve the cake’s tender crumb.
Another mistake often encountered is ignoring the baking time. Ovens can vary in temperature, so always perform the toothpick test a couple of minutes earlier than the recipe suggests. Waiting too long could result in a dry cake, ruining the moist experience you want. Lastly, icing a warm cake can lead to melted buttercream, so be patient and only frost once cooled completely.
Identification of these common pitfalls will empower you with the confidence needed to create an extraordinary cake without the fear of mishaps.
Storage, Freezing & Reheating Tips
To keep your Spring Cake Designs: Pastel Spring Buttercream Swirls fresh, proper storage is essential. If you have leftover cake, store it in an airtight container or wrap it tightly in plastic wrap. It can last in the refrigerator for up to a week, although best flavor is enjoyed within the first few days.
If you have a whole cake that you want to freeze, it’s best to do so before frosting. Wrap the cooled layers tightly in plastic wrap and place them in a freezer-safe bag. Cake layers can last in the freezer for up to two months. When you’re ready to enjoy, simply thaw the layers in the refrigerator overnight and frost them the next day.
For those who prefer to freeze individual slices, you can wrap each slice in plastic wrap and follow the same freezer instructions. When reheating, let the slice come to room temperature first, as this will prevent the buttercream from melting. If you’re short on time, a quick 10-15 second microwave zap can also work, but be cautious not to overheat.
Always practice food safety by ensuring your cake is well-refrigerated if kept longer than two hours at room temperature, especially in warm weather.
Frequently Asked Questions
Can I use a different type of frosting instead of buttercream? Absolutely! While buttercream is traditional for a reason, you can use cream cheese frosting for a tangy twist or even a fondant for a smoother finish. Each frosting type will impart its unique flavor and texture, allowing you to customize the cake even further.
Is this cake easy enough for beginners to make? Yes! This cake is designed with simplicity in mind. With straightforward instructions and common ingredients, even novice bakers can feel comfortable. Take your time with each step, and you’ll enjoy the process just as much as the final product.
Can I adjust the sweetness of the buttercream? Certainly! If you find the buttercream too sweet for your palate, you can add a pinch of salt to balance the sweetness or reduce the sugar content slightly. Always remember that the flavors will meld as they rest, so it can be useful to taste a bit before finalizing.
How do I ensure my cake doesn’t stick to the pan? Well-prepared pans are essential for a perfect cake release. Make sure to grease and flour the pans correctly or use parchment paper. Allow the cake to cool in the pans briefly before inverting them on a wire rack to cool completely.
What’s the best way to create vibrant pastel colors in the buttercream? Using gel food coloring will allow you to achieve bright pastel shades without compromising the buttercream’s consistency. Start with a small amount, mix it well, and adjust gradually to meet your desired hue.
Conclusion:
In summary, the Spring Cake Designs: Pastel Spring Buttercream Swirls is not just a cake, but a culinary journey that combines simplicity, flavor, and creativity. The results are undeniably rewarding, as you create a dessert that impresses both visually and in taste. Don’t hesitate to try it yourself! Customize the flavors, experiment with colors, and most of all, share it with friends and family who will surely cherish this springtime treat. Your baking endeavor can spark joy and create lasting memories, making it all the more worthwhile. So lace up your apron, preheat your oven, and let your creativity shine in the kitchen!