Prep time: 30 minutes
Cook time: 25 minutes
Total time: 55 minutes
Servings: 8
Indulging in a slice of cake, especially during the vibrant spring days, is one of life’s simplest yet profound pleasures. Picture a fluffy, moist cake adorned with swirls of rich, creamy buttercream that dance with the seasonal colors of spring. This is not just any cake; it is a Spring Cake that embodies the very essence of the season. This recipe provides an opportunity to showcase your creativity and baking skills while delighting in a dessert that speaks to both the heart and taste buds.
What makes this Spring Cake Design particularly special is its versatility. Whether you’re celebrating a birthday, hosting a picnic, or simply wishing to brighten up a mundane day, this cake can easily become the centerpiece of your gathering. Additionally, you are about to learn not just how to bake this beautiful cake but also some tips and tricks to customize it to your liking. The fusion of flavor, texture, and vibrancy sets this cake apart, making it a delightful experience from start to finish.
Throughout the article, you will discover the ingredients that make this cake a seasonal favorite, step-by-step instructions that are suitable for all skill levels, and various tips to adapt it for personal preference. Whether you’re a busy parent seeking to whip up something special, a beginner unsure of the baking process, or someone looking for budget-friendly dessert ideas, this recipe is crafted for you.
What Is Spring Cake Designs: Simple Spring Cake with Buttercream Swirls?
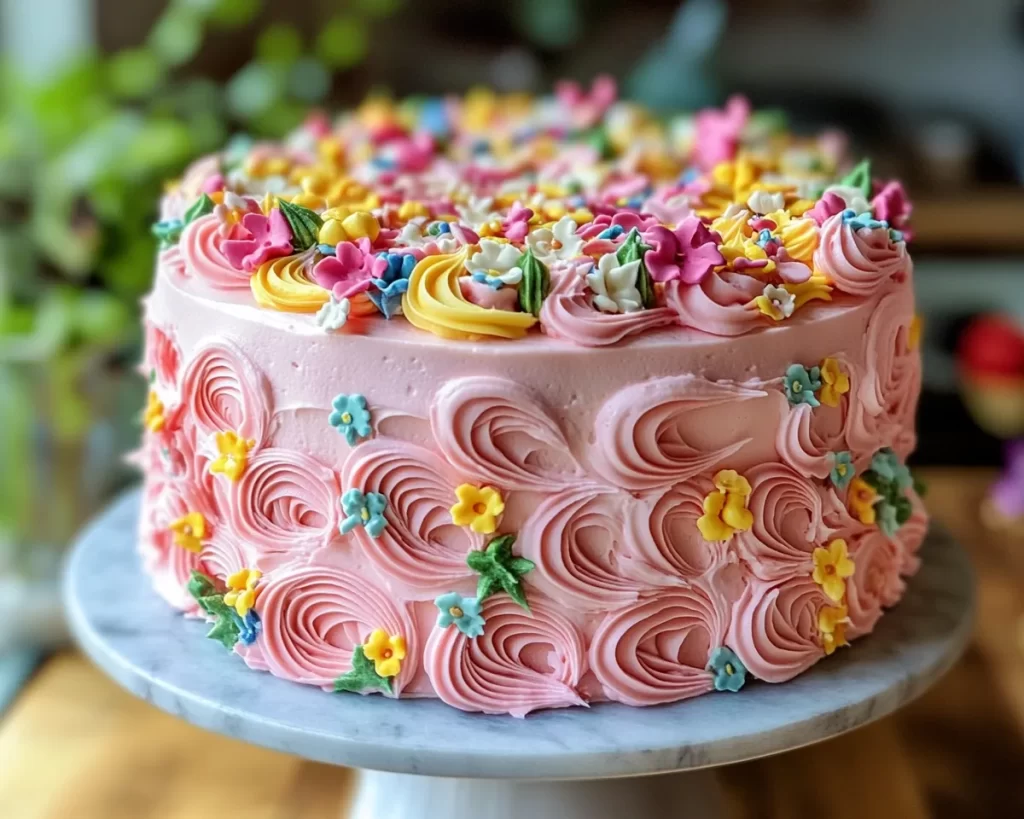
Spring Cake Designs refer to a delightful approach to baking, focusing on cakes that celebrate the beauty and freshness of spring. The Spring Cake with Buttercream Swirls is a soft, fluffy cake that embraces seasonal flavors and colors. Originating from classic cake recipes, the addition of various vibrant colors allows you to customize it according to your personality and the season. The cake has a tender crumb that melts in your mouth, while the buttercream frosting adds a rich, sweet creaminess that beautifully contrasts the lightness of the cake.
The texture of this cake is incredibly important. When baked correctly, it should yield a moist and tender slice with a fine crumb. The flavor is equally captivating; imagine a delicate vanilla or lemon base paired with the sweetness of butter, sugar, and perhaps a hint of almond. The real magic happens in the decoration; colorful buttercream swirls can transform the cake into a mesmerizing work of art. The vibrant colors not only play a visual role but also allow for a variety of flavors, making this cake not just a feast for the eyes but also a sensation for the palate.
This recipe invites you to explore your inner baker as well. The simple techniques involved make it accessible for beginners while still offering enough room for experienced bakers to showcase their skills. By the end of this article, you will not only know how to bake a stunning spring cake but also how to personalize it in numerous ways.
Why You’ll Love This
There are numerous reasons to love this Spring Cake Design. First and foremost is its delightful taste; the cake’s light and fluffy texture is perfectly complemented by the rich and creamy sweetness of the buttercream. Every bite feels like a celebration of spring, with its fresh and airy notes, making it perfect for any occasion. Additionally, it is an incredibly easy recipe to follow, requiring simple ingredients that you likely already have in your kitchen. This accessibility means you can prepare it without a trip to the specialty store, making it an economical choice as well.
While some may believe that baking a stunning cake requires professional skills, here’s a reassuring fact: this recipe breaks that mold. It’s designed for everyone, from skilled bakers to amateurs, making it a perfect weekend project or a last-minute dessert for unexpected guests. Even if you’ve made a handful of cakes in your life, you will find this recipe inviting and achievable.
Perhaps one of the most rewarding aspects of this cake is its versatility. You can adapt the flavors, colors, and decorations to suit different occasions or personal preferences. Want a lemony twist? Add lemon zest to the batter! Prefer a deep hue? Try using natural colorings made from real fruits and vegetables. The opportunities for customization are endless; therefore, you can create something that feels uniquely yours.
Ingredients You’ll Need
To create this scrumptious Spring Cake with Buttercream Swirls, you will need the following ingredients:
- 2 cups all-purpose flour: This forms the cake’s base and gives it structure. Whole wheat flour or almond flour can be used for healthier options.
- 1 ½ cups granulated sugar: Adds sweetness and caramel notes. You can substitute with coconut sugar for a less refined option.
- ½ cup unsalted butter, softened: Provides rich flavor and moisture. If dairy-free, opt for margarine or coconut oil.
- 1 cup milk: Keeps the cake moist; any milk (including almond or oat) can work.
- 3 large eggs: Acts as a binding agent and provides structure. For a vegan option, consider using flax eggs.
- 2 ½ teaspoons baking powder: Helps the cake rise.
- 1 teaspoon vanilla extract: Enhances flavor; almond extract is a great alternative.
- 1 teaspoon salt: Balances flavors.
- 2 cups confectioners’ sugar: This sweetens the buttercream frosting and gives it that creamy texture.
- ½ cup butter, softened: Used in the frosting; for a lighter option, you can use whipped cream.
Understanding the ingredients and their roles can help you feel more confident in your baking endeavors. The flour is responsible for structure, the sugar sweetens, and the eggs bind. Meanwhile, the butter contributes to richness and depth of flavor, making the cake a comforting delight.
How to Make
Follow these step-by-step instructions to create your Spring Cake with Buttercream Swirls.
- Preheat your oven: Start by preheating your oven to 350°F (180°C). This is essential to ensure your cake bakes evenly. Preparing your pans ahead of time is also crucial; greasing them or lining them with parchment paper will prevent sticking and make it easier to remove the cakes once baked.
- Mix dry ingredients: In a medium bowl, whisk together the all-purpose flour, baking powder, and salt. This step helps to evenly distribute the leavening agent and prevents clumping. A well-mixed dry base is essential for a uniform texture.
- Cream the butter and sugar: In a large mixing bowl, use an electric mixer or stand mixer to cream the softened unsalted butter and granulated sugar together. Mix on medium speed until the mixture becomes light and fluffy, usually about 3-5 minutes. This is when air is incorporated, influencing the cake’s texture.
- Add the eggs: Next, add in the eggs one at a time, beating well after each addition. This ensures that they are fully incorporated. Following the eggs, add the vanilla extract; this adds a depth of flavor that enhances the cake.
- Alternate wet and dry ingredients: Gradually add the dry mixture to your wet mixture, alternating with the milk. Start with the dry ingredients and mix until just combined, then add some milk, continuing to alternate until all ingredients are combined. Be careful not to overmix, as this can lead to a dense cake.
- Check the batter: Your batter should be smooth and slightly thick. If it’s too runny, you may need to add a bit more flour, while if it’s too thick, a splash of milk can help achieve the desired consistency.
- Pour into pans: Divide the batter evenly between your prepared cake pans. Gently shake the pans to level the batter. This will ensure that your cakes bake evenly. Tapping the pans lightly on the counter can eliminate any air bubbles that may have formed.
- Bake: Place the pans in the oven and bake for about 25-30 minutes or until a toothpick inserted in the center comes out clean. The cakes should be golden and spring back when lightly pressed. The aroma of baking should also fill your kitchen at this point.
- Cool the cakes: Once baked, remove the cakes from the oven and allow them to cool in the pans for about 10 minutes. After that, carefully turn them out onto wire racks to cool completely. Cooling completely is crucial before frosting; otherwise, the frosting may melt.
- Make the buttercream frosting: In a mixing bowl, beat the softened butter until creamy. Gradually add the confectioners’ sugar and a splash of milk, mixing until you achieve a smooth, spreadable consistency. You can add food coloring at this point to create vibrant swirls. Each shade can represent the blooming colors of spring.
- Assemble and decorate: Once the cakes are completely cool, place the first layer on a serving plate. Spread a layer of frosting on top, then gently place the second layer on top. Use the remaining frosting to cover the entire cake and create swirls or patterns as desired. Be creative! Use a spatula or piping bag to achieve the desired design.
- Chill before serving: For best results, refrigerate the assembled cake for about 30 minutes before serving. This helps to set the frosting and makes the cake easier to slice. Now your cake is ready to impress your guests or family.
Following these steps ensures your Spring Cake comes out perfectly every time, inviting smiles and joy at any gathering.
Variations & Substitutions
Citrus Burst Variation: If you’re looking for a refreshing twist, consider adding citrus zest to your cake batter. A tablespoon of orange or lemon zest can elevate the cake’s flavor profile, providing a vibrant citrus aroma that screams spring. This option is great for those who love zesty flavors and want to add a fresh note to their cake.
Chocolate Delight Variation: For chocolate lovers, consider substituting a portion of the all-purpose flour for unsweetened cocoa powder. This will yield a rich chocolate cake that pairs beautifully with a chocolate buttercream frosting. You could also add chocolate chips for an extra burst of flavor throughout the cake.
Gluten-Free Option: To make this recipe gluten-free, simply replace the all-purpose flour with a 1:1 gluten-free flour blend, such as almond or coconut flour. Keep in mind that these alternatives may require additional adjustments in liquid content to maintain moisture. Be mindful of specific proportions, as these flours can have different textures.
Vegan Variation: Making this cake vegan-friendly is straightforward! Swap the eggs for flax eggs (mix one tablespoon of ground flaxseed with three tablespoons of water) and use plant-based butter and non-dairy milk such as almond or oat milk. This allows you to enjoy the same great taste without compromising on dietary restrictions.
Each variation opens up a world of possibilities while ensuring that this Spring Cake with Buttercream Swirls remains delightful and impressive. Experimenting with different flavors and textures allows everyone to find their favorite combination, making this cake even more special.
Common Mistakes to Avoid
One common mistake is overmixing the batter. When it comes to cake, overmixing can lead to a dense texture rather than the desired light and fluffy crumb. Mix the batter until just combined, and remember that it’s okay if there are a few lumps.
Another mistake is not measuring ingredients accurately. Baking is a science, and even a small discrepancy in ingredients can alter the outcome. Use measuring cups or a kitchen scale for more precise results.
Baking at the wrong temperature can also lead to cakes that don’t rise properly. Always make sure your oven is properly preheated, and use an oven thermometer if necessary, as ovens can vary substantially. Lastly, allow your cakes to cool completely before frosting; frosting warm cakes can lead to melting and slippage, which could ruin your beautifully designed cake.
Being mindful of these pitfalls will help ensure your Spring Cake turns out beautifully, with the perfect taste and texture every time.
Storage, Freezing & Reheating Tips
To store your Spring Cake with Buttercream Swirls, simply cover it with plastic wrap or place it in an airtight container. Stored this way, it can last for up to 3 days at room temperature or up to a week if refrigerated. If you notice any condensation forming, it can lead to soggy frosting, so be cautious when wrapping.
For longer storage, consider freezing the cake. Wrap it well in plastic wrap, then in aluminum foil to prevent freezer burn. The cake can be frozen for up to 2 months. When you’re ready to enjoy it, allow the cake to thaw in the refrigerator overnight. Once thawed, let it come to room temperature before serving.
If you wish to reheat individual slices, you can use the microwave. A few seconds on low power is usually sufficient, as you simply want to warm it without melting the frosting. Alternatively, enjoy it cold for a refreshing treat, especially in the warm spring days.
Baking and decorating this cake is an exciting experience all on its own. Understanding how to store and reheat your creation will ensure its freshness for longer, allowing you to savor every bite at your leisure.
Frequently Asked Questions
Can I use a different frosting instead of buttercream? Yes! While buttercream is a classic choice for this cake, you can also try cream cheese frosting for a tangy flavor or whipped cream for a lighter touch. Each type of frosting can add a unique twist to your overall dessert experience.
How long will this cake stay fresh? When stored properly in an airtight container or wrapped in plastic wrap, the cake remains fresh for about 3 days at room temperature or up to a week in the refrigerator. If you’re not going to consume it in that time, freezing is your best option.
Can I make this cake in advance? Absolutely! You can bake the cake a day or two ahead of your event. Just bake, cool, wrap it up well, and store it in the refrigerator. Frost it on the day of your gathering for the best texture and flavor.
What’s the best way to achieve a smooth buttercream frosting? To achieve a smooth buttercream, make sure your butter is softened to room temperature before mixing. Gradually add the confectioners’ sugar and whip it on medium speed until creamy and fluffy. For extra smoothness, consider sifting the powdered sugar before adding it to the butter.
Can I replace eggs in this recipe? Yes! If you prefer a vegan option or are dealing with an egg allergy, you can replace each egg with a flax egg (1 tablespoon ground flaxseed mixed with 3 tablespoons water). This will still help bind your cake without compromising its soft texture.
Conclusion:
Creating a beautiful and delicious Spring Cake with Buttercream Swirls is not just a baking project; it’s an experience filled with joy, creativity, and flavor. You have learned the ins and outs of making this seasonal delight, complete with variations and tips to ensure success. Whether you choose to follow the standard recipe or experiment with different flavors, the important thing is to enjoy the process. Don’t hesitate to share your creations with friends and family—baking is a wonderful way to bring people together. Get started today; your kitchen is the perfect canvas for a masterpiece that tastes as delightful as it looks!


