Prep time: 20 minutes
Cook time: 12 minutes
Total time: 32 minutes
Servings: 24 cookies
There’s something truly enchanting about the arrival of spring. As the flowers bloom and the days grow longer, it’s the perfect season to indulge in light, fresh flavors — and what better way to celebrate than with a batch of delightful strawberry thumbprint cookies? These cookies combine the sweetness of strawberries with a buttery, tender cookie base, making each bite a moment of bliss. This recipe is not only easy to follow, but it also provides endless variations, ensuring that everyone can enjoy their own twist on this classic treat.
Imagine the aroma of freshly baked cookies wafting through your home, making each family member’s mouth water. Whether you need a simple treat for a gathering, a delightful dessert for your family, or a sweet addition to a spring picnic, these strawberry thumbprint cookies deliver on all fronts. In this post, you will discover how to make your own, understand the ingredients involved, explore exciting variations, and learn helpful tips for baking success.
What Is Spring Cookies: Strawberry Thumbprint Cookies?
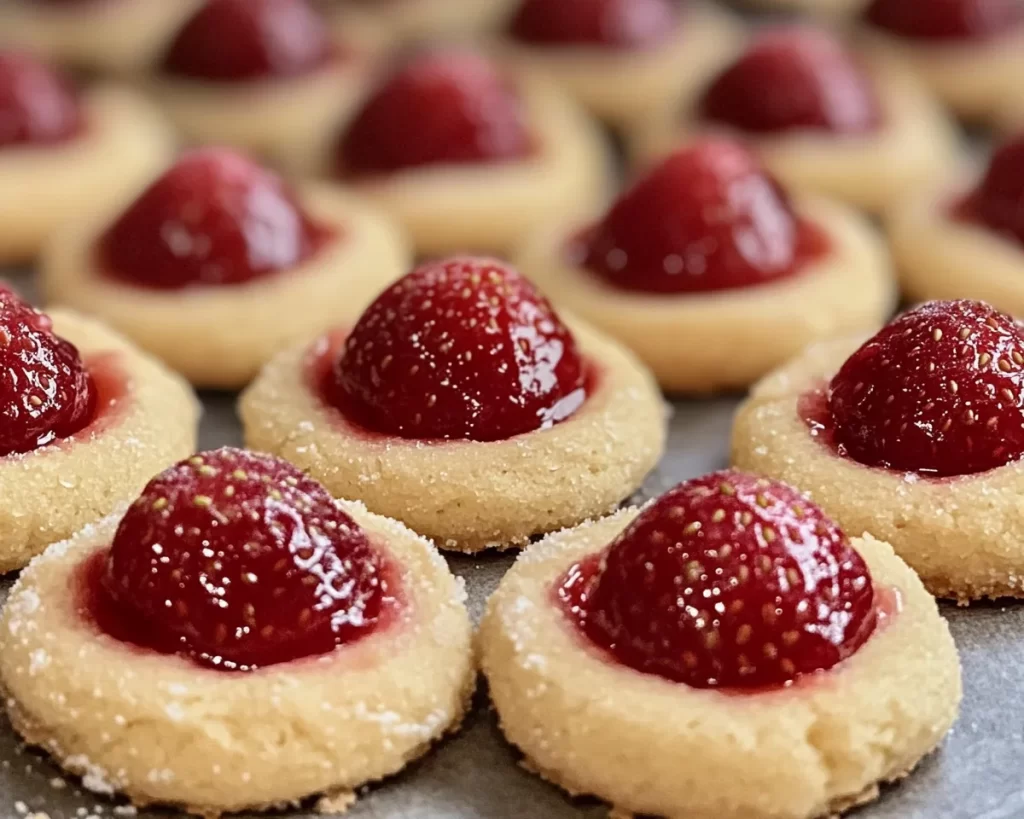
Spring cookies, particularly the strawberry thumbprint variety, are a delightful meld of classic cookie textures and vibrant flavors. This treat typically features a rich, buttery dough that serves as the perfect backdrop for the jam or compote of your choice, with strawberry holding a special place due to its natural sweetness and vibrant color. The origin of thumbprint cookies can be traced back to Europe, where they were often filled with fruit preserves, embodying a rustic charm that has lasted through generations.
The texture of these cookies is incredibly satisfying, offering a crisp edge that gently gives way to a chewy center. Each cookie is reminiscent of a burst of spring freshness, especially when complemented by a luscious strawberry filling. It’s not just about taste; the color splash of strawberries brings a visual appeal that brightens any dessert table. Because they are easy to make and require minimal ingredients, they are often a go-to choice for novice bakers looking to impress.
Why You’ll Love This
One of the primary reasons you will love this recipe is its delightful taste. The harmony of the buttery cookie with the sweet strawberry filling creates a balance that is hard to resist. Not only are these cookies indulgent, but they are also surprisingly simple to make, which means even busy parents can whip up a batch without stress.
Cost-wise, this recipe is friendly on your pocketbook. Fresh strawberries are often available at reasonable prices in spring, and the other ingredients required are pantry staples. If you’re mindful of health, swapping out regular flour for a gluten-free alternative or replacing sugar with a natural sweetener like honey can make this treat fit various dietary needs.
Many people may think that baking is a complicated art reserved for professionals, but this recipe proves otherwise. The steps are straightforward, and the ingredients are simple. The ability to customize each cookie with your preferred jam or filling turns this recipe into a versatile treat that works for different tastes and dietary preferences.
Ingredients You’ll Need
- All-purpose flour: The base of your cookie, providing structure and texture. You can substitute it with gluten-free flour for a healthier option.
- Unsalted butter: Key for imparting a rich, creamy flavor. Always ensure your butter is softened but not melted for the right consistency.
- Sugar: This adds sweetness; granulated sugar works best, but feel free to use a natural sweetener if you prefer.
- Vanilla extract: Enhances the cookie’s taste. Use pure vanilla extract for the best flavor, as imitation varieties can alter the taste slightly.
- Egg yolk: Adds richness and helps bind the dough together. You can omit this for vegan variations.
- Strawberry jam or fresh strawberries: This is your filling. Choose high-quality jam or make your own for a fresher taste.
- Salt: A crucial ingredient that helps balance the sweetness and enhances flavor.
Each ingredient plays a pivotal role in the final outcome of the cookies. Understanding their function can empower you to make substitutions based on personal preferences or dietary restrictions, ensuring a delightful end result every time.
How to Make
- Preheat your oven to 350°F (175°C). This ensures that your cookies bake evenly. A preheated oven allows the cookie dough to set quickly upon entry, preventing it from spreading too much.
- Prepare a baking sheet by lining it with parchment paper. This prevents your cookies from sticking and makes cleanup a breeze.
- In a mixing bowl, combine the softened butter and granulated sugar. Beat them together on medium speed until the mixture turns light and fluffy. This should take about 3-4 minutes. The fluffiness is crucial for achieving a tender texture in the final product.
- Add the egg yolk and vanilla extract to the butter and sugar mixture. Blend until fully incorporated. The egg gives the cookies structure, while the vanilla enhances the sweetness.
- In a separate bowl, whisk together the all-purpose flour and salt. Gradually add this dry mixture to the wet ingredients, mixing until just combined. Be careful not to overmix, as this can lead to tough cookies. You want the dough to be soft and a bit sticky.
- Chill the dough in the refrigerator for about 30 minutes. This not only makes it easier to handle, but it also helps control spread during baking. The chill helps the butter firm up again, producing a plumper cookie.
- Roll the chilled dough into generous tablespoons and place them on the prepared baking sheet, leaving space in between each cookie. Once they’re all placed, use your thumb or the back of a small spoon to create a well in the center of each dough ball. This is where your strawberry jam will go.
- Bake the cookies in the preheated oven for 10-12 minutes or until the edges are golden and the centers are set. Keep an eye on them in the final minutes to prevent overbaking.
- Remove the cookies from the oven and allow them to cool for a few minutes on the baking sheet. This makes them easier to handle. Then transfer them to a wire rack to cool completely.
- Finally, fill each thumbprint with your strawberry jam or fresh strawberries. If you’re using fresh strawberries, you might want to mash them a bit to create a spreadable texture. And there you have it, wonderful strawberry thumbprint cookies!
Following these steps will yield delicious cookies that are sure to impress. The beautiful color and gentle aroma will have everyone gathering around to sneak a taste.
Variations & Substitutions
Chocolate-Dipped Strawberry Thumbprints: If you’re seeking a richer flavor, consider dipping the cooled cookies in melted dark chocolate. This adds a layer of sophistication and enhances the sweetness of the strawberries. The contrast between the warm chocolate and cold jam is decadent, making it perfect for fancier occasions.
Gluten-Free Version: By substituting the all-purpose flour with a gluten-free baking blend, you can cater to those with gluten sensitivities without sacrificing taste or texture. Ensure you are using a blend that contains xanthan gum to maintain structure. These cookies can still be just as soft and delicious as their traditional counterparts.
Berry Medley Variation: Instead of using only strawberry jam, you can create a mixed berry filling. Use a combination of raspberries, blueberries, and strawberries. This brings a lovely tartness to your cookies and an appealing aesthetic, as the medley creates a beautiful swirl in the dough.
Nutty Thumbprints: For a nutty flavor, consider adding finely ground almonds or hazelnuts to your cookie dough. This not only provides a rich taste but also contributes to a delightful crunch. Pair this with a raspberry filling to complement the nuttiness beautifully.
Coconut Twist: For those who love the tropical taste, adding shredded coconut into the dough will give your cookies a unique flavor. A coconut-based filling like coconut cream or coconut-infused jam would elevate the experience even further. This is a great option for summer gatherings or a beach-themed party.
Each variation can create an entirely new experience while maintaining the core essence of the strawberry thumbprint cookies. The beauty of this recipe lies in its versatility, allowing you to tailor it according to your or your guests’ preferences.
Common Mistakes to Avoid
One common mistake in making thumbprint cookies is overmixing the dough. This leads to tough cookies rather than tender ones. Remember to mix until the ingredients are just combined. Another pitfall is not chilling the dough long enough, which results in cookies that spread too much during baking. The chilling step is crucial for achieving the perfect shape and texture.
Moreover, it’s important to keep an eye on your cookies while they bake. Overbaking can cause them to become hard and lose their chewy texture. Each oven is different, so start checking them a minute or two before the recommended baking time. Lastly, be cautious while filling the thumbprints with jam. If overfilled, the jam can spill over during baking, creating a messy appearance.
Ensure that you are using good-quality jam as well. Low-quality jam can alter the flavor of your cookies, making them taste overly sweet or artificial. Authentic strawberry jam made with real fruit will enhance the satisfaction of your thumbprint cookies significantly.
Storage, Freezing & Reheating Tips
To maximize the life of your strawberry thumbprint cookies, proper storage is essential. Once cooled, place them in an airtight container at room temperature, where they can last for up to a week. For longer storage, consider freezing them. To do this, place the cookies in a single layer on a baking sheet and freeze them until firm. Once frozen, you can transfer them to a freezer-safe bag. They are best consumed within three months.
When you are ready to enjoy your frozen cookies, there’s no need to thaw them beforehand. Simply pop them in an oven preheated to 300°F (150°C) for about 5-10 minutes. This will revive the chewy texture and warm the strawberry jam. Be sure to monitor them to prevent them from becoming overly crisp.
If you made a large batch of dough but haven’t baked all of it, you could also freeze the dough itself. Roll the dough into balls and freeze them on a baking sheet. Once frozen, you can transfer them to a zip-top freezer bag, allowing you to bake fresh cookies whenever the craving strikes!
Frequently Asked Questions
Can I use fresh strawberries instead of jam?
Yes, you can use fresh strawberries as a filling for your thumbprint cookies, but you’ll want to mash them slightly to create a spreadable consistency. They may not provide the same sweetness as jam, so consider dusting your cookies with powdered sugar after baking for an additional treat.
What should I do if my cookies spread too much?
If your cookies spread excessively, it might be due to your dough being too warm. One remedy is to chill the dough longer or work with it in parts, keeping the rest in the fridge while you shape and bake the first batch. Alternatively, adding a bit more flour can help give structure to the dough.
Can I make these cookies vegan?
Absolutely! To make these cookies vegan, substitute butter with a suitable vegan alternative and replace the egg yolk with a flax egg (1 tablespoon of flaxseed meal mixed with 2.5 tablespoons of water). Ensure your jam is also vegan-friendly and you’re all set!
How can I ensure my cookies have a beautiful appearance?
To keep your cookies looking lovely, avoid overfilling the thumbprint with jam, as it can spill out during baking. You can also sprinkle a bit of coarse sugar on top of the unbaked cookies for a delightful sparkle that looks charming when baked.
Are these cookies suitable for a crowd? How many do they yield?
Yes, this recipe yields about 24 cookies, perfect for sharing during gatherings or parties. If you need a larger batch, feel free to double the recipe; just watch the baking time closely if you bake them in two sheets at once.
Conclusion:
These strawberry thumbprint cookies embody the essence of spring with their vibrant flavors and delightful textures. Their easy preparation makes them perfect for both novice bakers and seasoned chefs alike. Don’t hesitate to customize the filling or the cookie base to cater to your tastes or dietary needs. I encourage you to try this recipe, enjoy the baking process, and share it with your loved ones. Whether it becomes a family tradition or a one-time treat, the joy of creating something delicious will surely leave lasting memories. Happy baking!