Prep time: 30 minutes
Cook time: 15 minutes
Total time: 45 minutes
Servings: 24 cookies
Spring is a time of renewal, blossoming flowers, and joyous celebrations. What better way to commemorate this vibrant season than with delightful Spring Flower Cookies decorated to create joyful memories? These cookies encapsulate the essence of spring, both in their beautiful floral shapes and in the sweet indulgence of their flavors. Perfect for family gatherings, festive picnics, or simply as a treat to brighten your day, these cookies are not only delicious but also a wonderful opportunity to bond with loved ones in the kitchen.
Prepare to enjoy the playful aspect of baking as you create these stunningly decorated treats. The soft, buttery texture combined with the sweetness of the icing will undoubtedly bring smiles to faces, young and old alike. So roll up your sleeves and step into a world of sweet creativity!
What Is Spring Flower Cookies Decorated to Create Joyful Memories?
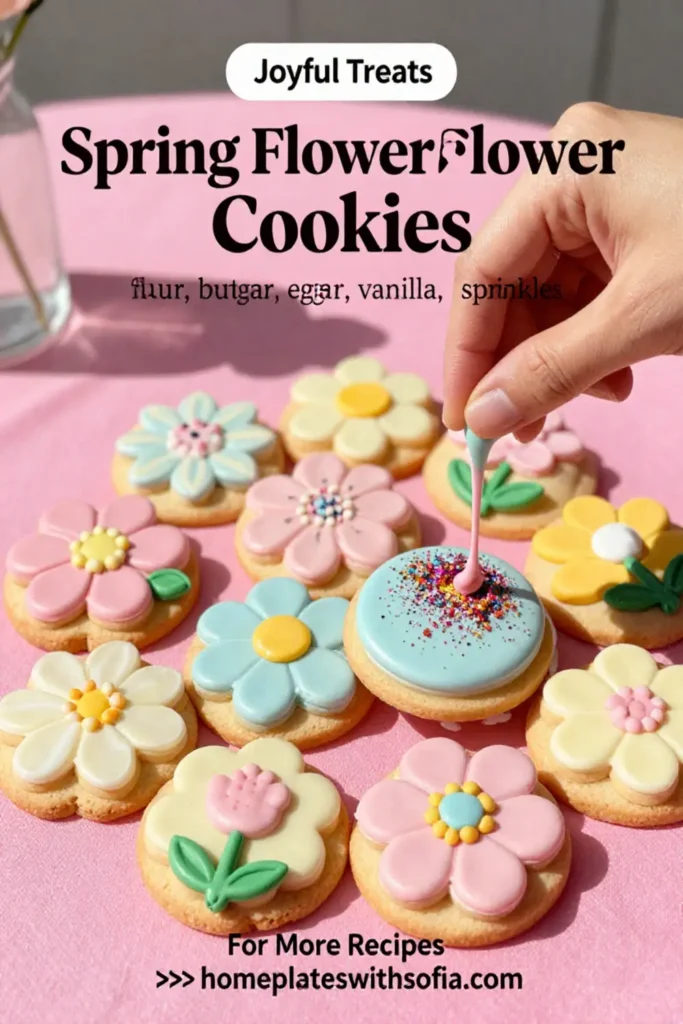
Spring Flower Cookies are not just your ordinary sugar cookies; they are meticulously crafted into beautiful flower shapes that look as good as they taste. These cookies are a soft, buttery delight that melts in your mouth, paired with a colorful icing that adds a whimsical touch to each floral design. By incorporating various flower shapes and colors, you can truly personalize these cookies, making them not just treats but pieces of edible art.
The recipe allows for customization; whether you want pastel shades for an elegant tea party or vibrant colors for a child’s birthday, the possibilities are endless. The use of almond extract adds a hint of nutty warmth, elevating them beyond basic sugar cookies, and welcoming the essence of springtime.
Why You’ll Love This
You’ll absolutely adore these Spring Flower Cookies for several reasons:
- Versatility: Perfect for various occasions such as baby showers, birthdays, or simply an afternoon snack.
- Family Activity: Baking and decorating cookies offers a fantastic bonding opportunity with children and friends.
- Distraction from daily life: Engaging in this delightful activity provides a break from daily routines, allowing for creativity.
- Gorgeous Presentation: The decorated cookies can serve as stunning centerpieces on any dessert table.
- Customization: Variations are simple, letting you incorporate different flavors and colors as you wish.
Ingredients You’ll Need
To bring your Spring Flower Cookies to life, gather the following ingredients:
- 2 ¾ cups all-purpose flour: This is the foundation of your cookies, providing structure and texture.
- 1 tsp baking powder: This will ensure your cookies rise perfectly and have a lovely, fluffy texture.
- ½ tsp salt: This enhances the sweetness and balances flavors.
- 1 cup unsalted butter, softened: The star ingredient that adds richness and a smooth texture.
- 1 cup granulated sugar: For sweetness, contributing to the delightful flavor and crisp edges.
- 1 cup powdered sugar: Used in the icing for a super smooth consistency and subtle sweetness.
- 2 large eggs: They act as a binding agent, helping the ingredients meld together.
- 1 tsp pure vanilla extract: This adds a warm, aromatic flavor that complements the cookies beautifully.
- 1 tsp pure almond extract: Gives a subtle nuttiness that elevates the flavor profile of the cookies.
- Food coloring: Choose your favorite colors to create vibrant flowers. Gel colors work best for vivid hues.
- Edible glitter (optional): A sprinkle can add a fun, festive touch to your decorated cookies.
How to Make
1. Begin by preheating your oven to 350°F (175°C). Line a baking sheet with parchment paper to ensure easy removal of the cookies once baked. This preparation step helps achieve those perfectly baked cookies with a slight crisp on the edges.
2. In a medium bowl, whisk together the all-purpose flour, baking powder, and salt. Mixing these dry ingredients ensures they are evenly distributed, which is crucial for the uniformity of flavor in your cookies. Set this mixture aside while you work on the wet ingredients.
3. In a large mixing bowl, cream the softened unsalted butter and granulated sugar until the mixture becomes light and fluffy. This process typically takes about 3-5 minutes. The creaming phase is essential as it incorporates air into the butter, contributing to the lightness of your cookies.
4. Beat in the eggs, one at a time, ensuring that each egg is well incorporated before adding the next. Add in the vanilla and almond extracts, mixing thoroughly. The combination of these extracts will create a beautifully aromatic dough.
5. Gradually add the flour mixture to the wet ingredients, mixing on low speed until just combined. Be careful not to overmix, as this can lead to tough cookies. The dough will be soft and a little sticky at this stage, which is perfect for shaping.
6. To create flower shapes, scoop the dough using cookie cutters. If the dough is too sticky, consider chilling it in the refrigerator for about 30 minutes. Once shaped, place the cookies on the prepared baking sheet with enough space in between for them to spread slightly while baking.
7. Bake for 8 to 10 minutes, or until the edges begin to turn a light golden brown. Keep an eye on them during the last few minutes to prevent over-baking. Allow the cookies to cool on the baking sheet for a couple of minutes before transferring to a wire rack.
8. While the cookies cool, prepare the icing by mixing the powdered sugar with a small amount of water or milk until it reaches your desired consistency. Divide the icing into separate bowls and add food coloring to each, creating your palette for decorating.
9. Once the cookies have fully cooled, dip or drizzle the colored icing onto each cookie and decorate with any additional toppings like edible glitter or sprinkles. Watch as your simple cookies transform into stunning blossoms, bursting with color and joy.
Variations & Substitutions
Chocolate Spring Flower Cookies: For a delightful twist, substitute half the all-purpose flour with cocoa powder. This variation adds a rich, chocolatey flavor that pairs wonderfully with floral designs. Use a chocolate or cream cheese icing for decoration, which beautifully complements the cookies’ flavors.
Vegan Spring Flower Cookies: Swap out the butter for coconut oil or a vegan butter alternative. Use flaxseed meal mixed with water in place of the eggs. This ensures your cookies remain fabulously soft and sweet while adhering to vegan guidelines, making them an inclusive treat for everyone.
Lemon Zest Spring Flower Cookies: Brighten up your cookies by adding the zest of one lemon to the dough. The citrusy flavor enhances the overall taste and freshness of the cookies. Piping lemon-flavored icing on top adds an extra zing, making these cookies a refreshing treat.
Gluten-Free Spring Flower Cookies: Use a gluten-free flour blend as a substitute for all-purpose flour in this recipe. This modification ensures that gluten-sensitive individuals can enjoy these delightful cookies without compromising taste. Just remember to check the other ingredients to ensure they fit gluten-free guidelines.
Common Mistakes to Avoid
Overmixing the Dough: One common mistake is overmixing the cookie dough, which can make the cookies dense and tough instead of light and tender. To avoid this, just mix the dough until the ingredients are combined, and no flour streaks remain.
Not Chilling the Dough: If your dough is sticky, don’t skip the chilling step. Chilling the dough for 30-60 minutes helps firm it up, making it easier to roll and shape. Skipping this step may result in cookies that spread too much during baking.
Overbaking: Baking time can vary between ovens; always keep a close eye on your cookies in the final minutes of baking. Overbaking can turn perfectly golden cookies into dry, hard ones. Remove them when the edges are just starting to brown.
Storage, Freezing & Reheating Tips
To ensure that your Spring Flower Cookies remain fresh and delicious, you’ll want to store them correctly. Place the cooled cookies in an airtight container at room temperature for up to a week. For longer-lasting cookies, you can freeze them. Simply layer parchment paper between each cookie, place them in a freezer-safe container, and freeze for up to three months.
When you’re ready to enjoy the frozen cookies, thaw them in the refrigerator overnight. If you’re looking to refresh them further, you can warm them in the oven at low heat for a more freshly baked texture. Avoid microwaving as this can make the cookies chewy rather than soft and warm.
Frequently Asked Questions
Can I use margarine instead of butter?
While margarine can be used in place of butter, it’s important to choose one with a similar fat content to keep the texture of your cookies consistent. Margarine may result in slightly different flavor and texture, as some margarine contains more water, which can affect the final outcome.
What is the best way to decorate the cookies?
When it comes to decorating your Spring Flower Cookies, consider using piping bags for detailed designs or simply dipping the cookies in the icing. Using edible glitter and sprinkles can elevate the visual appeal. Creativity is key—have fun experimenting with different color combinations!
Can I make the dough ahead of time?
Absolutely! You can prepare the dough a day in advance. After mixing, wrap it tightly in plastic wrap and refrigerate. Before rolling and cutting, let the dough sit at room temperature for about 10 minutes to soften slightly, making it easier to work with.
How do I make sure my cookies are the right thickness?
Using a rolling pin with guides or measuring sticks can aid in achieving uniform thickness while rolling out the dough. Aim for about ¼ inch in thickness, as this ensures even baking and a delightful texture.
What’s the best way to store decorated cookies?
Decorated cookies can be stored in an airtight container, but it’s essential to separate layers with parchment paper to prevent them from sticking together. Store in a cool, dry place to maintain their shape and decorations.
Conclusion: Enjoy crafting these enchanting Spring Flower Cookies decorated to create joyful memories in your kitchen. They are a delightful way to embrace the vibrant spirit of spring, perfect for any celebration or just to spread happiness. Happy baking!


