Prep time: 20 minutes
Cook time: 15 minutes
Total time: 35 minutes
Servings: 12 servings
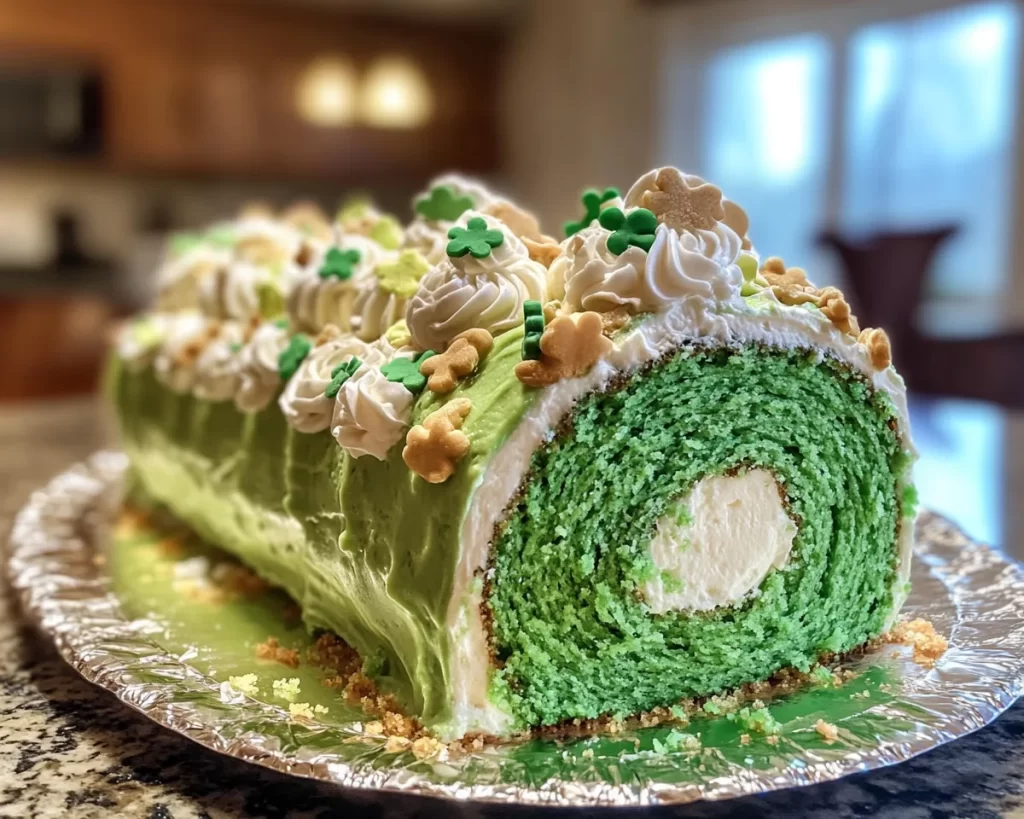
St. Patrick’s Day is often filled with festive celebrations, and what better way to commemorate this joyous occasion than with a delightful St. Patrick’s Day Green Velvet Cake Roll? This dessert not only embodies the festive spirit with its vibrant color but also offers a luxurious texture and a rich flavor that will leave everyone clamoring for more. Whether you’re hosting a gathering for friends and family or just looking to make something special for yourself, this recipe will not disappoint.
The allure of a cake roll lies in its beautiful presentation and the surprise it holds inside. As you slice into it, the stunning swirl of green velvet cake with a luscious cream cheese filling mesmerizes onlookers. But beyond its visual appeal, this recipe is incredibly straightforward and allows for flexibility with flavor variations. Whether you are seasoned in the kitchen or just starting, you will find this recipe approachable yet impressive. Today, you’ll discover the steps to creating this fantastic dessert, along with tips, variations, and some helpful insights into achieving the best results.
What Is St Patrick’s Day Green Velvet Cake Roll?
The St. Patrick’s Day Green Velvet Cake Roll is a fun twist on the traditional red velvet cake, perfect for celebrating this Irish holiday. Originating from the South in the United States, the velvet cake’s signature smooth texture and hint of cocoa create a unique flavor profile that is both luxurious and moist. The cake batter is enhanced with green food coloring, transforming it into a delightful green hue that symbolizes St. Patrick’s Day festivities.
What sets this cake roll apart from other desserts is its creamy filling, often made from a mixture of cream cheese and powdered sugar, balancing the rich chocolate notes of the cake with a tangy sweetness. The rolled presentation creates a stunning centerpiece for any dessert table, making it an impressive option for gatherings or parties. If you enjoy desserts that look as good as they taste, this cake roll will not only satisfy your sweet tooth but will also provide a beautiful showcase for any celebration.
The texture of the green velvet cake is incredibly soft and tender, thanks to its specific combination of cake flour and buttermilk. Combined with the delightful cream cheese filling, every bite is a textured delight, giving you a lovely experience that’s both visual and flavorful.
Why You’ll Love This
There are countless reasons to adore the St. Patrick’s Day Green Velvet Cake Roll. First and foremost, the taste is a standout feature. With its velvety texture and unique combination of cocoa and cream cheese flavors, it’s a dessert that appeals to various palates. The vibrant green color also adds excitement to your table, making it a fun addition to any St. Patrick’s Day celebration.
Ease is another factor that makes this cake roll a beloved recipe. While it may appear complex, the steps are simple to follow even for beginners. The rolling technique, once mastered, can be used for various cake roll recipes, making it a valuable skill in your baking repertoire. Additionally, the ingredients are quite common, which means you can whip it together without having to hunt down specialty items.
It’s also a cost-effective choice for your dessert table. Using basic pantry staples and accessible ingredients means you can create this delightful cake roll without breaking the bank. Moreover, the versatility of the recipe allows you to make adjustments to cater to any dietary needs or preferences. For those looking for a healthier version or gluten-free alternative, there are ways to tweak ingredients, ensuring everyone can enjoy this festive treat.
Ingredients You’ll Need
- Cake Flour: Provides a fine crumb and soft texture. If unavailable, all-purpose flour can be used; just sift it well.
- Cocoa Powder: Adds a subtle chocolate flavor to the cake. Opt for unsweetened cocoa for the best results.
- Granulated Sugar: Sweetens the cake and balances the slight bitterness of the cocoa.
- Baking Powder: Helps the cake rise and ensures a light, airy texture.
- Baking Soda: Works in conjunction with the baking powder to achieve a fluffy cake.
- Salt: Enhances the flavors of the other ingredients.
- Vegetable Oil: Keeps the cake moist. You can substitute with melted coconut oil for a different flavor.
- Buttermilk: Provides acidity, which adds tenderness to the cake. If you don’t have buttermilk, you can mix milk with a tablespoon of vinegar.
- Eggs: Essential for binding the ingredients together and contributing to the rise.
- Green Food Coloring: Gives the cake its signature color. Gel food coloring is recommended for a vibrant hue.
- Powdered Sugar: Sweetens the cream cheese filling and gives it a nice, smooth texture.
- Cream Cheese: The star of the filling. Make sure it’s softened for easy mixing.
- Vanilla Extract: Adds flavor depth to the cream cheese filling.
How to Make
- Preheat your oven: Begin by preheating your oven to 375°F (190°C) and lining a jelly roll pan (or a baking sheet with sides) with parchment paper. This ensures that your cake will not stick, making it easier to roll later.
- Mix dry ingredients: In a medium bowl, whisk together the cake flour, cocoa powder, baking powder, baking soda, and salt. This step is essential as it aerates the flour and ensures even distribution of the leavening agents.
- Combine wet ingredients: In a separate bowl, beat the granulated sugar and vegetable oil together until well combined. Add in the buttermilk, eggs, and green food coloring, mixing everything until the mixture is well blended and smooth.
- Combine the mixtures: Gradually add the dry mixture to the wet ingredients, stirring until just combined. Avoid overmixing, as this can make the cake dense. Using a rubber spatula, gently fold in any remaining flour clumps.
- Pour and bake: Pour the batter onto the prepared baking sheet. Spread it into an even layer using the spatula. Bake for approximately 15 minutes, or until the cake springs back when gently pressed in the center.
- Cool and roll: Once baked, remove it from the oven and let it cool for about 5 minutes. After cooling slightly, turn the cake out onto a clean kitchen towel dusted with powdered sugar. Starting from one end, gently roll the cake while still warm, using the towel to help shape it. Allow it to cool completely in this rolled position.
- Prepare the filling: While the cake cools, prepare the cream cheese filling. In a bowl, beat the softened cream cheese with the powdered sugar and vanilla extract until smooth and creamy. Taste and adjust, adding more sugar for sweetness if desired.
- Unroll and fill: When the cake has cooled completely, carefully unroll it from the towel, peeling it away gently. Spread the cream cheese filling evenly over the surface of the cake, leaving a small border around the edges.
- Roll it back up: Starting from one end again, gently roll the cake back into shape without the towel this time. Wrap it tightly in plastic wrap and refrigerate for at least 1 hour to set.
- Slice and serve: After chilling, unwrap the cake roll and slice it into 1-inch pieces. Serve immediately and watch your guests’ faces light up with joy!
Variations & Substitutions
Gluten-Free Variation: For those who are gluten-sensitive, you can easily adapt this recipe. Substitute the cake flour with a gluten-free all-purpose flour blend. Make sure to check the blend for xanthan gum, which helps mimic the elasticity of traditional flours. The result will be just as fluffy and delightful as the original, perfect for sharing with gluten-free friends.
Chocolate Mint Filling Variation: If you want to take this dessert up a notch, consider adding a mint twist to your cream cheese filling. Simply mix in a few drops of peppermint extract along with the vanilla extract. This will create a refreshing contrast to the richer chocolate flavors of the green velvet cake, offering a delightful surprise that’s perfect for those who love mint.
Vegan Option: For those following a vegan lifestyle, you can replace the eggs with flaxseed meal. Mix one tablespoon of flaxseed meal with three tablespoons of water for each egg. Allow it to sit for about 5 minutes until it becomes gel-like, then incorporate it into your wet mixture. Additionally, you can use a non-dairy cream cheese alternative for the filling. The essence of the cake will remain unchanged, but it will be friendly for vegan diets.
Red Velvet Variation: While the green hue is integral to the St. Patrick’s Day version, you can easily modify the food coloring to create a traditional red velvet cake roll. Replace the green food coloring with red, and maintain the same base ingredients. You will still enjoy the velvety texture with a color that’s classic for any festive occasion!
Mini Cake Rolls Variation: For individual servings, consider baking the green velvet batter in mini loaf pans or muffin tins. This will create adorable little cake rolls that are perfect for parties or kids’ gatherings. Just be sure to adjust the baking time, as smaller portions may require less time in the oven.
Common Mistakes to Avoid
One common mistake when making a cake roll is overbaking. You want just enough time in the oven for the cake to rise and set; if you leave it in too long, it can dry out, making it difficult to roll. Check it a few minutes before the suggested baking time and do the “toothpick test” to ensure doneness.
Another potential pitfall is using a cold cake. If you don’t allow your cake to cool before attempting to roll it, it may crack and tear. Always give it a few minutes to cool down—this will help preserve the structure of your cake as you roll it.
Additionally, avoiding the use of parchment paper can lead to sticky situations. Not properly lining your baking pan may result in your cake sticking to the surface, making it nearly impossible to roll or remove cleanly. Take the extra step to line your pan, and avoid the frustration.
Lastly, be cautious with the cream cheese filling. If it’s too cold or firm, it won’t spread well. Allow it to reach room temperature for easy spreading. Conversely, if it’s too soft, it will ooze out when rolling, so strike a balance in consistency for the best results.
Storage, Freezing & Reheating Tips
Once you’ve indulged in your delicious St. Patrick’s Day Green Velvet Cake Roll, you might wonder how best to store any leftovers. Wrapped tightly in plastic wrap or placed in an airtight container, the cake will keep well in the refrigerator for up to 3 days. You can also freeze the unfilled or filled cake roll. To do this, wrap it tightly in plastic wrap, then place it in a freezer-friendly bag. It can last in the freezer for a up to three months.
When you’re ready to enjoy your frozen cake roll, simply move it from the freezer to the refrigerator and allow it to defrost overnight. This slow thawing process helps maintain the cake’s texture. If you prefer to serve it slightly chilled, you can unwrap and cut it directly from the freezer, allowing for a firmer slice.
For those baking ahead of time, consider preparing just the cake and the filling separately. The cake can be baked and frozen, while the filling can stay in the refrigerator until you are ready to assemble. This method allows for a quick and easy dessert option for last-minute gatherings while keeping everything fresh.
Frequently Asked Questions
Can I use all-purpose flour instead of cake flour? Yes, you can use all-purpose flour if you don’t have cake flour on hand. However, for the lightest and fluffiest texture, cake flour is preferable due to its lower protein content. If you do use all-purpose flour, make sure to sift it before measuring and consider reducing the amount slightly.
What do I do if my cake cracks when rolling? If your cake cracks while rolling, don’t panic! It may still taste delicious. A gentle hand is required; if the cake is too warm or has not cooled enough before rolling, it’s more prone to cracking. If this happens, you can still use the pieces to layer in a parfait with whipped cream, or simply serve them as rustic bites.
How do I make this cake roll dairy-free? To create a dairy-free version, look for non-dairy alternatives for the buttermilk and cream cheese. For buttermilk, mix plant-based milk like almond or soy milk with a tablespoon of lemon juice or vinegar. For the filling, choose a vegan cream cheese spread available in many grocery stores.
How can I enhance the green color of the cake? To accentuate the green hue, use gel food coloring rather than liquid dye, as it provides a more vibrant shade without adding extra liquid to your batter. Always start with a small amount and increase gradually until you achieve the desired shade.
Is this cake roll suitable for freezing? Yes, the St. Patrick’s Day Green Velvet Cake Roll can be frozen either filled or unfilled. Just ensure it is tightly wrapped in plastic wrap and protected in a freezer-safe bag. Thaw it in the refrigerator before serving for the best texture and flavor.
Conclusion:
The St. Patrick’s Day Green Velvet Cake Roll is not just a visually stunning dessert; it’s also a delightful treat that captures the essence of celebration. Its unique flavor and texture are sure to impress friends and family alike. Whether you choose to follow the traditional recipe or make it your own with variations, this cake roll is a must-try for anyone looking to put a festive spin on their dessert offerings. I encourage you to give this recipe a try and experience the joy it brings. Share it with loved ones and create beautiful memories around the table. Happy baking!