Prep time: 15 minutes
Cook time: 10 minutes
Total time: 25 minutes
Servings: 12
When you think of festive treats, nothing quite captures the essence of St. Patrick’s Day like a delightful piece of mint chocolate bark. Picture this: creamy, velvety chocolate meets the refreshing, sweet flavor of mint, all layered on top of a crisp, cool surface, sprinkled with vibrant green accents. This vibrant candy not only fills your kitchen with heavenly aromas but also becomes an irresistible centerpiece for your holiday celebrations. In this article, you’re going to discover how easy it is to whip up St. Patrick’s Day Mint Chocolate Bark, including useful tips, variations, and answers to common questions.
What Is St Patrick’s Day Mint Chocolate Bark?
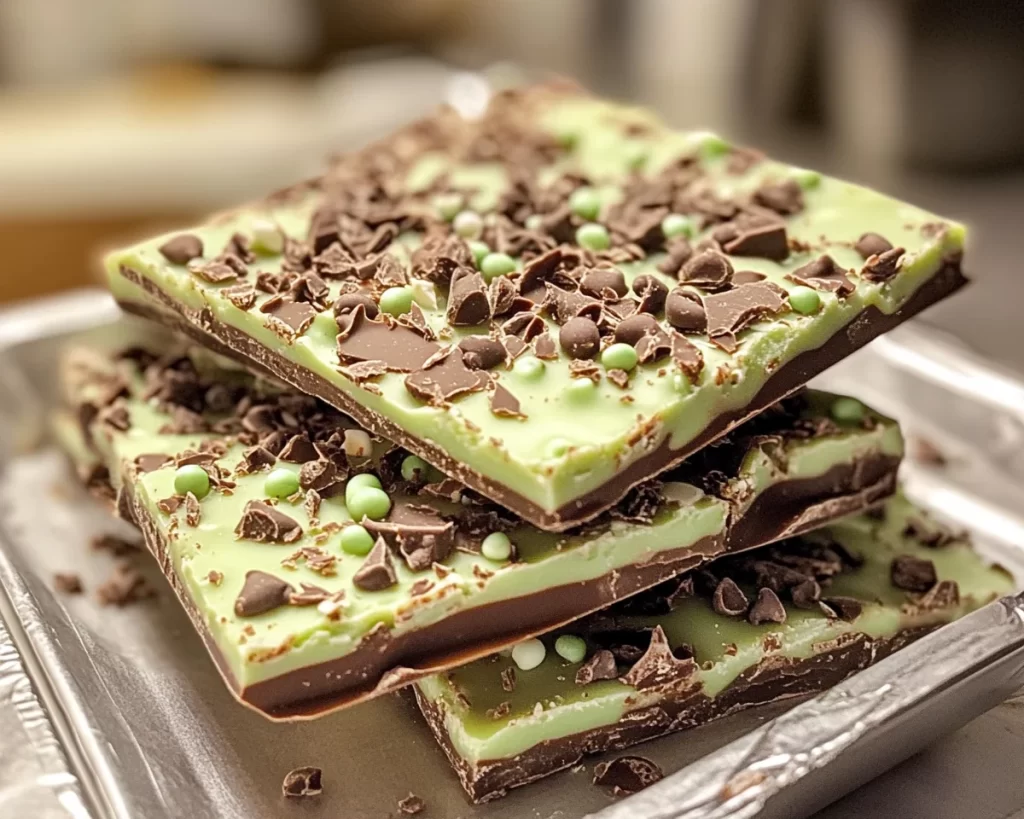
St. Patrick’s Day Mint Chocolate Bark is a festive treat that combines rich chocolate with refreshing mint flavor. This delightful confection traces its origins back to traditional bark, which historically involved spreading melted chocolate on a flat surface before allowing it to set. The simplicity of this technique makes it accessible for both novice and experienced cooks alike.
The texture is a captivating contrast: the outer layer is rich and smooth, while the interior remains cool and crisp, thanks to the mint. The flavor profile is both indulgent and refreshing, making it a perfect treat for any gathering or just for personal enjoyment. Typically garnished with festive colors, it allows for creativity in its presentation, and if you feel adventurous, you can enhance its flavors with various toppings.
Why You’ll Love This
You’ll adore St. Patrick’s Day Mint Chocolate Bark for various reasons. First, it’s incredibly easy to make—no fancy equipment or baking skills are required. Just a microwave or double boiler and some patience while it sets are all you need. The cost of ingredients is budget-friendly, ensuring that this treat can be prepared without breaking the bank, even for large gatherings.
Another perk? This recipe is versatile. You can play around with flavors and ingredients to suit your preferences. Adding nuts, sprinkles, or different types of chocolate can create a personalized version that you’ll love even more. Common misconceptions include the belief that baking is necessary for all sweet treats, but with bark, the melting and mixing process comes together effortlessly, allowing you more time to focus on enjoying your delicious creation.
Ingredients You’ll Need
- Dark Chocolate: The base of your bark. This chocolate provides a rich flavor that contrasts beautifully with mint. If you prefer, you can substitute it with milk chocolate for a sweeter profile.
- Mint Extract: This will give your bark that classic minty taste. Always use pure mint extract for a more authentic flavor; avoid imitation extracts when possible.
- White Chocolate: For drizzling on top or mixing into the bark, this sweet component adds a beautiful contrast and a creamy taste. You can also use colored melting chocolate for a festive look.
- Green Sprinkles or Crushed Mint Candies: These not only add color but also texture and an extra layer of minty flavor. Feel free to use colored sugar or even finely chopped nuts for a different twist.
- Sea Salt: If you fancy a sweet and salty combination, a sprinkle of sea salt can elevate the flavors significantly.
How to Make
- Prepare Your Baking Sheet: Line a baking sheet with parchment paper to ensure easy removal of the bark once it has set. This step is crucial as it prevents the chocolate from sticking to the pan, making cleanup a breeze.
- Melt the Dark Chocolate: Chop the dark chocolate into small, uniform pieces for even melting. Place it in a microwave-safe bowl and heat it in 30-second increments, stirring in between until it’s completely melted and smooth. If using a double boiler, make sure the water doesn’t touch the bowl with chocolate.
- Add Mint Extract: Once the chocolate is melted, add the pure mint extract. Be cautious with the amount; too much can make it overpowering! Stir until fully incorporated, allowing the warm chocolate to enhance the mint flavor.
- Spread the Mixture: Pour the melted chocolate onto the lined baking sheet. Use a spatula to spread it evenly. Aim for about a quarter-inch thickness. Tap the baking sheet gently on the counter to help eliminate air bubbles.
- Melting the White Chocolate: As the dark chocolate starts to set, melt your white chocolate exactly like the dark, using either a microwave or double boiler method. This will be drizzled later for decorative purposes.
- Chill the Chocolate: Place the baking sheet into the refrigerator for about 10-15 minutes, or until the dark chocolate has fully set but is still slightly tacky to the touch.
- Drizzle with White Chocolate: Once the dark chocolate has set, use a spoon or piping bag to drizzle the melted white chocolate over the top. You can also create fun patterns—let your creativity shine!
- Add Sprinkles or Candies: Before the white chocolate sets, sprinkle with your green sprinkles or crushed mint candies. This not only enhances the flavor but also adds a festive touch.
- Final Set: Return the tray to the refrigerator one last time for about 20-30 minutes, allowing everything to harden fully. The wait will be more than worth it!
- Break into Pieces: Once set, remove from the refrigerator. Lift the bark off the parchment paper and break it into pieces, using your hands or a sharp knife as per your preference.
Variations & Substitutions
Mint Chocolate Chip Variation: If you love the added texture of chocolate chips, consider folding in some mini chocolate chips either before spreading the melted chocolate on the baking sheet or right after you’ve drizzled the white chocolate. This variation doesn’t take away from the original flavor but enhances it with pockets of intense chocolate. Great for those who want a little more chocolate in every bite!
No-Bake Peanut Butter Variation: For a delightful twist, you can mix peanut butter with the melted chocolate. Simply add a few tablespoons of creamy peanut butter to the dark chocolate while melting. This addition will create a rich and indulgent flavor combination. Just be aware that you might not want to add as much mint extract if you’re going with this version, as peanut butter has its own strong taste that can overshadow the mint.
Healthy Alternative Variation: If you’re looking to make a healthier version of this treat, opt for a sugar-free chocolate or dark chocolate that has a higher cocoa content, offering fewer sugars. Additionally, you can replace the mint extract with fresh mint leaves, finely chopped and mixed into the melted chocolate. This will give it a refreshing note without extra calories.
Holiday Twist Variation: Why stop at just mint? You can create a holiday-themed bark by mixing in a bit of orange zest to the dark chocolate for a delightful citrus flavor that pairs wonderfully with mint. Also, consider using colored sprinkles that correlate with other holidays, making this treat adaptable to various festive occasions.
Common Mistakes to Avoid
One common mistake to avoid when making St. Patrick’s Day Mint Chocolate Bark is overheating the chocolate. Overheating can cause the chocolate to seize or become gritty. If you notice this happening, remove the chocolate from the heat immediately and add a small amount of vegetable oil to help bring the texture back to smoothness. Always melt chocolate slowly and patiently.
Another mistake is not allowing the bark to chill sufficiently. Skipping this step can result in a soft bark that doesn’t hold its shape upon breaking. Each layer should cool adequately to achieve that crisp texture characteristic of a good bark. If you’re in a hurry, try placing it in the freezer for quicker results; however, be careful not to forget about it!
Storage, Freezing & Reheating Tips
To store your St. Patrick’s Day Mint Chocolate Bark, keep it in an airtight container at room temperature for up to two weeks. If you notice warmer temperatures in your home, consider refrigerating it to prevent melting. If you’d like to freeze it for a longer shelf life, cut the bark into pieces and layer them in an airtight container with parchment paper between each layer. It can be kept frozen for up to three months.
Always consider food safety: ensure that your chocolate and any added ingredients have been stored correctly before use. When you’re ready to enjoy your frozen bark, simply take it out and let it sit at room temperature for a few minutes. Avoid reheating again after freezing, as this could change the texture of the chocolate unfavorably.
Frequently Asked Questions
Can I use milk chocolate instead of dark chocolate?
Absolutely! Using milk chocolate will create a sweeter version of the bark, making it a delight for those who prefer not to have the bittersweet taste of dark chocolate. Just keep in mind that the mint flavor might also come through differently, so you may need to adjust the amount of mint extract accordingly.
How do I make this bark gluten-free?
This bark is naturally gluten-free, but it’s essential to check labels on any added ingredients, especially if you’re using store-bought sprinkles or candies. Ensure they are certified gluten-free to be safe for those with gluten sensitivities.
What can I substitute for mint extract if I don’t have any?
If you don’t have mint extract, peppermint essential oil can be a ok option, but you must use it sparingly as it is significantly more potent. Alternatively, you can finely chop fresh mint leaves and mix them into the melted chocolate for a refreshing flavor—this will provide a different but delightful twist!
Can kids help make this recipe?
Yes, kids can be wonderful helpers in preparing this bark! They can assist with stirring the chocolate, sprinkling toppings, and breaking the bark apart once it’s set. Just ensure you handle the melted chocolate with care, especially if you’re using a microwave or double boiler, to keep them safe from burns.
Can I make this bark ahead of time?
Definitely! Making St. Patrick’s Day Mint Chocolate Bark ahead of time is a fantastic idea. It can be prepared several days in advance and stored properly. Just remember to allow it to come to room temperature before serving, as it will enhance the flavors when enjoyed fresh.
Conclusion:
St. Patrick’s Day Mint Chocolate Bark is an extraordinary treat that balances indulgence with a festive flair. Its ease of preparation, customizable variations, and delightful texture make it a must-try for anyone, regardless of cooking experience. Whether you decide to add nuts, go the healthier route, or simply stick with the classic mint and chocolate combination, the end result is sure to impress. So gather your ingredients, embrace the festive spirit, and don’t hesitate to share this treat with friends and family. It’s time to make your kitchen the heart of celebration!